
Welcome to my “3D Modeling & Printing” Page. In this webpage I will try to provide you some idea as to what I am learning about the world of 3D Modeling & Printing, how it can be applied to my Balsa RC Model Builds, and as my wife said - “make toys for our grandchildren.”
For many of the projects the descriptive information and images taken during my printing/assembly are contained in a separate “3D Print/Assembly Description” which you can access through a link provided at the bottom of the project section. If anyone has suggestions, recommendations, or questions about this new webpage or any of my 3D projects, please feel free to contact me @: 3D Modeling & Printing Input.
Click on any link below to jump to that 3D Project
Updated - 3D Printed Bird Houses
1:144 Scale LGM-25C Titan II ICBM
LEGO Minifigures Holder
Douglas A-26 Invader 3D Modeling Efforts
OA-1K Skyraider II 3D Modeling Efforts
First 3D Models off My Ender-3 V3 Printer
Secret Butterfly Box
Majestic Pegasus Statue
Haunted Skull Key Holder
Beetle “Ring Holder” Boxes
SpaceX Starship 1:200 Scale Model
Flying Dragon Book Nook
Miss Vintage WW1 Pilot Bust & Spandau Machine Guns
3DAeroventures X-100 Infinity Wing V2
Kyles Designs RC RQ-4 Global Hawk
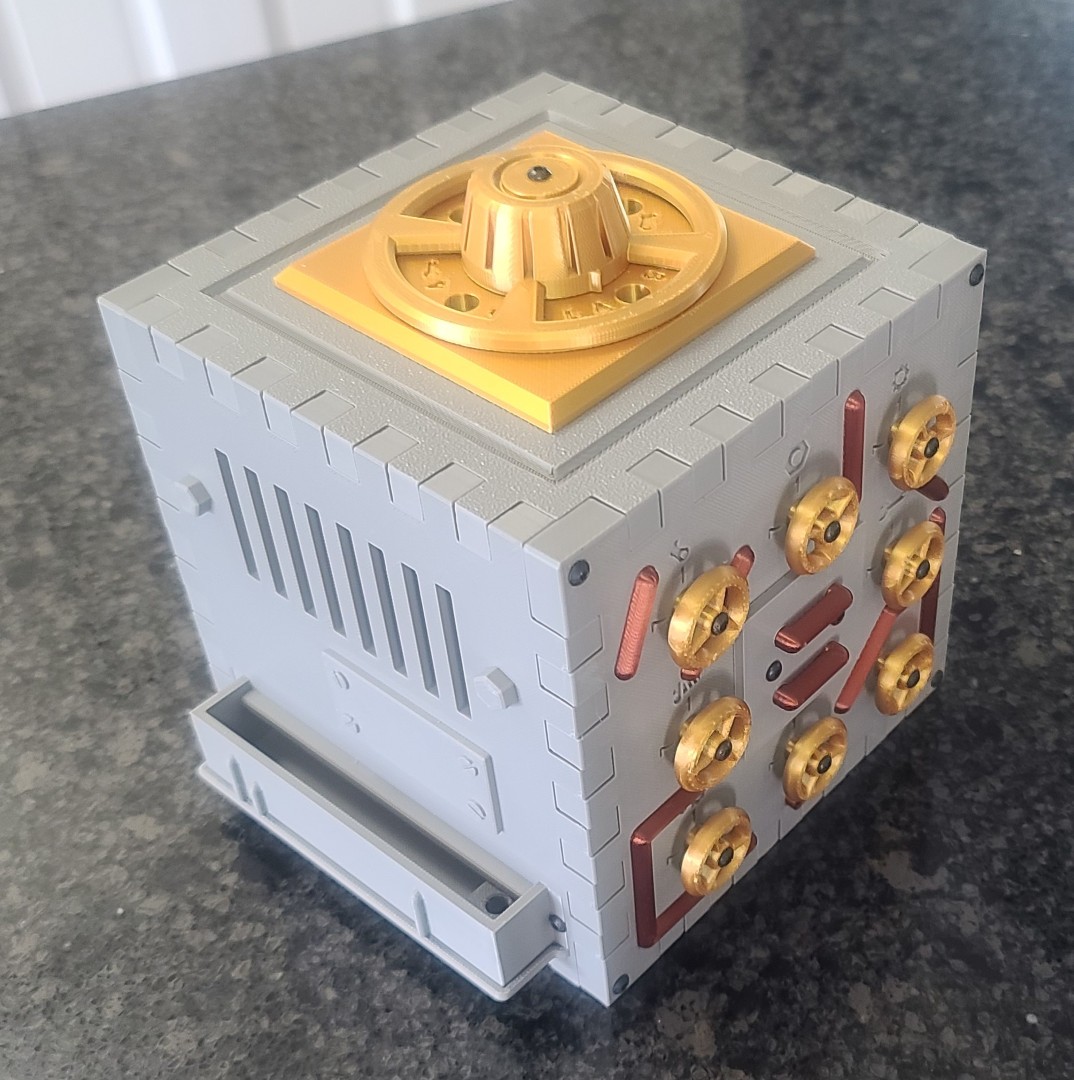
Steam "Turbine" Puzzle Box
Steam "Machine" Puzzle Box
"The Heist" Puzzle Box
Dark Techno Isopodius Transport/Tank
Dark Techno Odonatopter Gunship
Tempest Knights Heavy Assault Resistance Eliminator (HARE)
Handy 3D Modeling & Printing Information
NOTE - You can view all images in a “Spotlight Box” by simply clicking on any image.
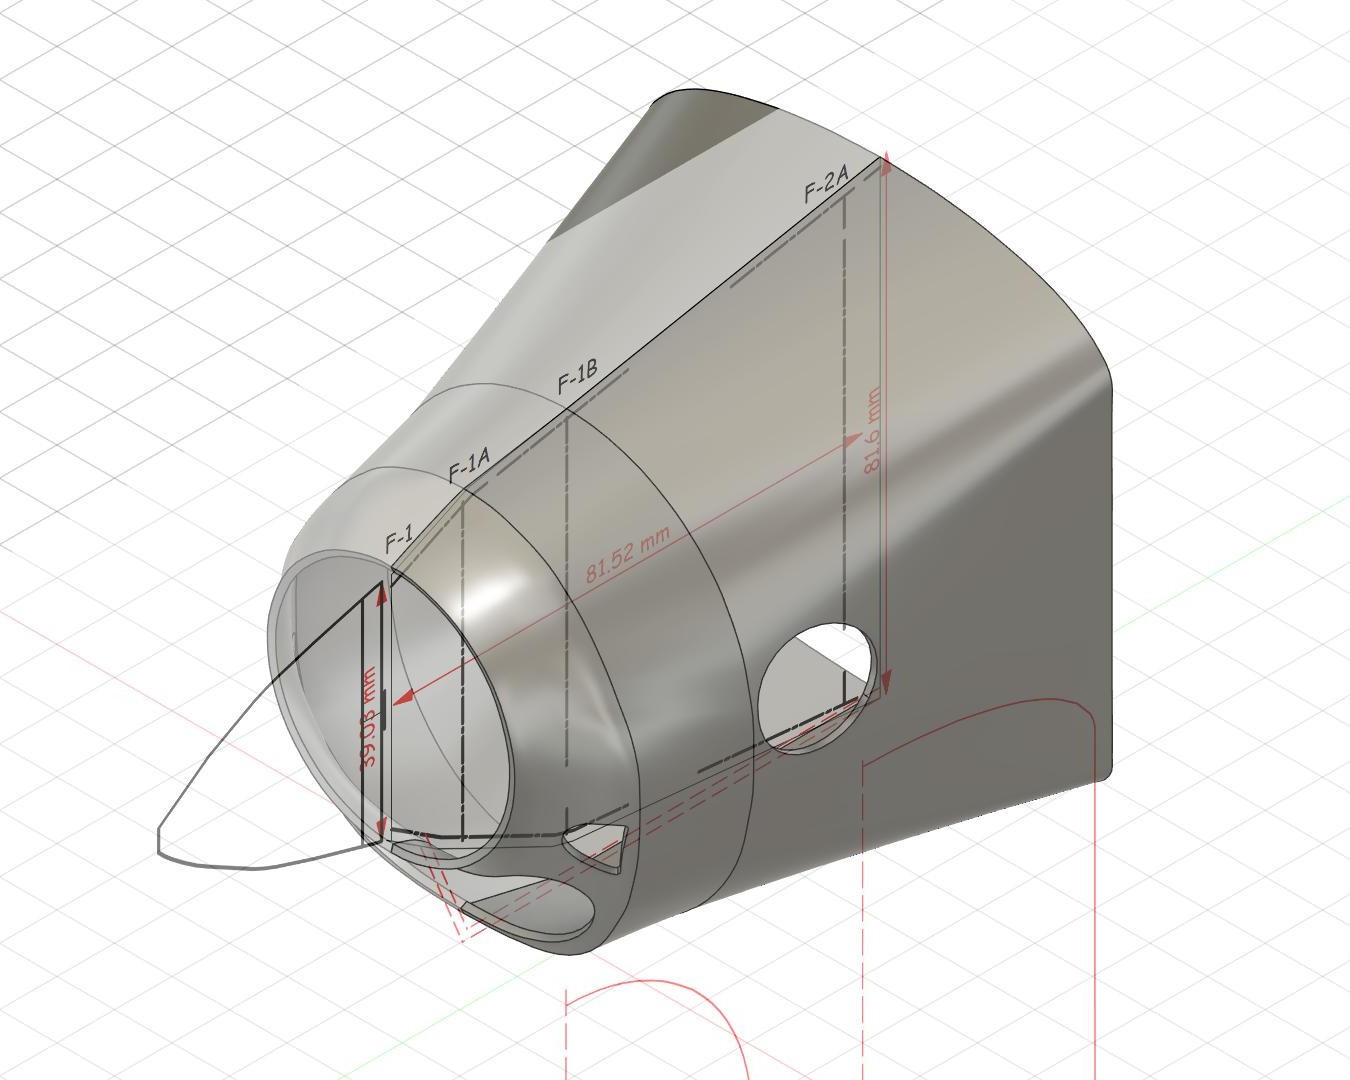
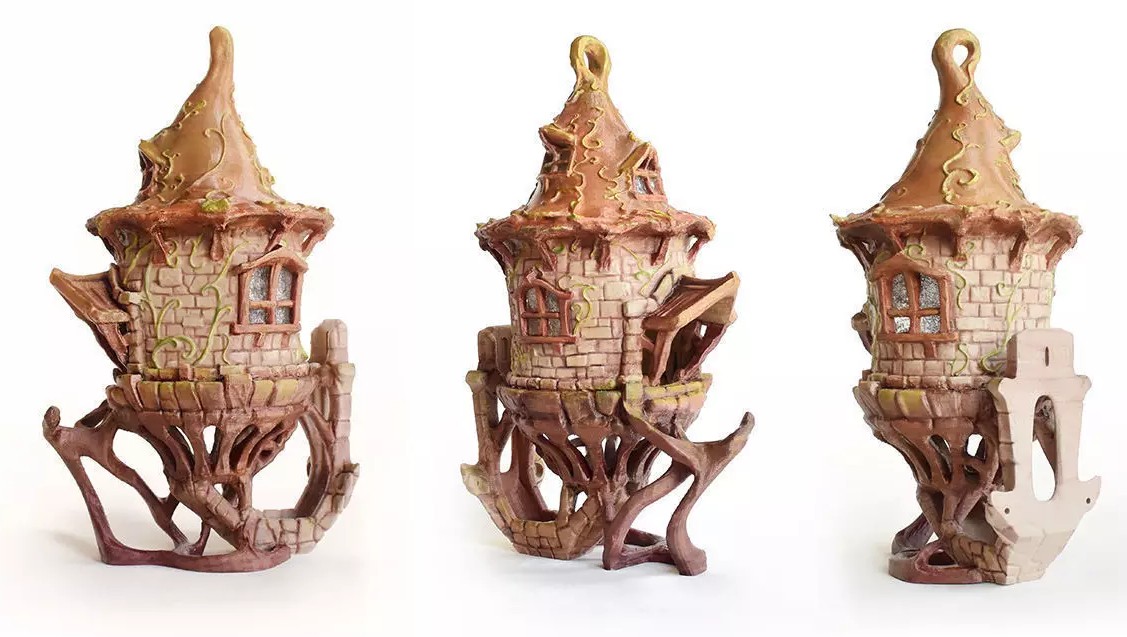
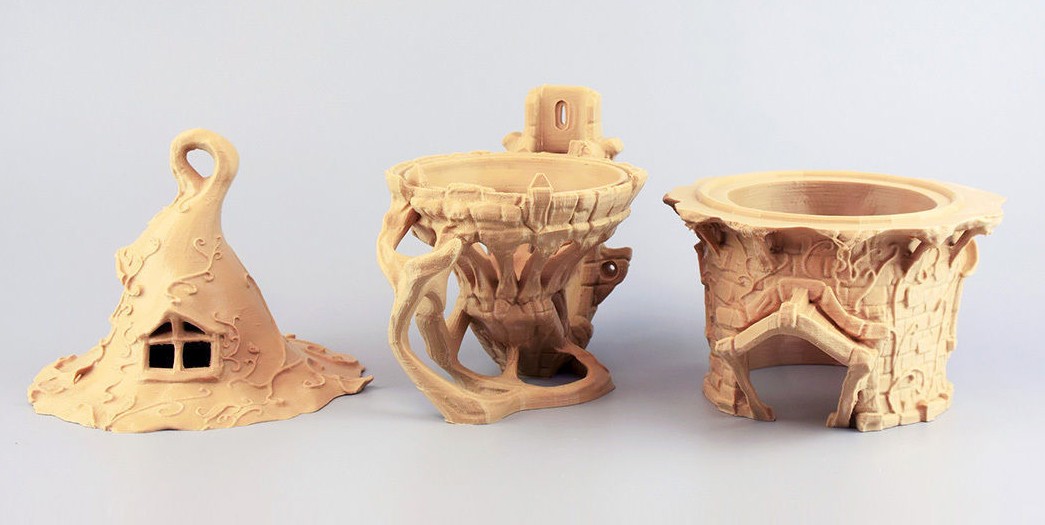
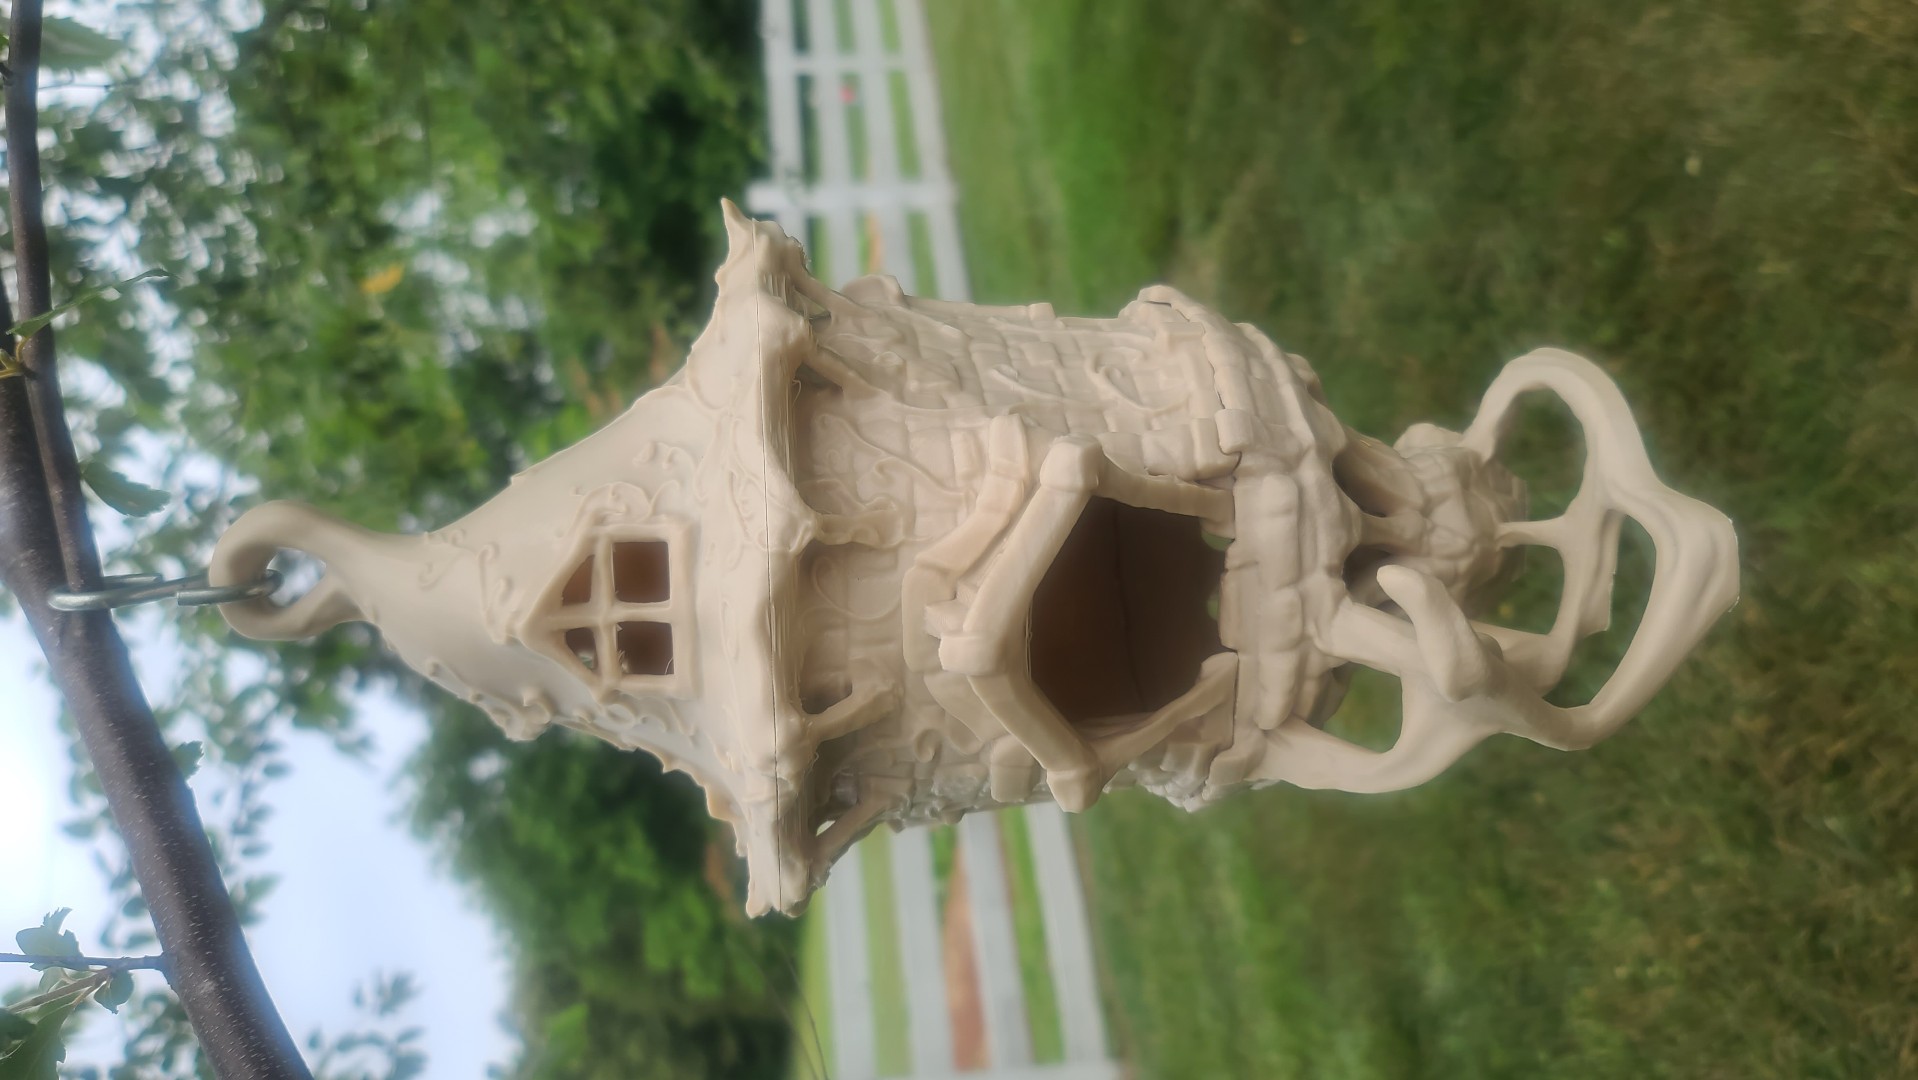
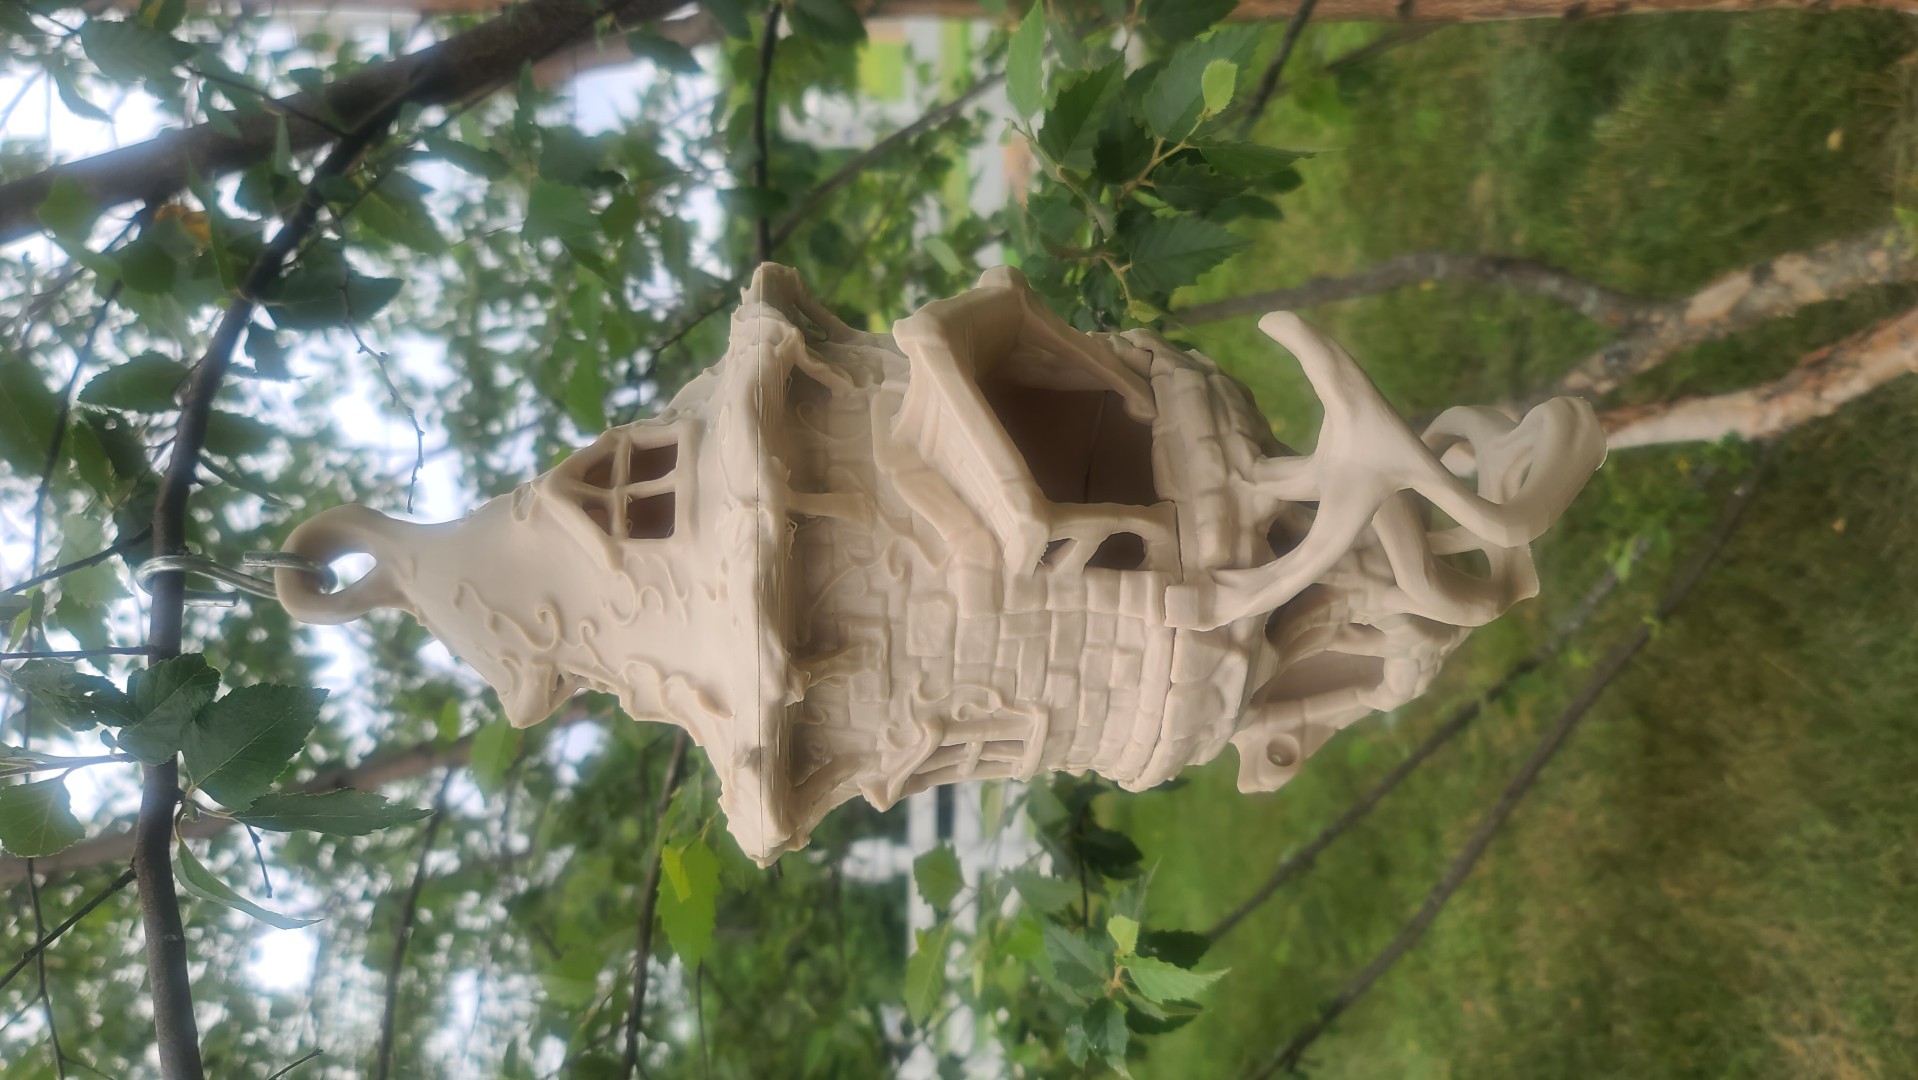
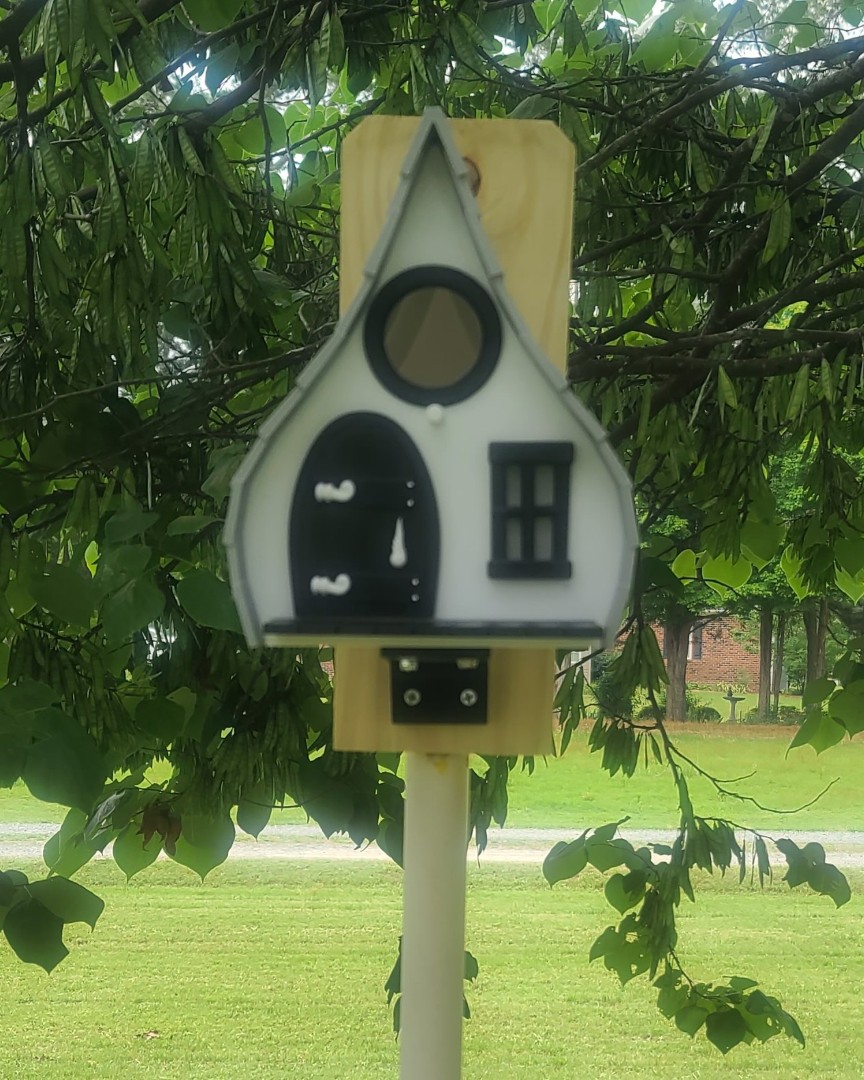
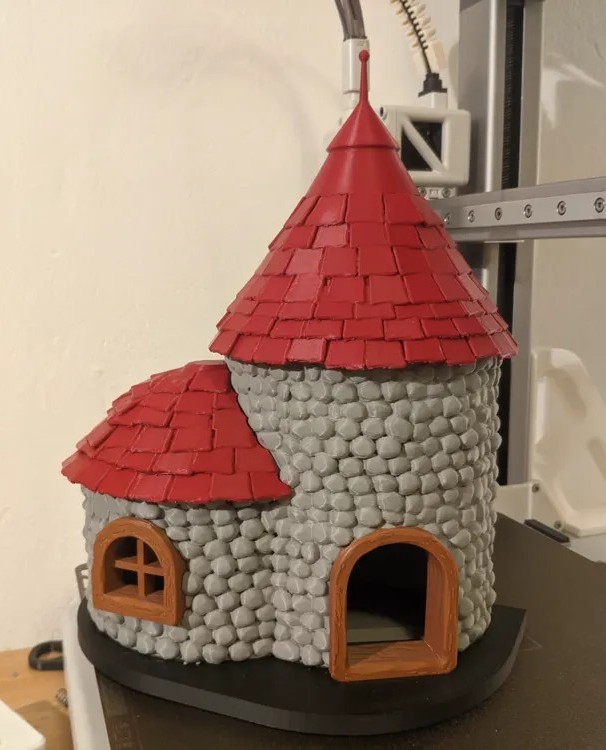
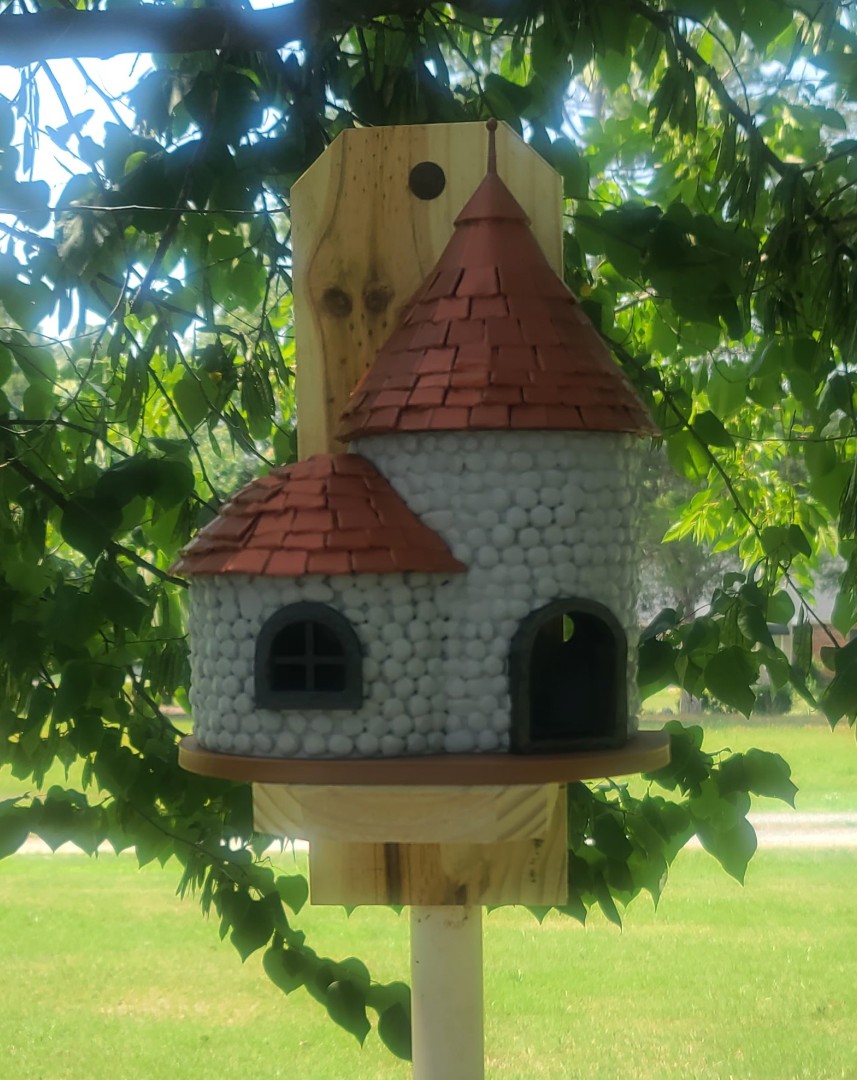
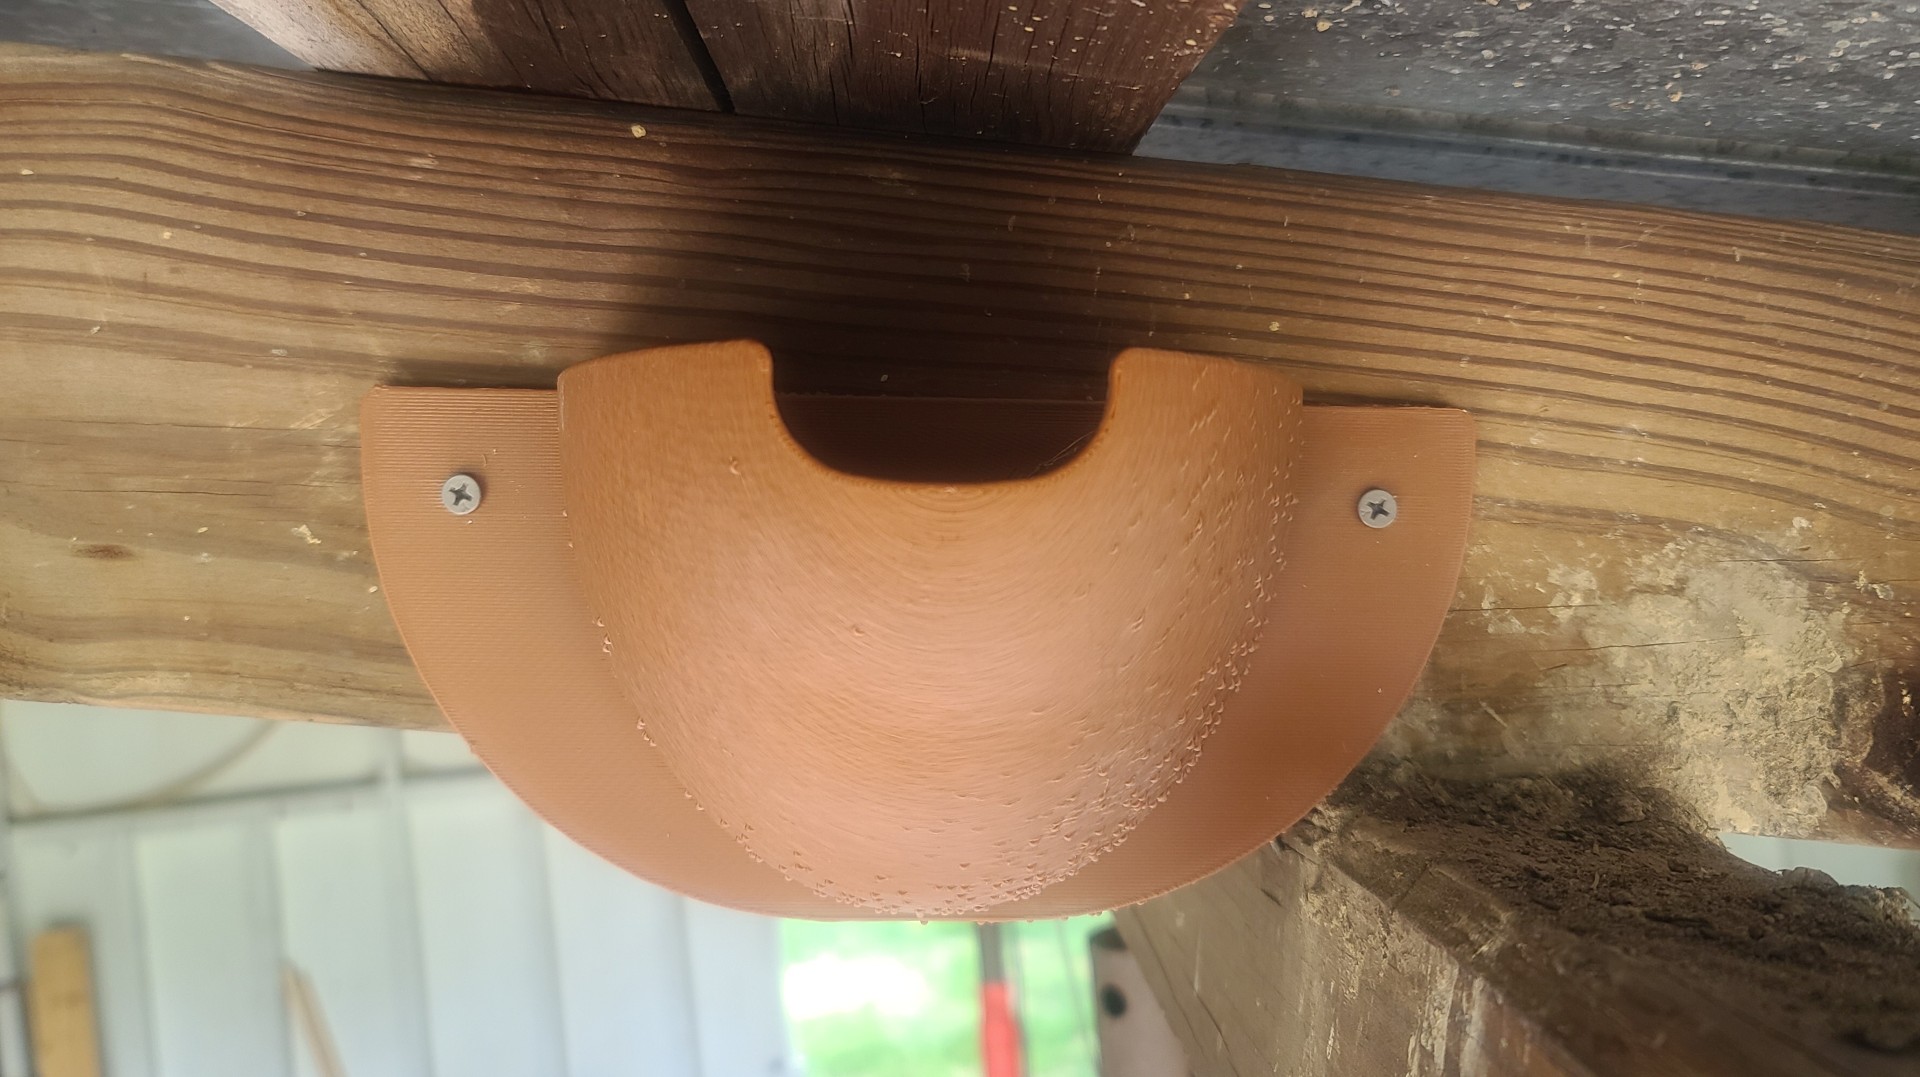
3D Printed Bird Houses
My daughter-in-law Beth in TN likes her yard birds almost as much as my wife and I do here in NC. Since we were planning a visit to TN, I thought I would see what I could find in the way of a birdhouse for Beth's back yard.
After some cruising around on the web I was able to find a very nice and interesting outdoor birdhouse 3D model by Sonia Verdu (she lives in Spain) on cgtrader.com. Her downloadable package includes three STL files, one each for the bottom, middle, and top sections of the 3D model. This is a simple model to print, fits together great, and her design details are very nice. I really like it.
Source of Images: cgtrader.com.
Using my Creality Print slicer I increased all three STL part sizes by 110%, which was as large as I could go and still have the parts fit on my Ender-3 V3 print bed. I then printed the three parts at 200mm/sec. using some Bone White eSun PLA+ filament with a 0.4mm nozzle, 3 wall loops set at a 0.2mm layer height and 0.42mm layer width, and used a 15% sparse infill. No supports or rafts were required.
The total print time for all three parts was 23 hours, 25 minutes, and required 579 grams of filament. Since I decided to use some PLA I already had on the shelf, I applied a couple layers of Papilio Clear UV-protective spray coating to all surfaces of the model to help it withstand the outdoor elements. If I make more of this 3D model, I will use PETG instead of PLA since the PETG is much better suited for the outside environment. I assembled the three parts using some CA glue with the final results shown in the next two images below. Since the front opening is large enough to support annual clean-out of the birdhouse, having to disassemble the birdhouse will not be required. I decided to leave any final detail painting for Beth to do as she wishes.
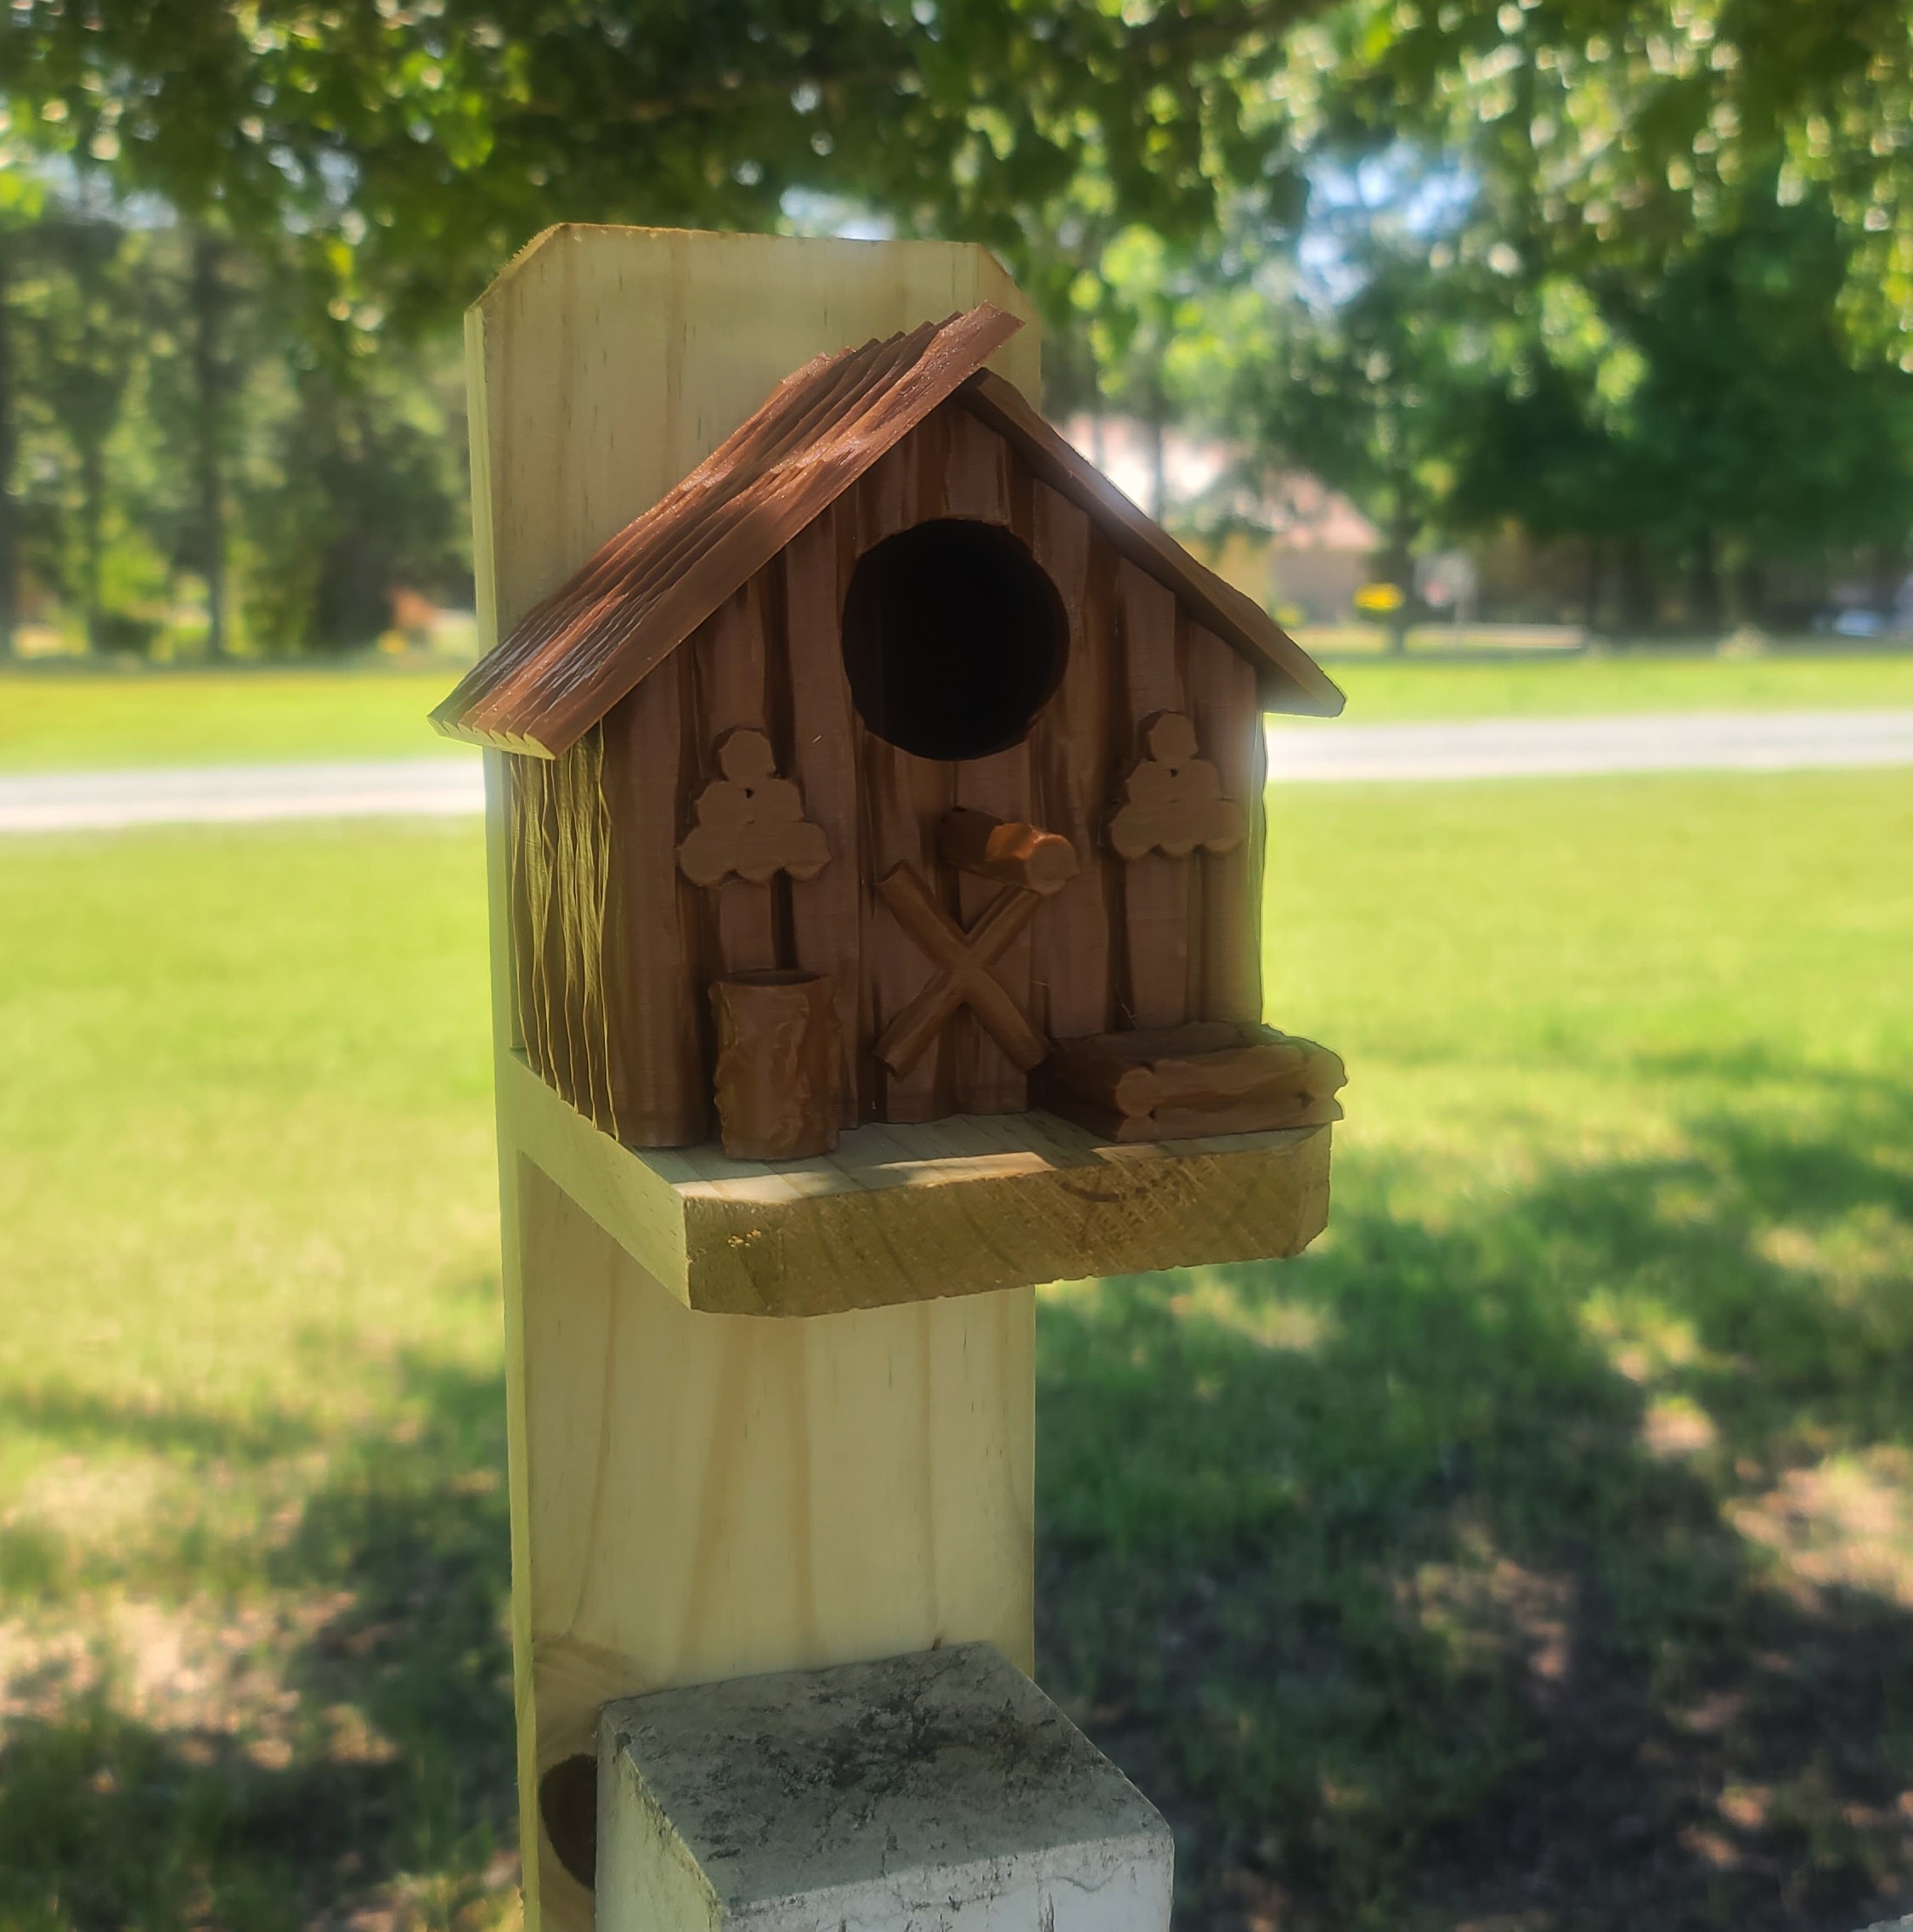
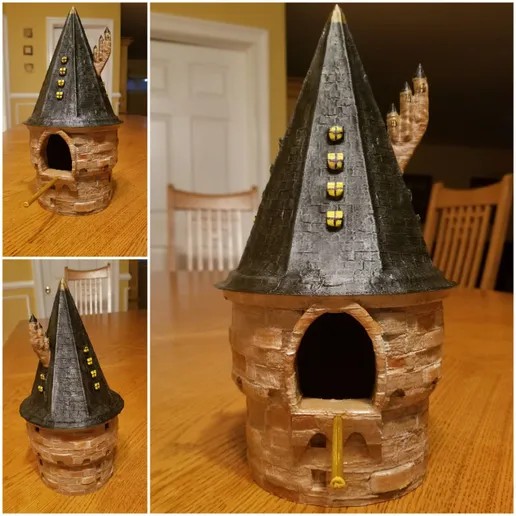
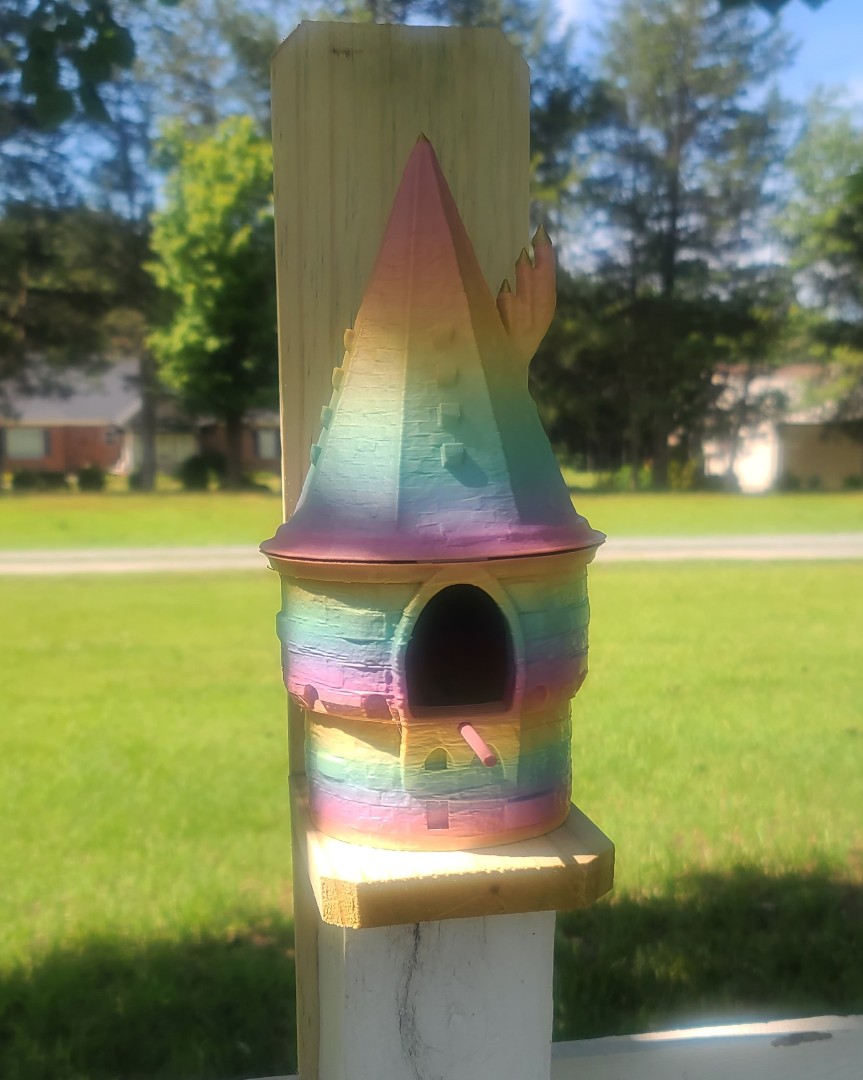
Our NC Yard 3D Printed Bird Houses
As I stated above, we have several (14) different birdhouses placed around our yard here in NC. All were hand built using pressure treated wood and then painted different colors. Over many years of use by our many winged friends, even with yearly cleaning and repairs they are starting to look really ragged, so I decided to start replacing them with various 3D printed birdhouse models. As I work through the printing and assembly of each of the selected birdhouse models, I will update “My 3D Printed Bird Houses Print & Build Description” which you can view and download using the link below, and I will post images of the selected models to this 3D Modeling & Printing webpage.

Source of Left Image: cgtrader.com.
Source of Left Image: cults3d.com.

Source of Left Image: cults3d.com.
Source of Left Image: makerworld.com.
Source of Left Image: makerworld.com.

Source of Left Image: makerworld.com.
1:144 Scale LGM-25C Titan II ICBM
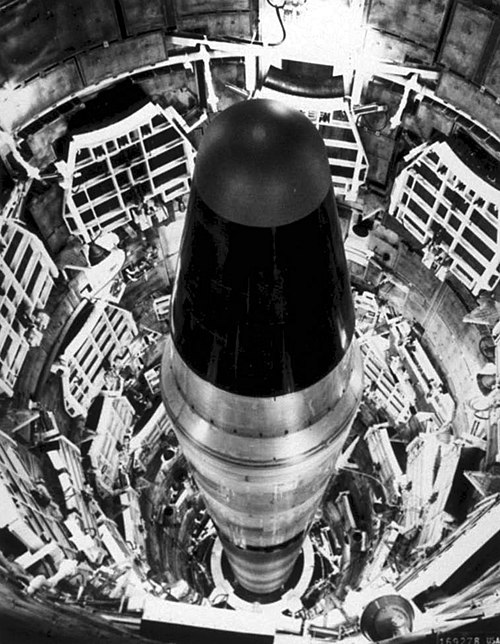
When I first entered the Air Force back in August 1969, after nine months of technical training I was assigned to Little Rock AFB, Arkansas as a Guidance and Control Specialist on the Strategic Air Command LGM-25C Titan II ICBM system. I worked not only on the missile inertial guidance system inside the underground silo, but also performed topside missile alignment surveys at night to ensure the inertial guidance system was properly aligned so the warhead would hit it's intended target some ten-thousand miles away. I was also fortunate enough to participate as a member of the Little Rock AFB Team for two years in the Strategic Air Commands “Olympic Arena” Competition. It was very rewarding service.
The first flight of the Titan II was in March 1962 and the missile, now designated LGM-25C, reached initial operating capability in October 1963. The Titan II contained one W-53 nuclear warhead in a Mark 6 re-entry vehicle with a range of 8,700 nautical miles (10,000 mi; 16,100 km). The W-53 had a yield of 9 megatons. This warhead was guided to its target using an inertial guidance unit. The Titan II was in service from 1963 to 1987. There were originally 54 Titan II Strategic Air Command missiles. The 54 Titan II missiles were on 24-hour continuous alert with 18 missiles each surrounding three bases: Davis-Monthan Air Force Base near Tucson, Arizona, Little Rock Air Force Base in Arkansas, and McConnell Air Force Base in Wichita, Kansas. The 54 deployed Titan IIs formed the backbone of America's strategic deterrent force until the LGM-30 Minuteman ICBM was deployed in mass during the early to mid-1960s. Twelve Titan IIs were flown in NASA's Gemini crewed space program in the mid-1960s.


Source of Images: Wikipedia.
Here are the Titan II Specs:
Type: Inter-Continental Ballistic Missile (ICBM)
Place of origin: United States
Service history: In service 1962 to 1987
Used by: United States
Production history: Manufacturer - Glenn L. Martin Company
Specifications:
Total Launch Mass: 342,000 lb. (155,000 kg)
Stage I length: 67 feet (20 m)
Stage II length: 29 feet (8.8 m)
RV length (including spacer): 14 feet (4.3 m)
Stage I diameter: 10 feet (3.0 m)
Stage II diameter: 10 feet (3.0 m)
RV diameter (at missile interface): 8.3 feet (2.5 m)
Warhead: W-53 9 Mega Ton thermonuclear warhead
Detonation mechanism: Air-burst or surface contact
Engine: Two-stage liquid-fueled rocket engines; first stage: LR-87s; second stage: LR-91
Propellant: N2O4 / Aerozine 50
Guidance system: Inertial IBM ASC-15
Launch platform: Missile silo
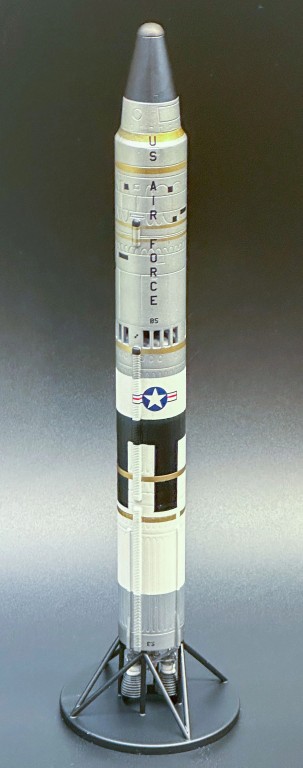
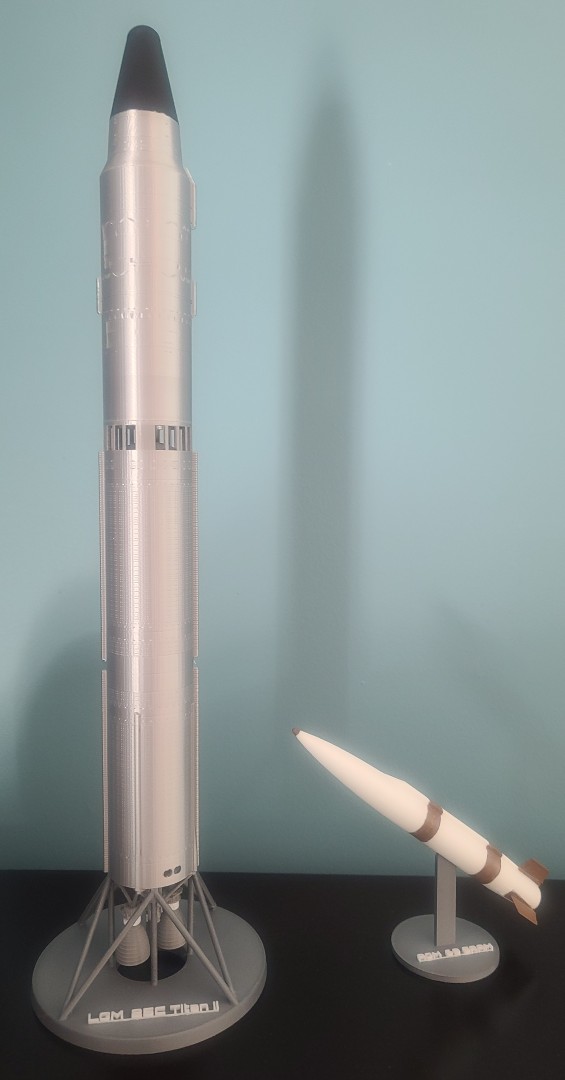
I have always wanted a model of the LGM-25C Titan II to sit on my shelf along with all the other models of the USAF systems/programs (B-52 AGM-69 SRAM, C-17, KC-135 GATM, RQ-4 Global Hawk, Litening Targeting Pod, and others) I worked on during my 41 years with the Air Force. So now that I have a nice 3D printer, I am finally going to be able to fill that wish.
Cruising around on the web I was able to locate a very nice 1:144 scale 3D model by ESzczesniak on Cults3d.com. The package includes 10 STL files representing stages, nozzles, engine truss, warhead, and stand. This is a fairly simple model. The tolerances are rather tight and may need some light sanding. This was intentional to help insure the model would align itself well in assembly and without risk of introducing bends in the body. The STL's are scaled to 1:144. It should easily upscale, but the panel lines may start to look overdone and the detail may be bland for a larger scale. While the model is intended for resin printing, I will have to see how the STL files will work on my FDM printer. The assembled model in the images below was painted and then spare decals from aircraft model kits used for the markings.
Source of Images: Cults3d.com.
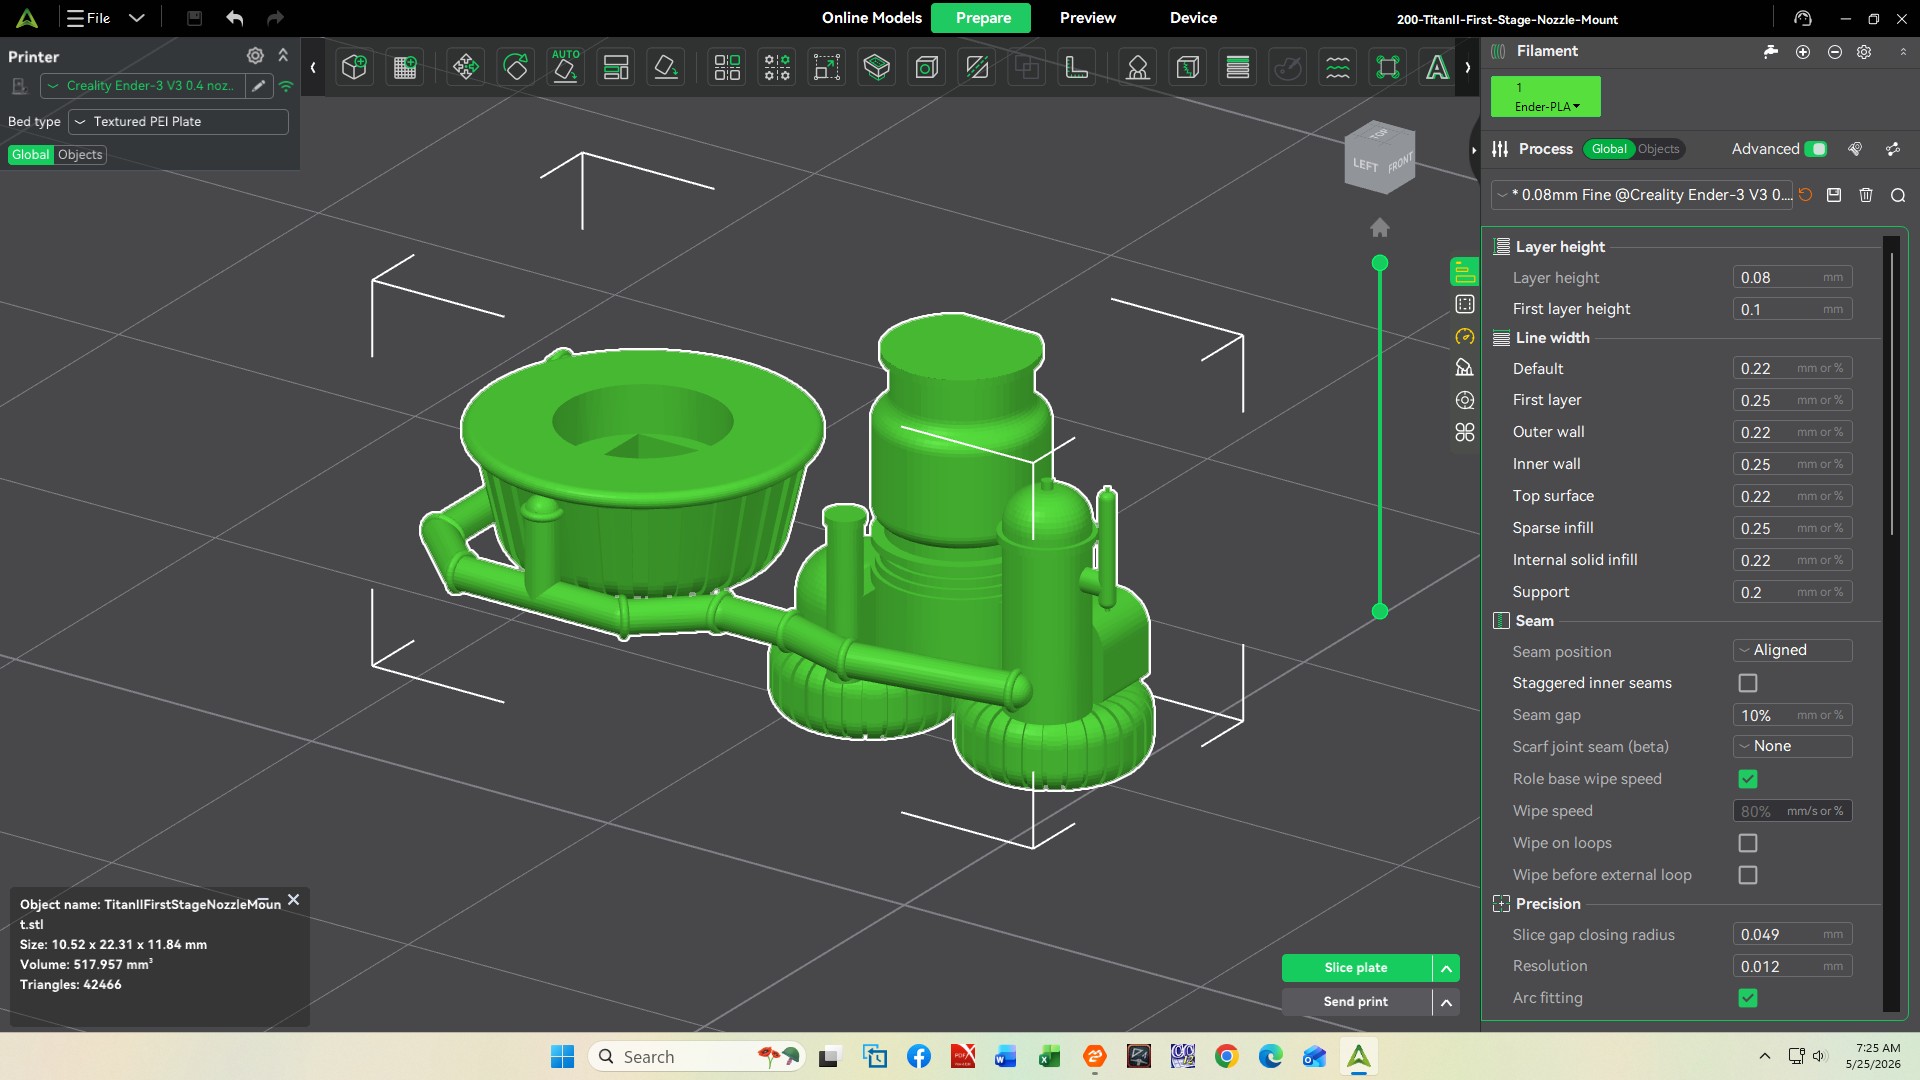
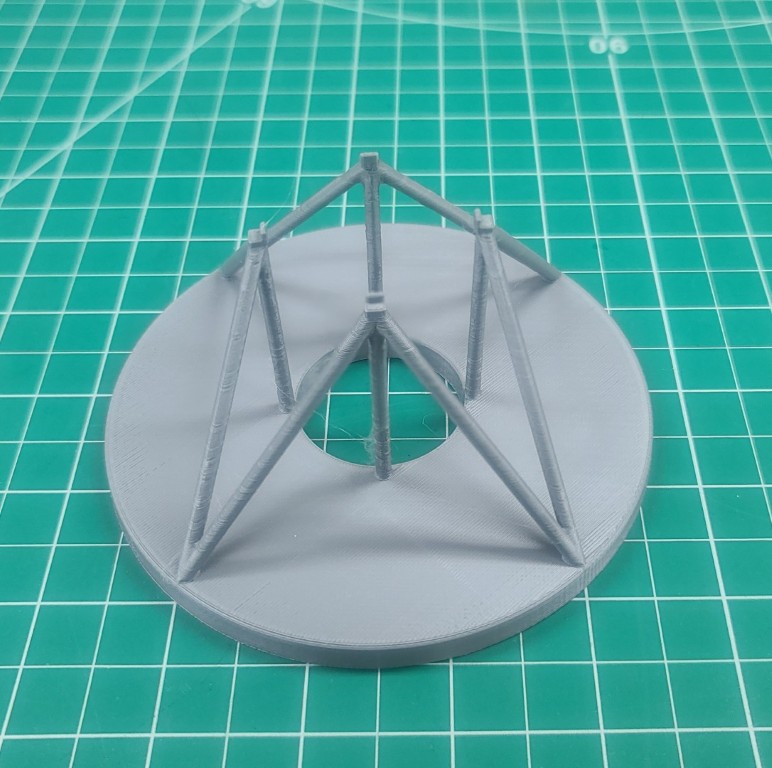
Well the time has finally come to start this long awaited project. First step was to determine the scale I would use. The 1:144 scaled parts as provided in the download resulted in first stage engine parts that were way too small for my old fingers, so using my Creality Print slicer I increased all ten of the model part sizes by 200%, which results in approximately a 1:72 scaled 3D model. I was limited to no larger than 200% by the resulting size of the largest part, TitanIIFirstStage.stl, and the print size limit of my Ender-3 V3. I then printed the smallest part, TitanIIFirstStageNozzleMount.stl, and found that using my standard 0.4mm nozzle was not going to provide the detail in the part needed, so I installed a 0.2mm nozzle and adjusted my Creality Print settings using 4 wall loops with a 0.08mm layer height and 0.22mm layer width, as you can see in the left image below. Note, even at the 200% scaling, this part still is only 10.5x22.3x11.8mm in size.
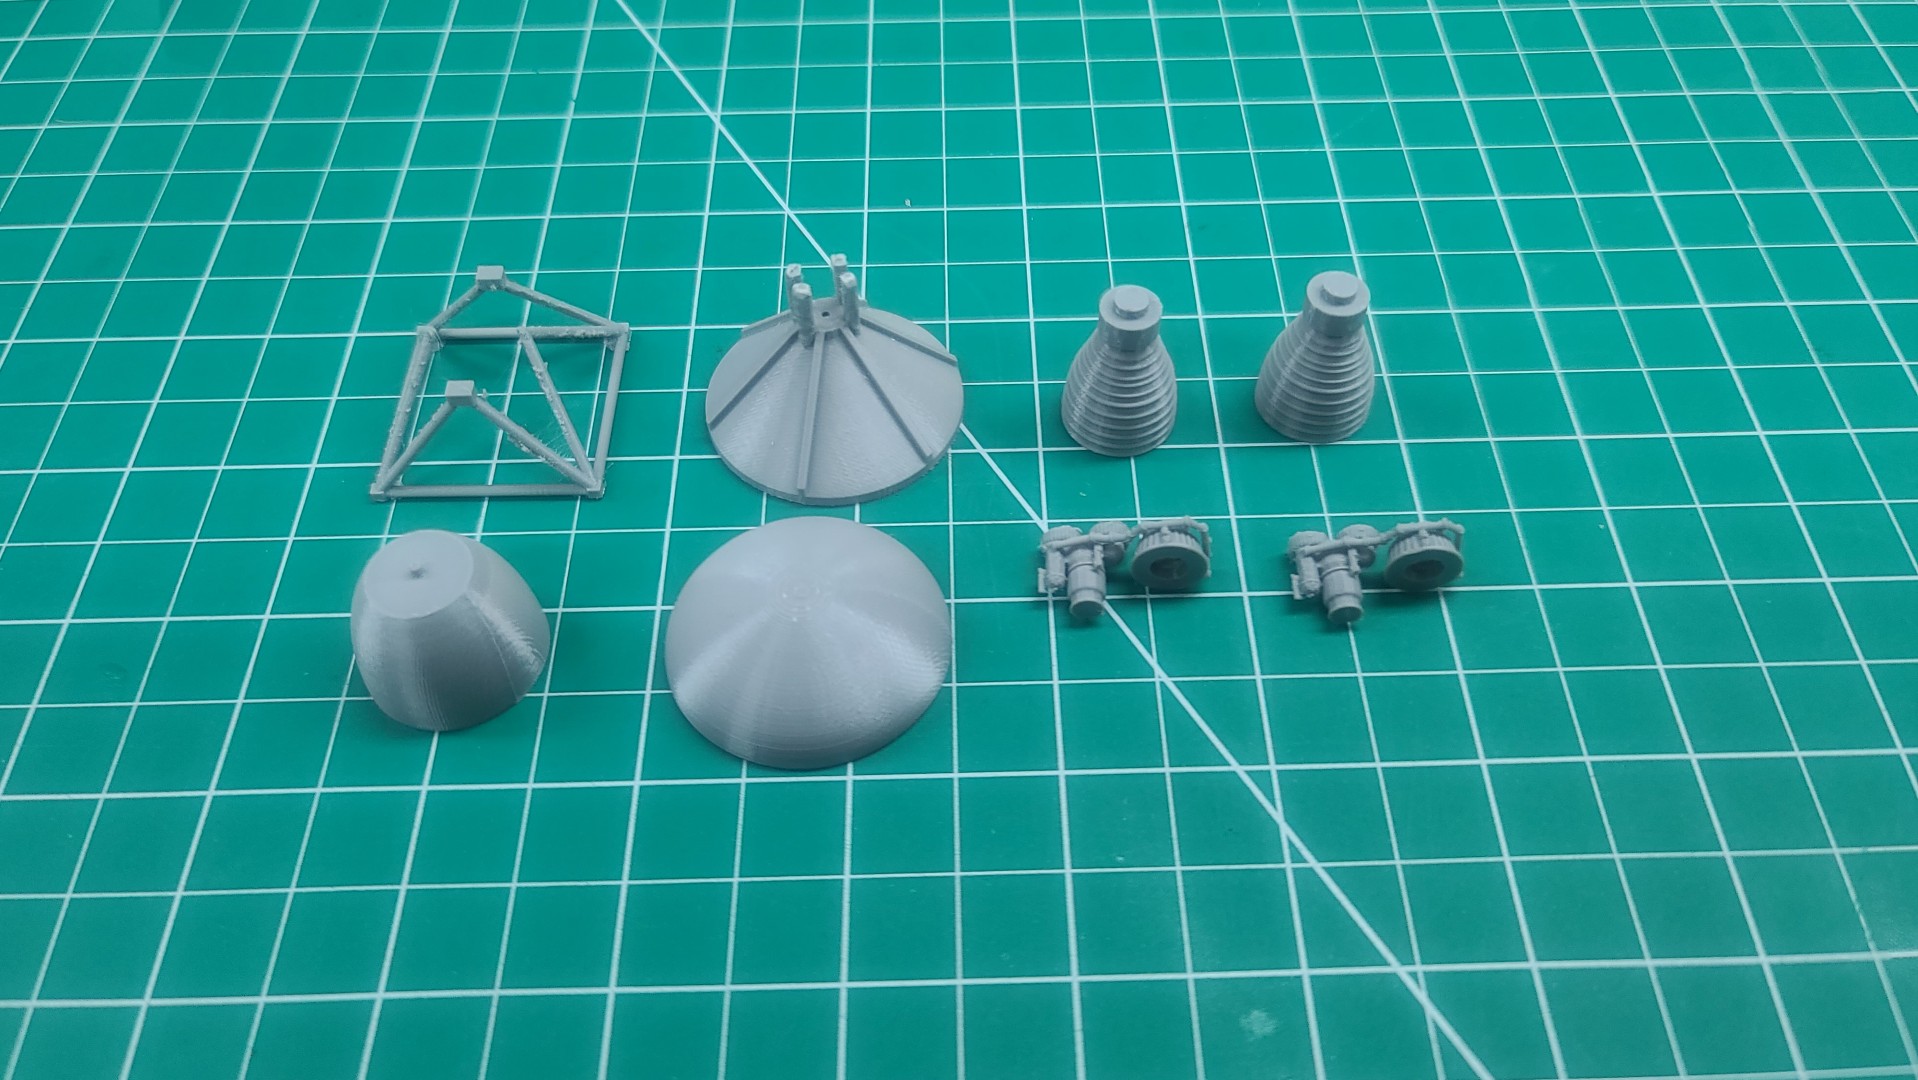
Using these slicer settings and some Gray Ender-PLA filament, I proceeded to 3D print the various parts displayed in the right image below. I think these should work just fine for my 3D model.
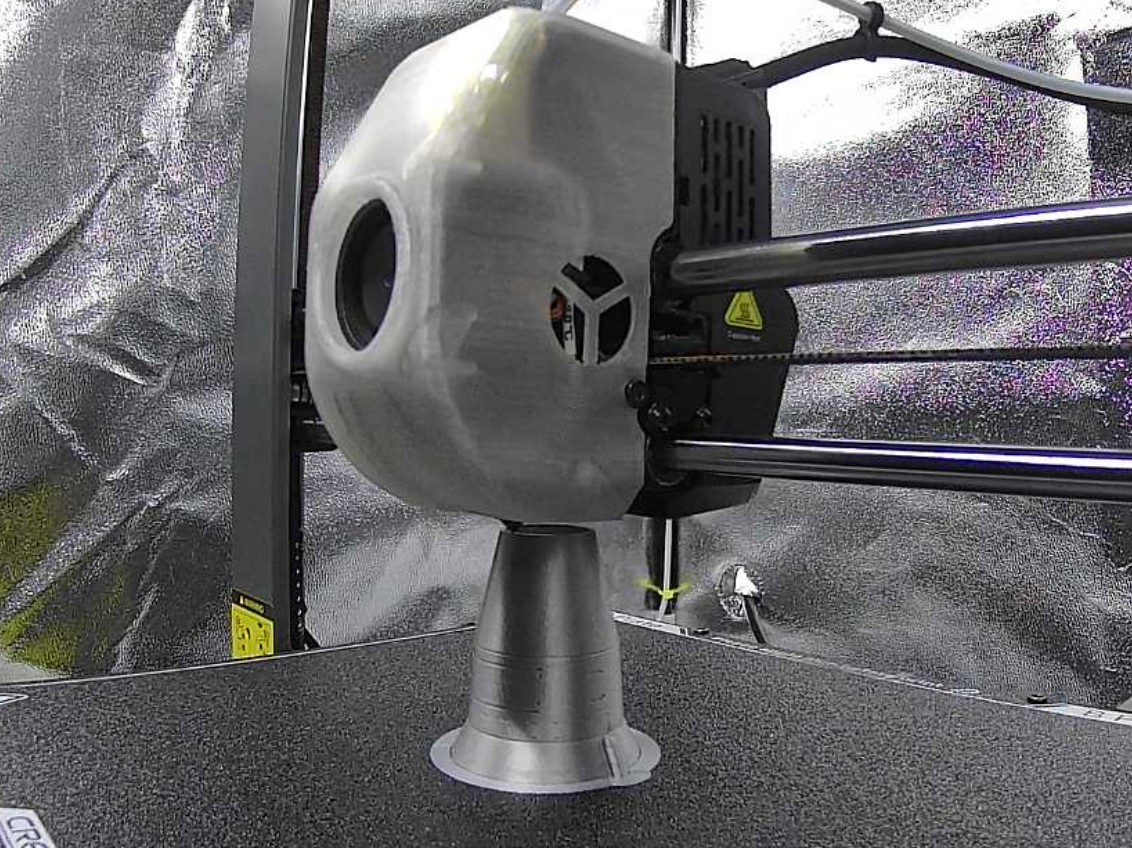
With those parts printed, I replaced the filament with some Silk-Silver PLA. I then adjusted the print settings for 3 wall loops with a 0.1mm layer height, 0.42mm layer width, and a 10% sparse infill density. The print speed was also reduced to 50mm/sec for the silk filament. The left image below shows part TitanIIWarhead.stl approximately 83% complete in its 2 hr. 28 min. print.
The Titan II missile body is divided into three parts; the first stage which at 200% is 218mmx46mm; the second stage at 111mmx45mm; and the warhead at 67mmx44mm. The total print time for these three parts was 18 hrs. 58 min. Note, there are 2,181 print layers in the first stage alone when printed at a layer height of 0.1mm. All three Silk-Silver PLA printed parts are shown in the right image below.

The last part to print was the the display stand. I installed some Space Gray PLA filament in my Ender-3 V3, and then adjusted the print settings for 3 wall loops with a 0.15mm layer height, 0.32mm layer width, and a 10% sparse infill density using a 0.4mm printer nozzle. The left image below shows the TitanStand.stl 3D printed part.
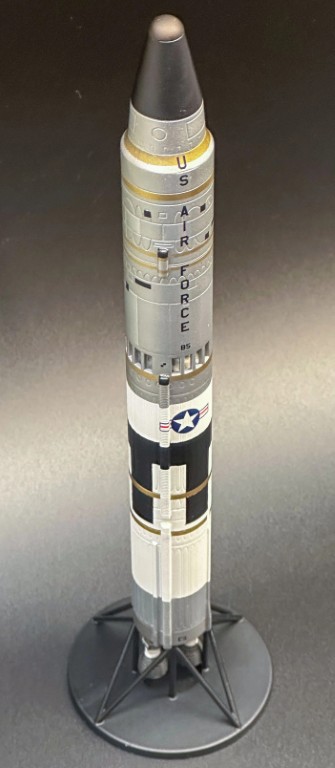
Last was some minor detail painting and model assembly. I limited my detailing to match the operational Titan II's in the silos that I worked on at Little Rock AFB, AR. The model designer painted his model in the colors used on the Titan in NASA's Gemini crewed space program. Using some white Hyper-PLA, I added a 3D printed title bar to the model stand. In the right image below is my finished Titan II 3D model. The other 3D model is an AGM-69 SRAM, another system I worked on when I cross-trained from Titan II. The two models are not the same scale.
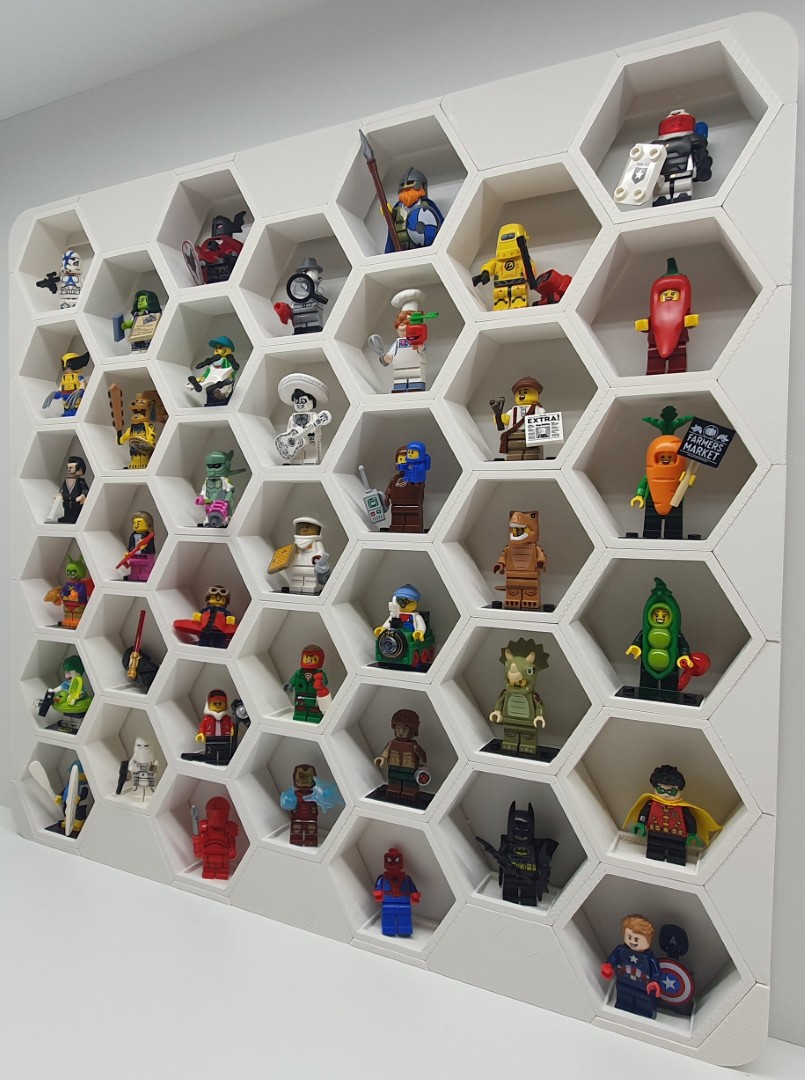
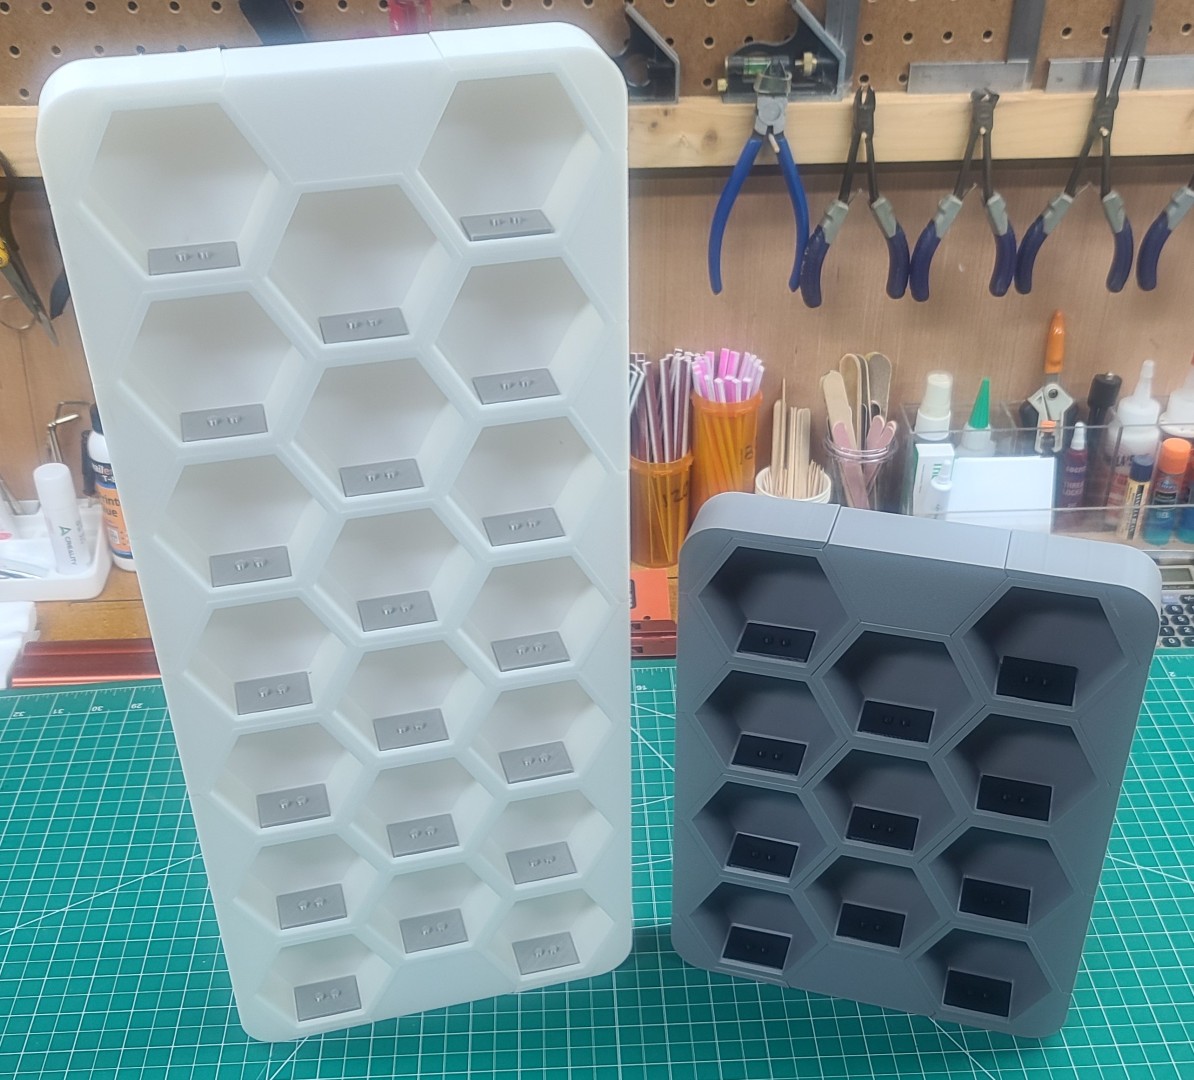
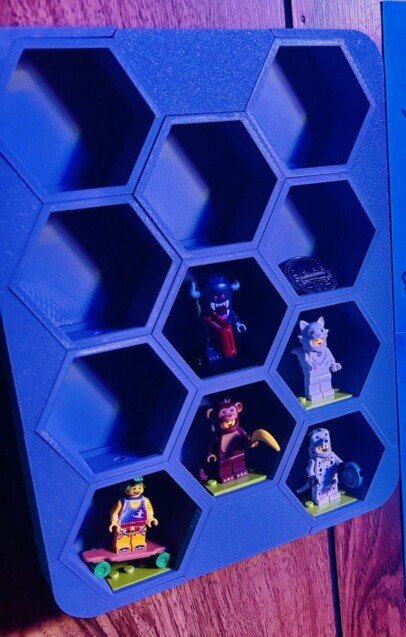
LEGO Minifigures Holders
I have three members of my family who are real LEGO lovers, my Grandson August, my oldest son Kent, and his beautiful wife Beth. Anyone who has built some LEGO sets knows they generally come with some kind of LEGO minifigures. To help keep these little critters from running off and getting lost some clever 3D designers have come up with several different styles of minifig display stands. With a little web research, I was able to find what I felt would work well for my LEGO lovers in a design from Metaman @: Cults 3D.
Source of Images: Cults 3D.
Well, my LEGO lovers have now placed orders for their minifigs display stands. Gus's will have 11 cubies in a Light Gray frame and Black minifig bases, and Kent's will have 20 cubies in a White frame and Silk Silver minifig bases. The design of the stands are such that as their collections grow, I can 3D print more cubies to add to their display stands. All the required parts will be printed on my Ender-3 V3 using a 0.4mm nozzle with a 0.2mm layer height.
After having to modify a couple of the provided parts so they would fit properly, I finished the two display stands shown in the images below. The lights in Gus's “Mancave” makes his gray holder in the right image appear blue.
Douglas A-26 Invader 3D Modeling Efforts
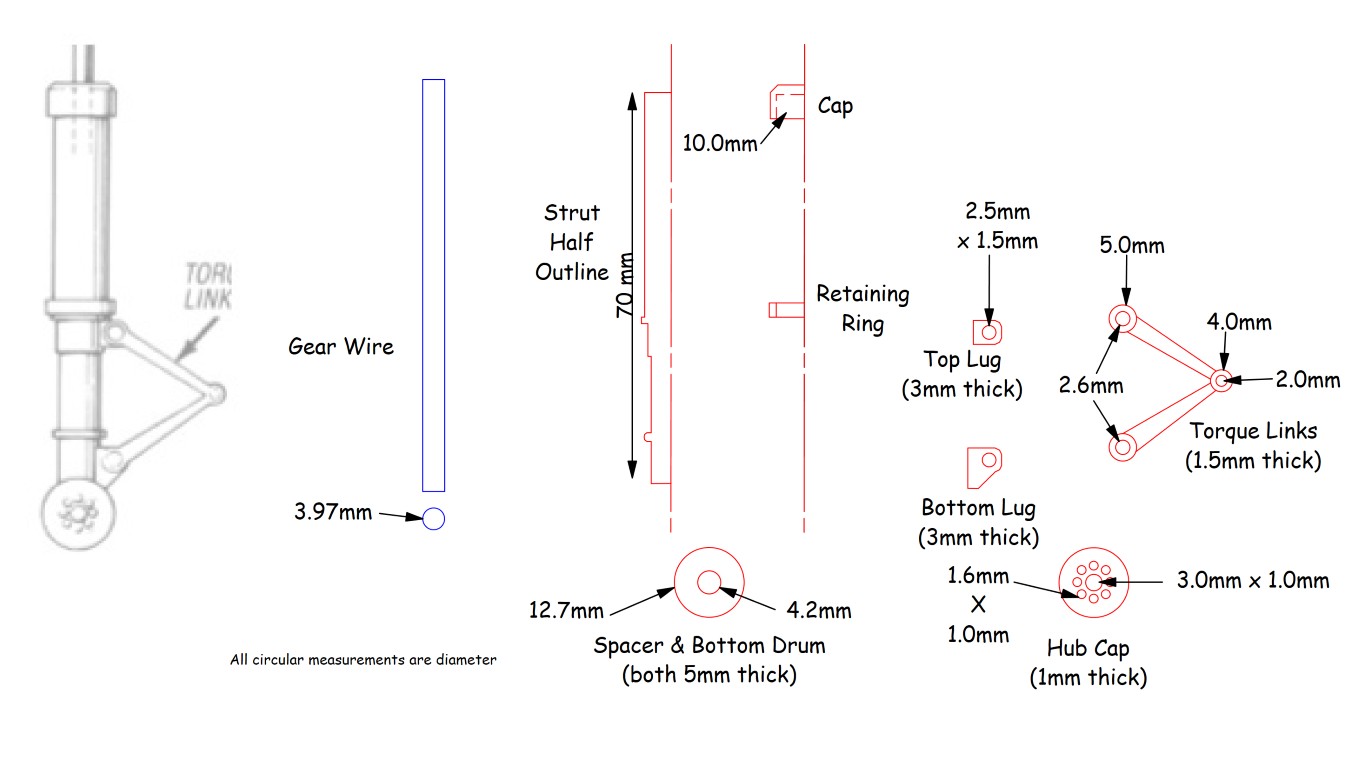
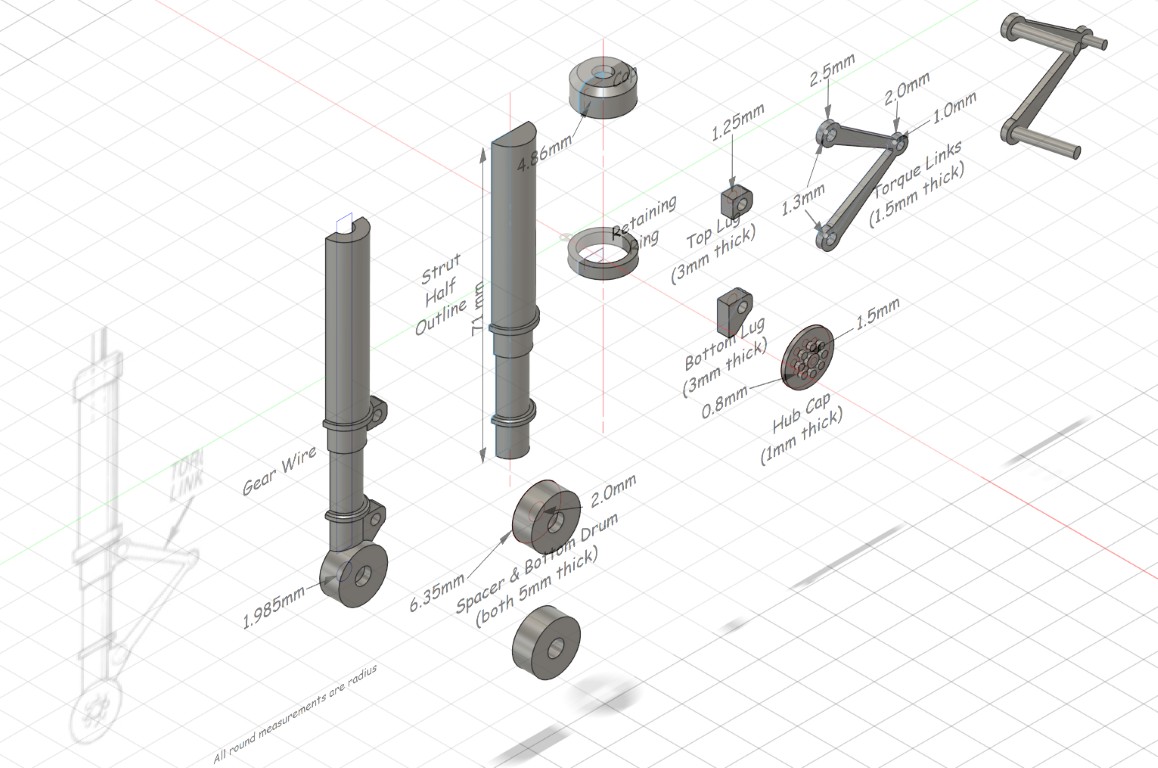
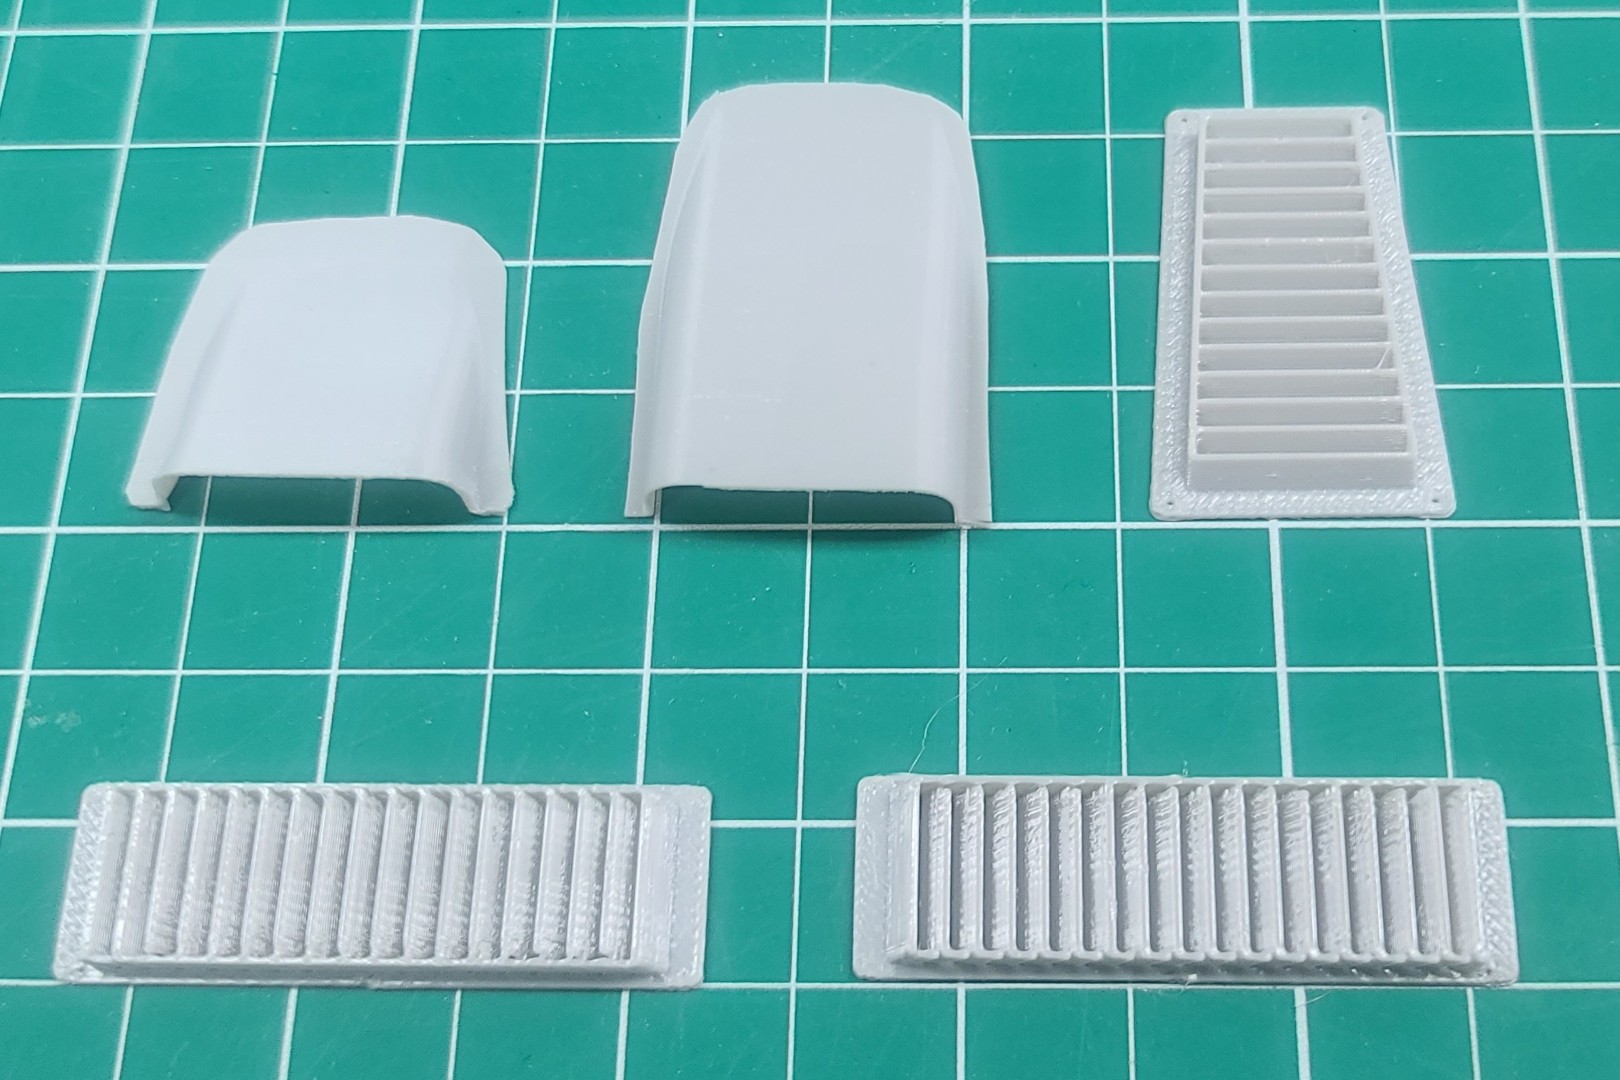
While working on the nacelle and fuselage plans for my 1/15th Semi-Scale Douglas A-26 Invader scratch build, in using 9/64″/3.5mm bent music wire MLG struts I needed to do something to make them look at least a little more like the real aircraft struts. On a couple of my older models many years ago, I used some plastic strut covers to spruce up the gear. With a little web research, I was able to find that Robart still makes strut covers for RC models. While these would be exactly what I needed, I decided to see if I could 3D model some covers myself.
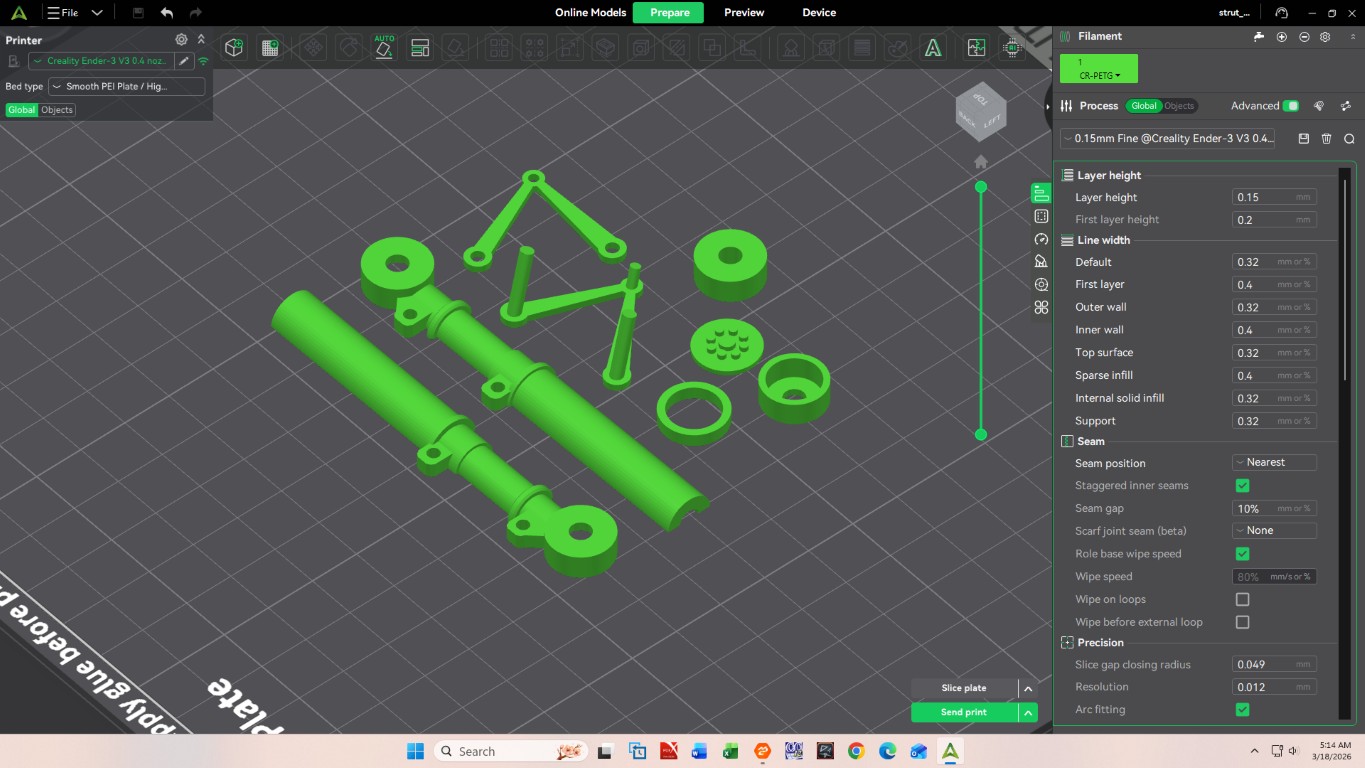
Using some images I found of the Robart covers, I worked up a 2D plan (top left image) for the strut cover parts, imported it into Fusion 360, and after a couple hours on my computer had a 3D model of a strut cover (top right image) and set up ready to print in Creality Print (bottom image). These should work out ok.
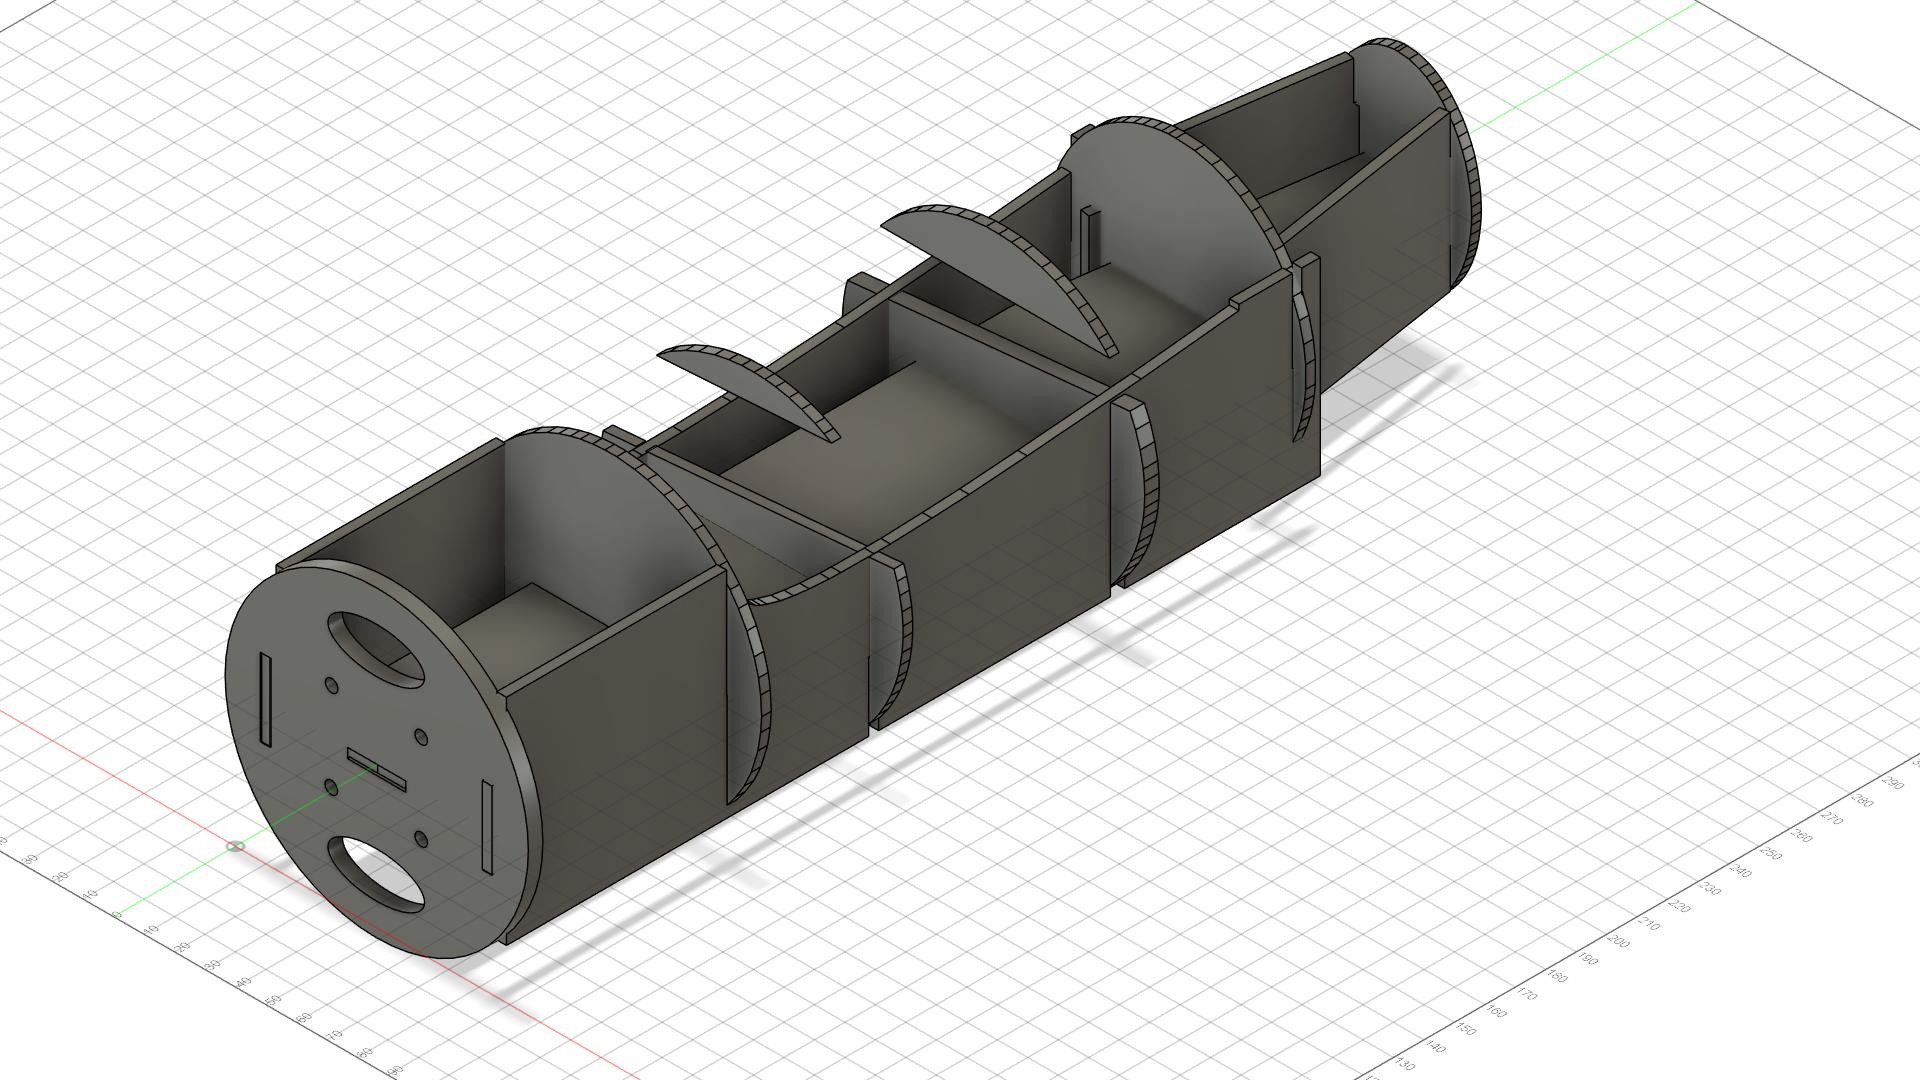
To verify my Motor Nacelle Plan would work, I took the 2D plan and imported it into Fusion 360 so I could build a 3D model of the motor nacelle in my computer versus cutting out all the parts from balsa and plywood to see if they fit together correctly (next two images below). This was an exercise in learning how to build sketches for each part and use “offset planes” to positioning each of the nacelle formers (NF1-NF6) and nacelle trusses (NT-I, NT-O, NT-tail).
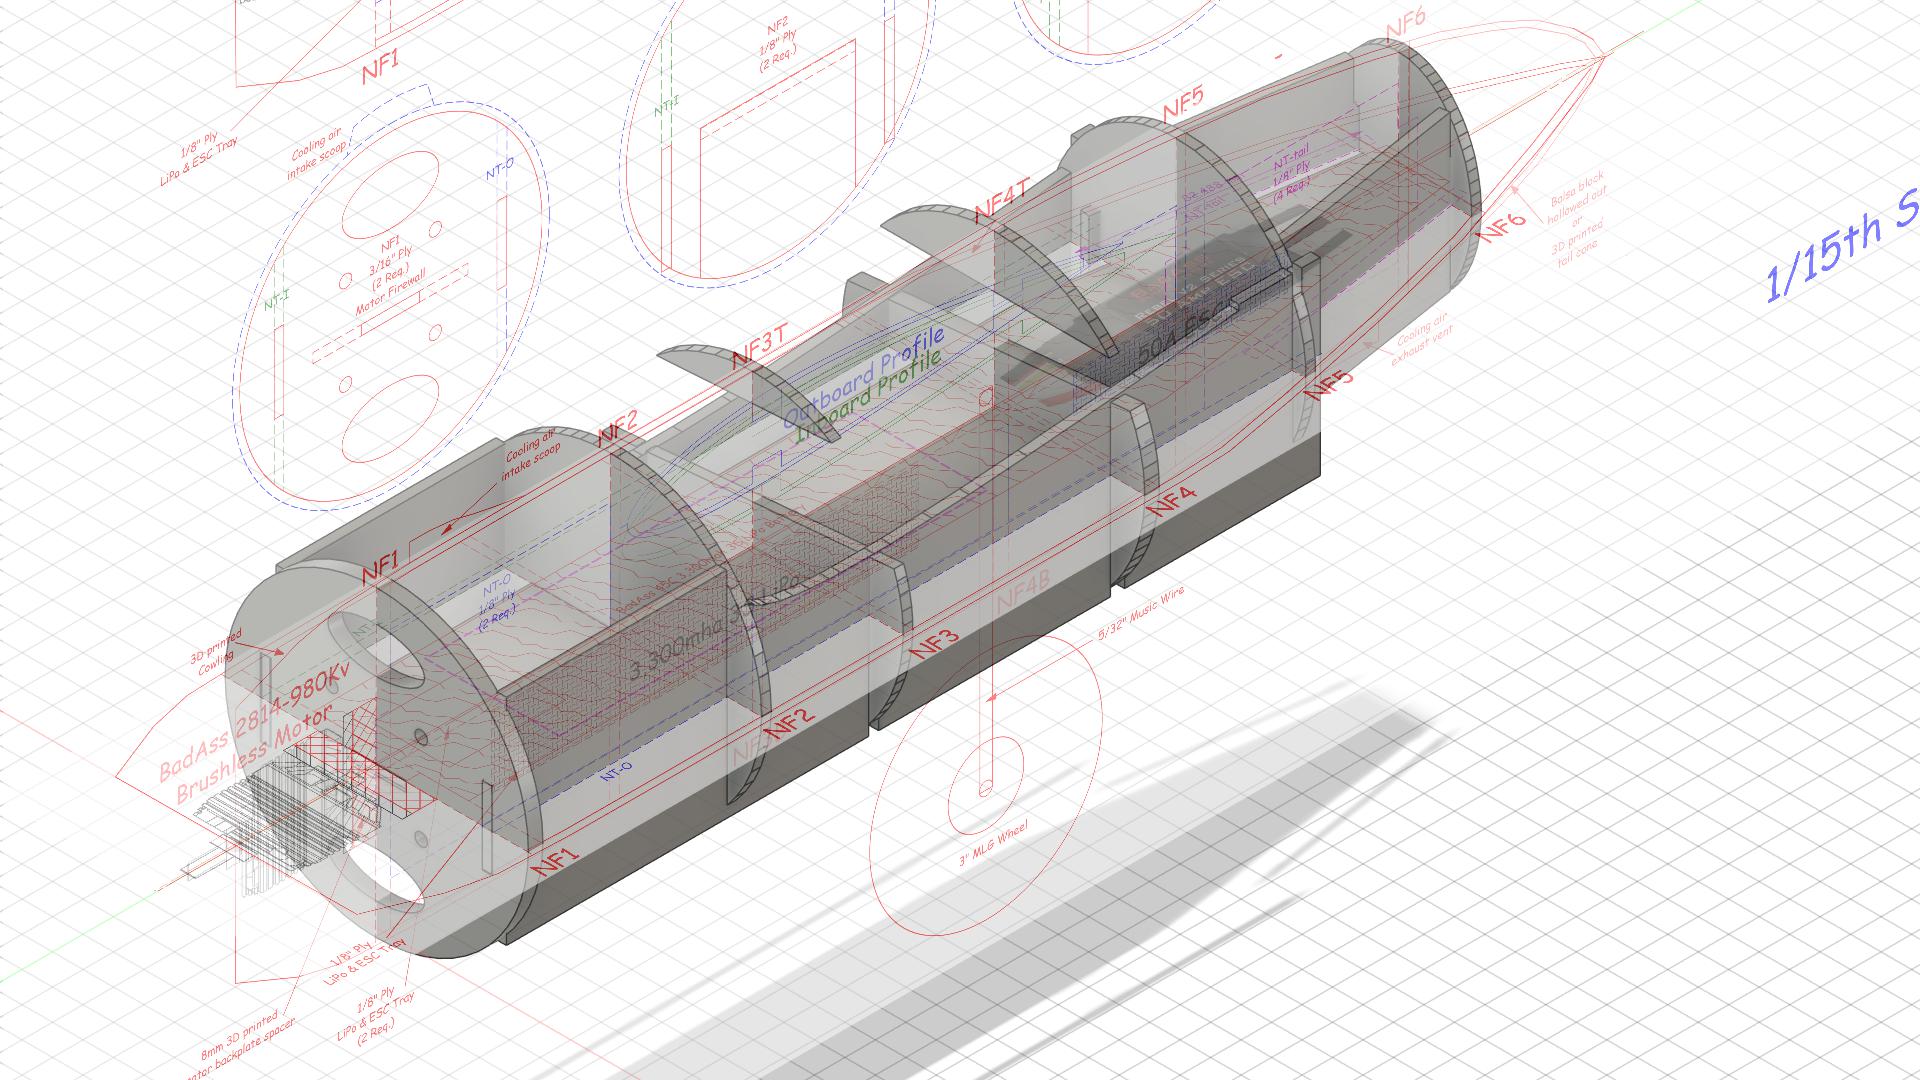
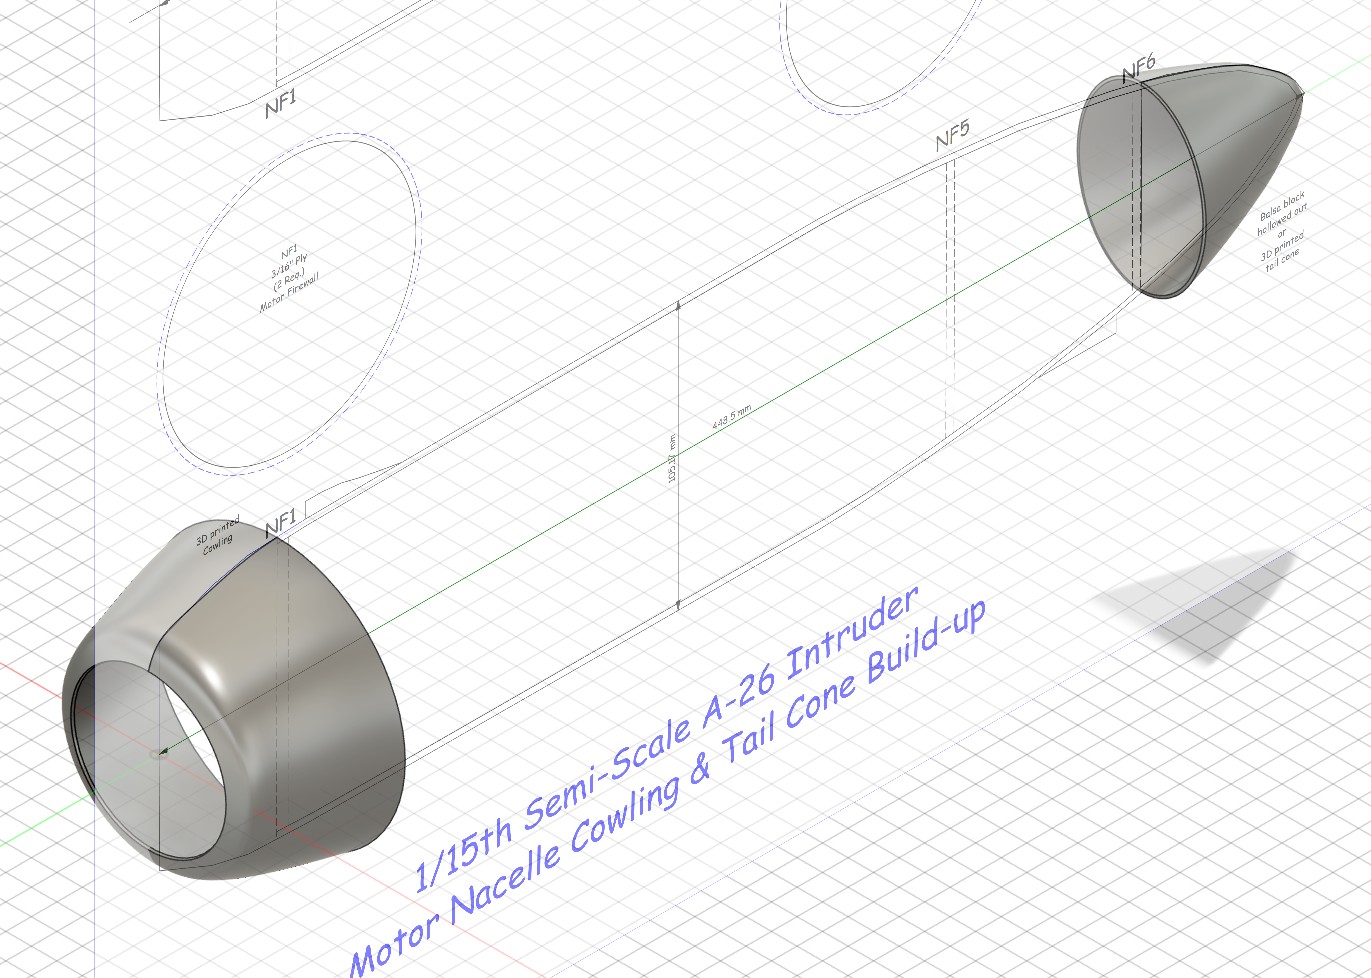
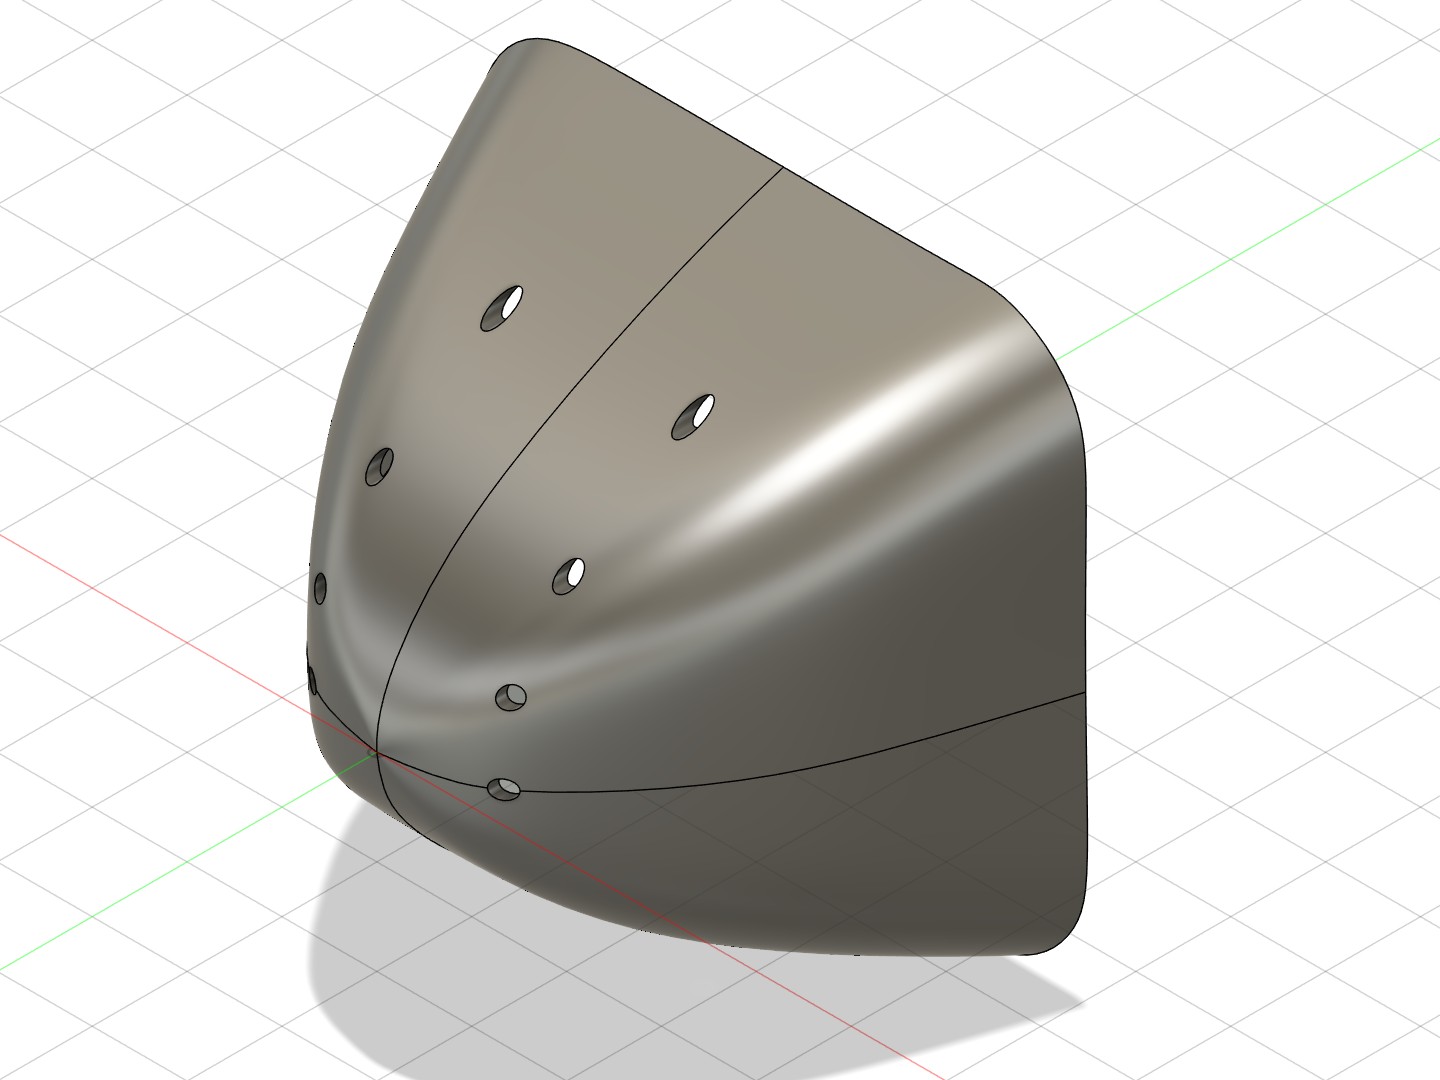
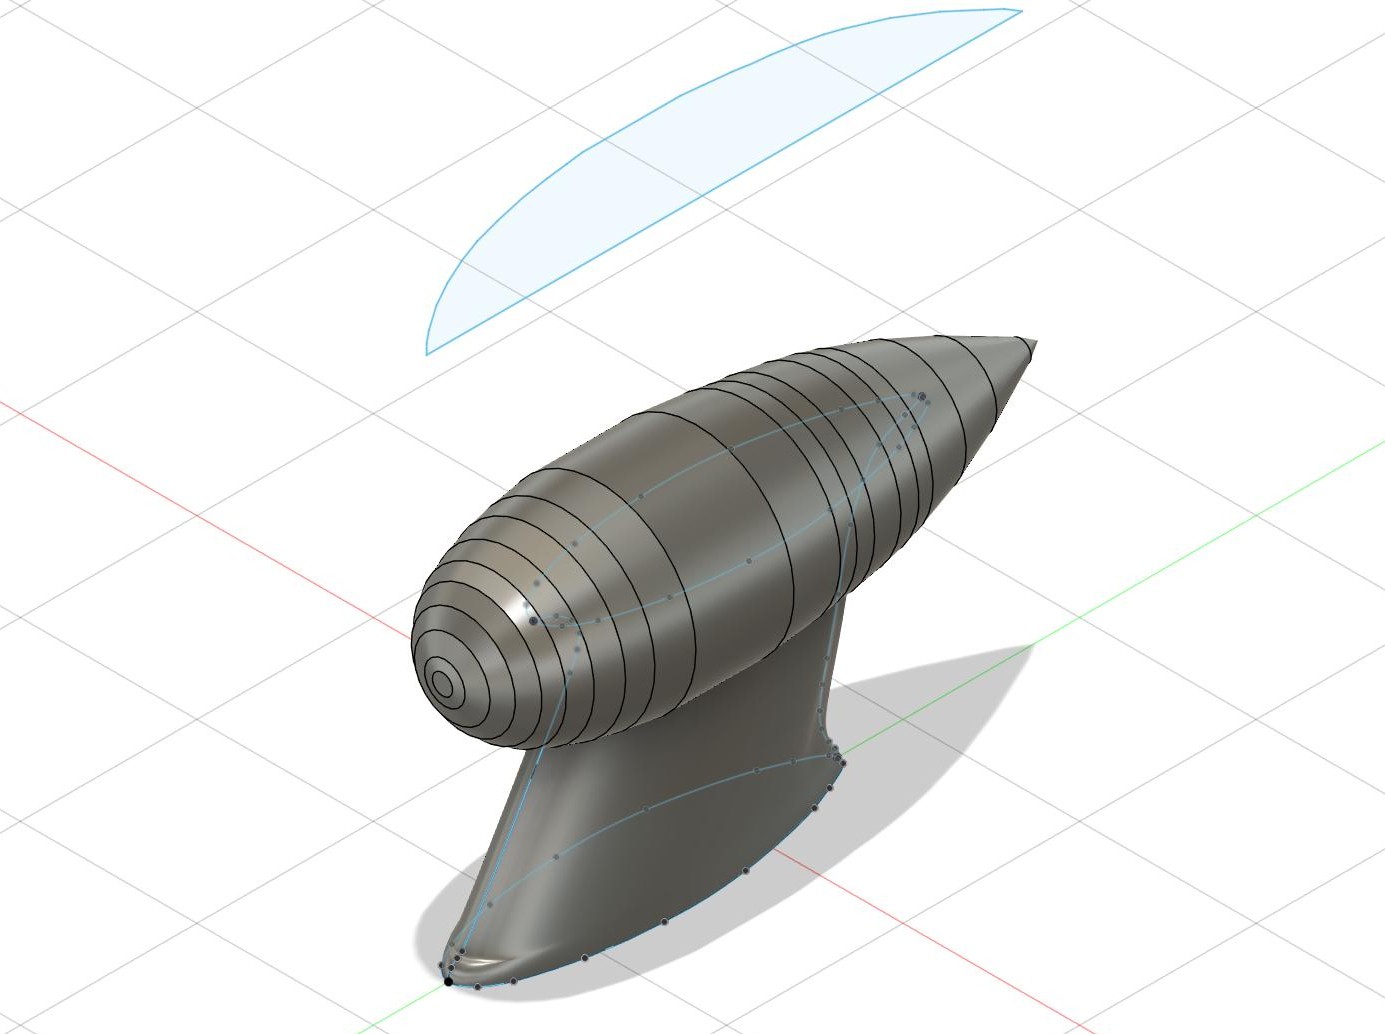
While I was at it, I went ahead and 3D modeled the nacelle cowling and tail cone using “lofts,” and then I imported the forward section of the fuselage plans and 3D modeled a nose cone using a “surface loft” design approach for my A-26 Invader model. With that finished I exported all the STL files needed to 3D print the 3D parts once the balsa/ply nacelles and fuselage are built. Results of my efforts can be seen in the next two images below.
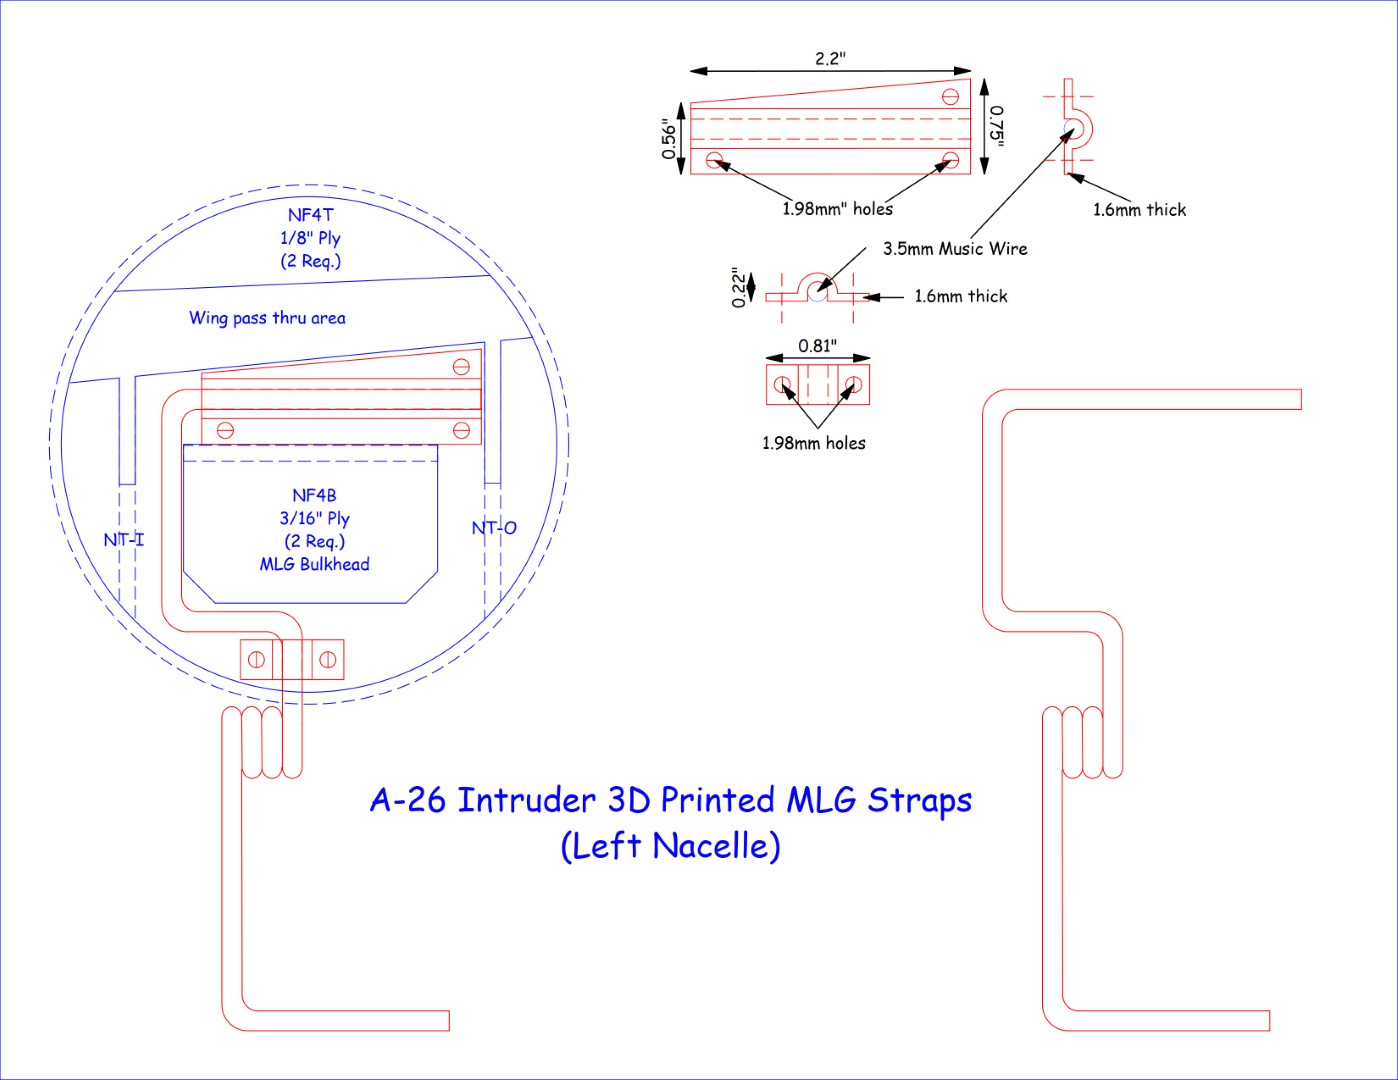
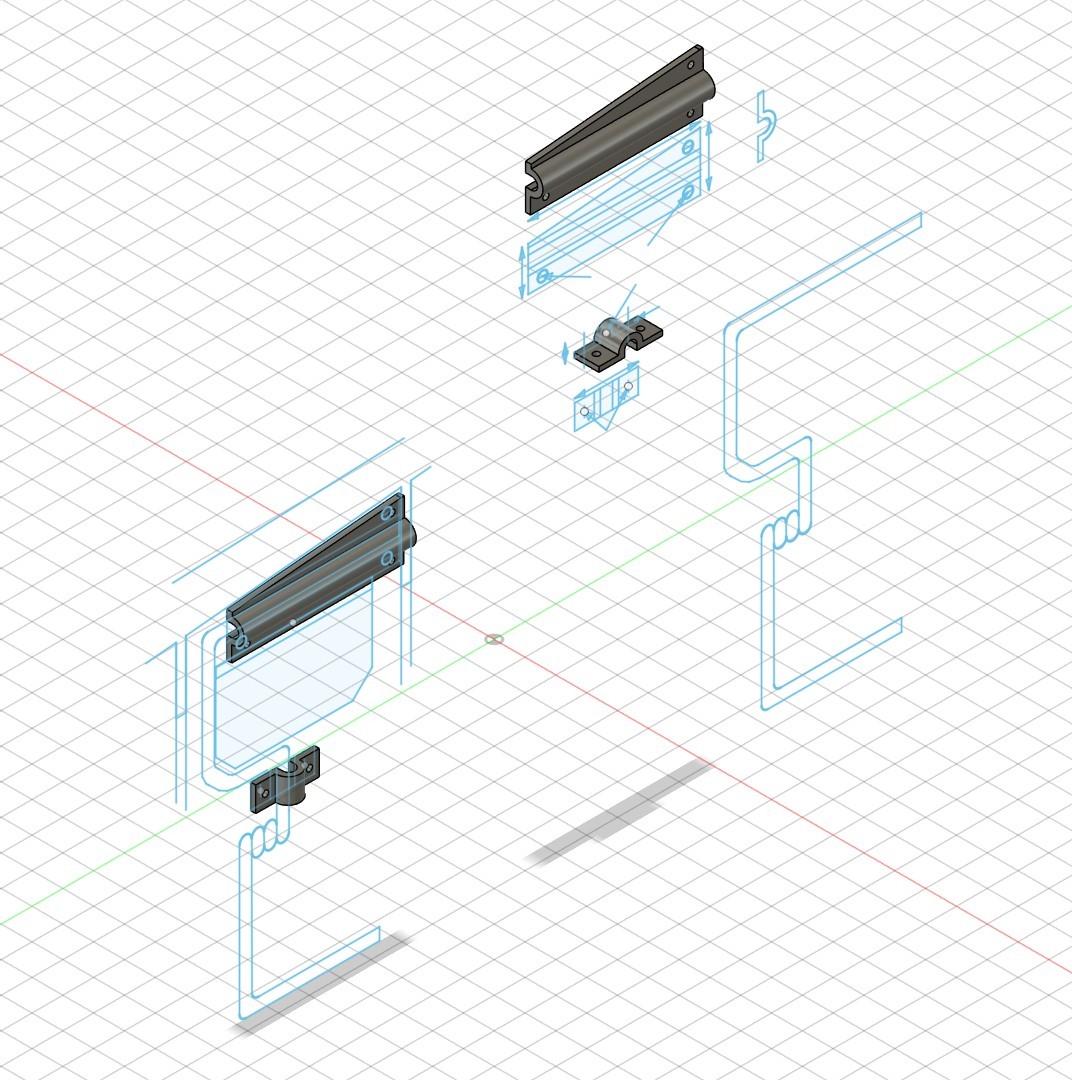
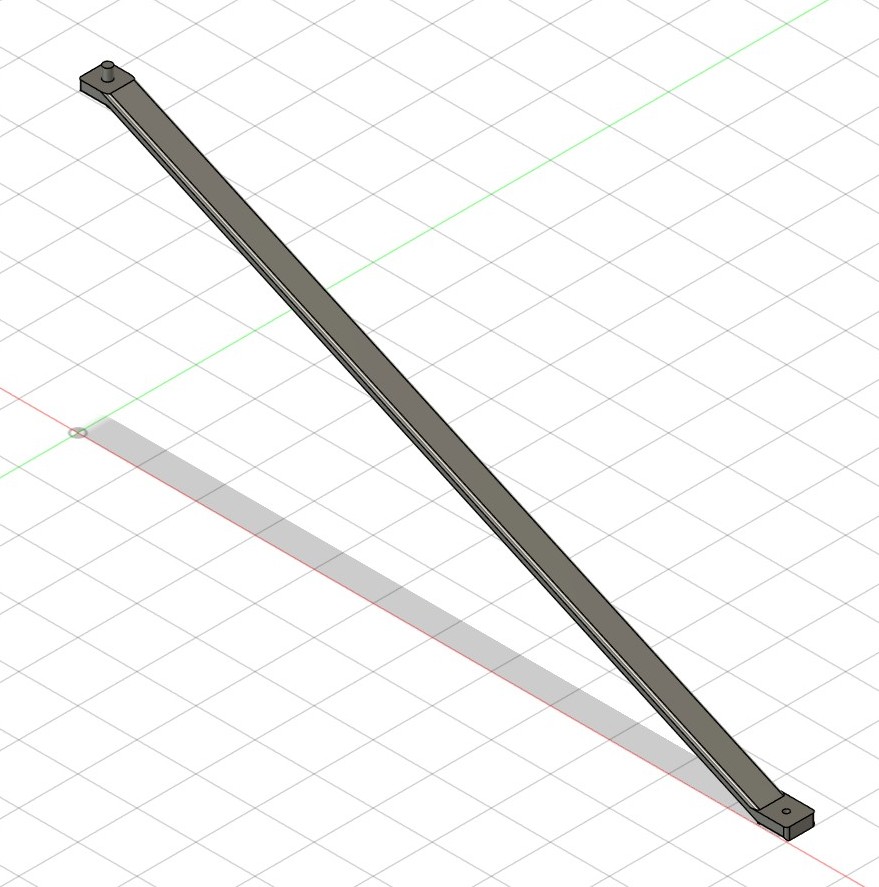
Ok, with that finished I decided to address a couple other items in my motor nacelle design. In my motor nacelle plan, the bent music wire MLG are attached to former NF4B (MLG bulkhead). While this can be accomplished using standard 5/32″/4mm DU-BRO Nylon MLG Straps, as you can see in the left image below, there is only enough room on the face of the bulkhead to install two of those straps. One at the bottom of the MLG wire, and the second at the upper right end of the MLG wire.
While this may work ok, I was not happy with not having any support around the MLG wire at the upper left bend. So, to address this concern I decided to design and 3D model my own MLG straps. Using my 2D plan, I exported a DXF file which I then imported into Fusion 360. Using this I then developed 3D models for a large strap across the top of the MLG wire, and a small strap at the bottom. These are shown in the right image below. I exported the STL file to use once the NF4B formers are made.
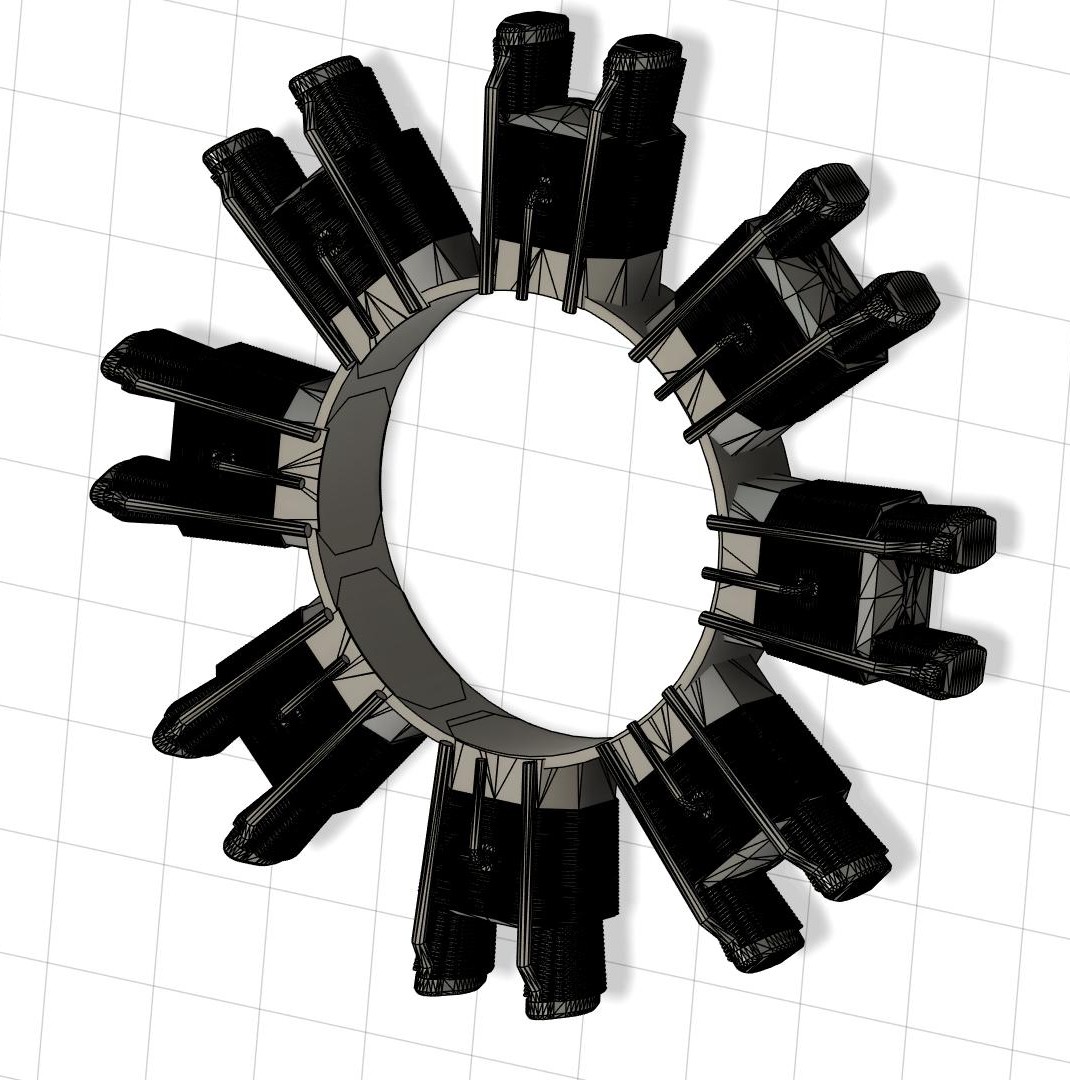
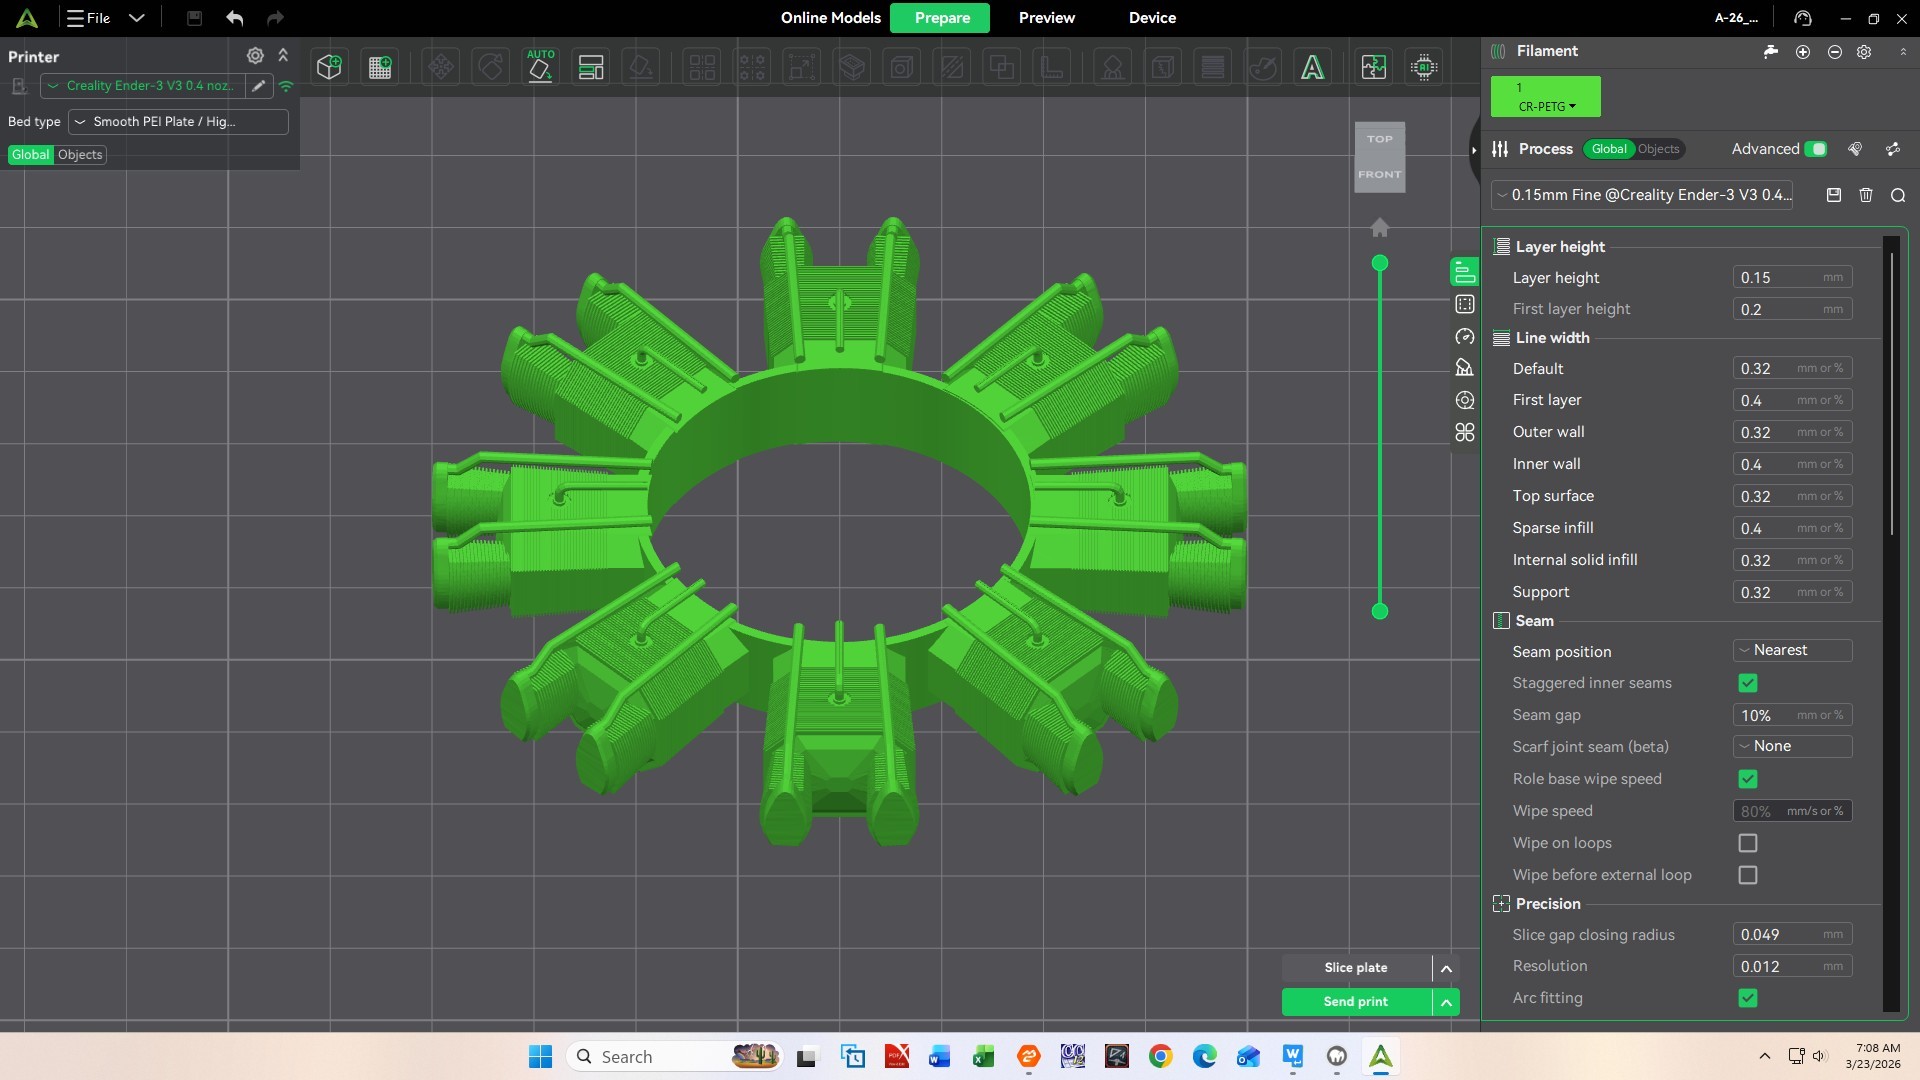
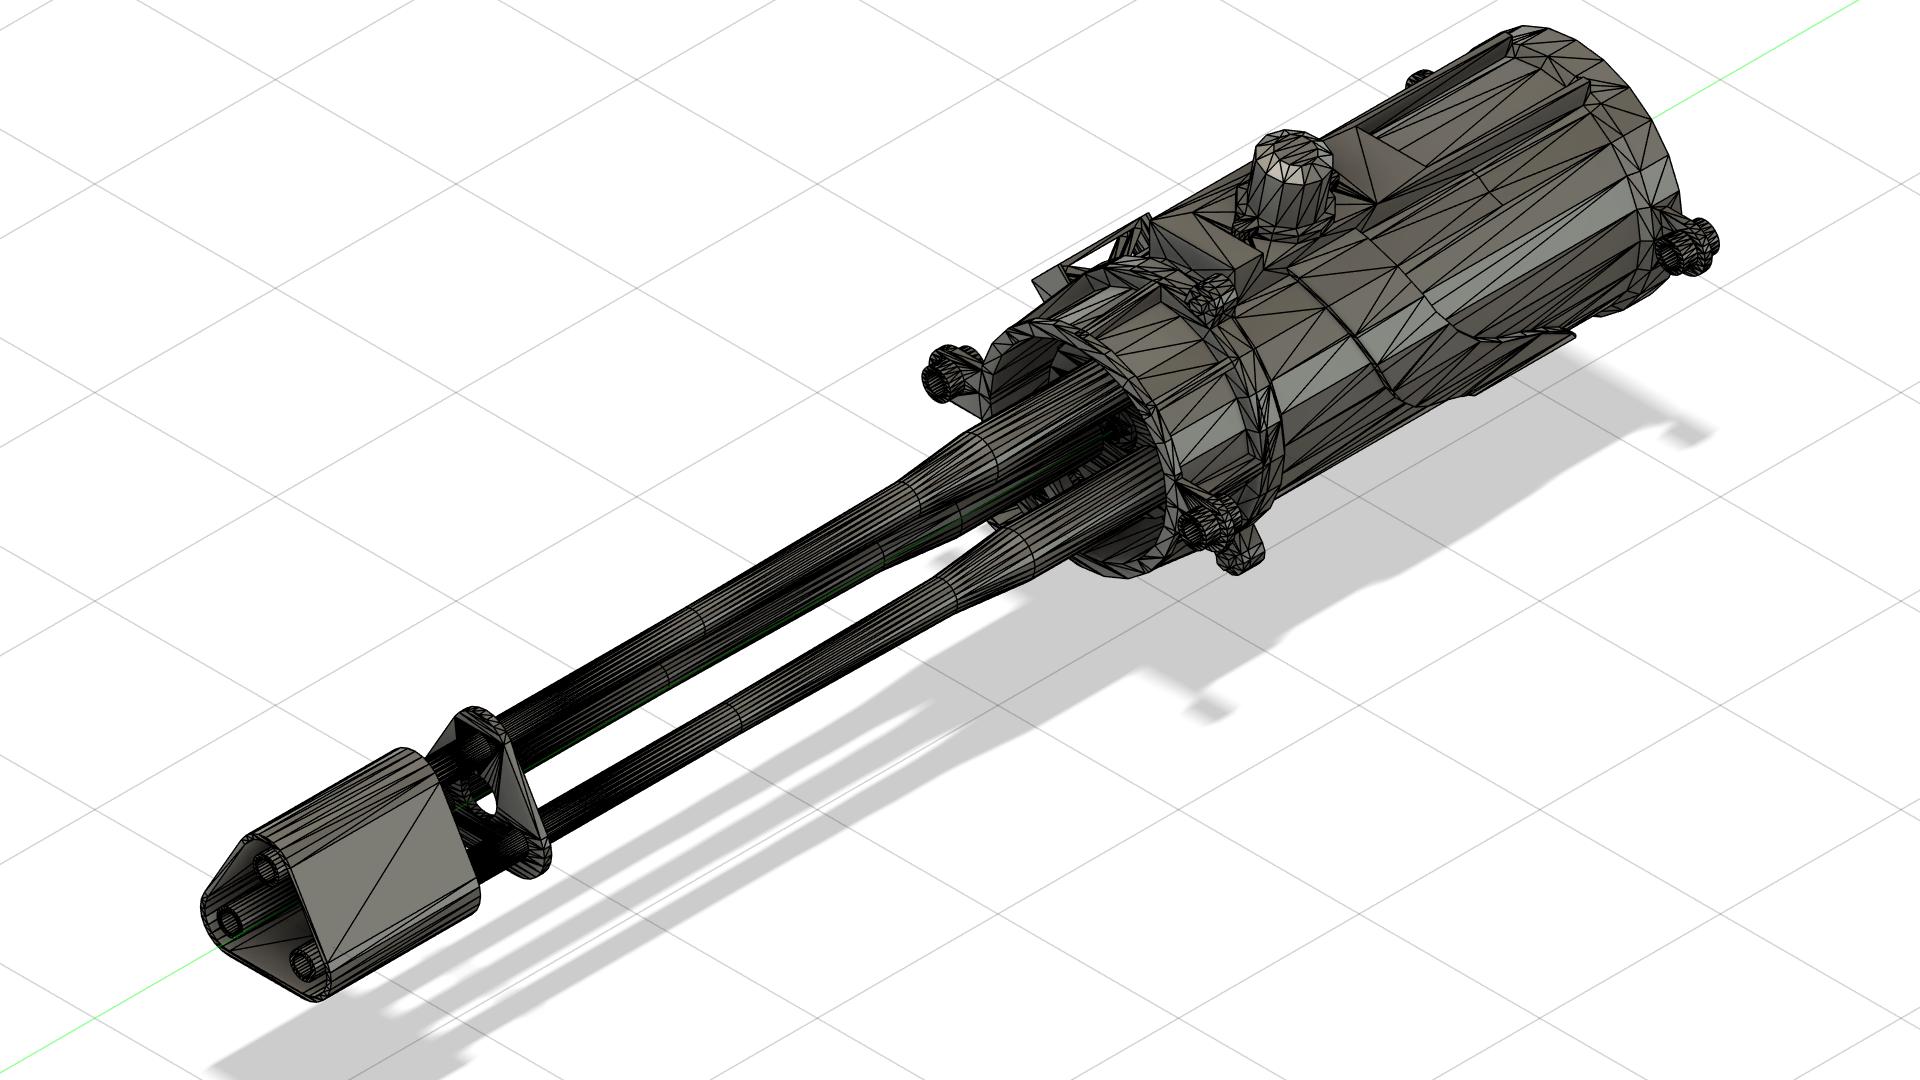
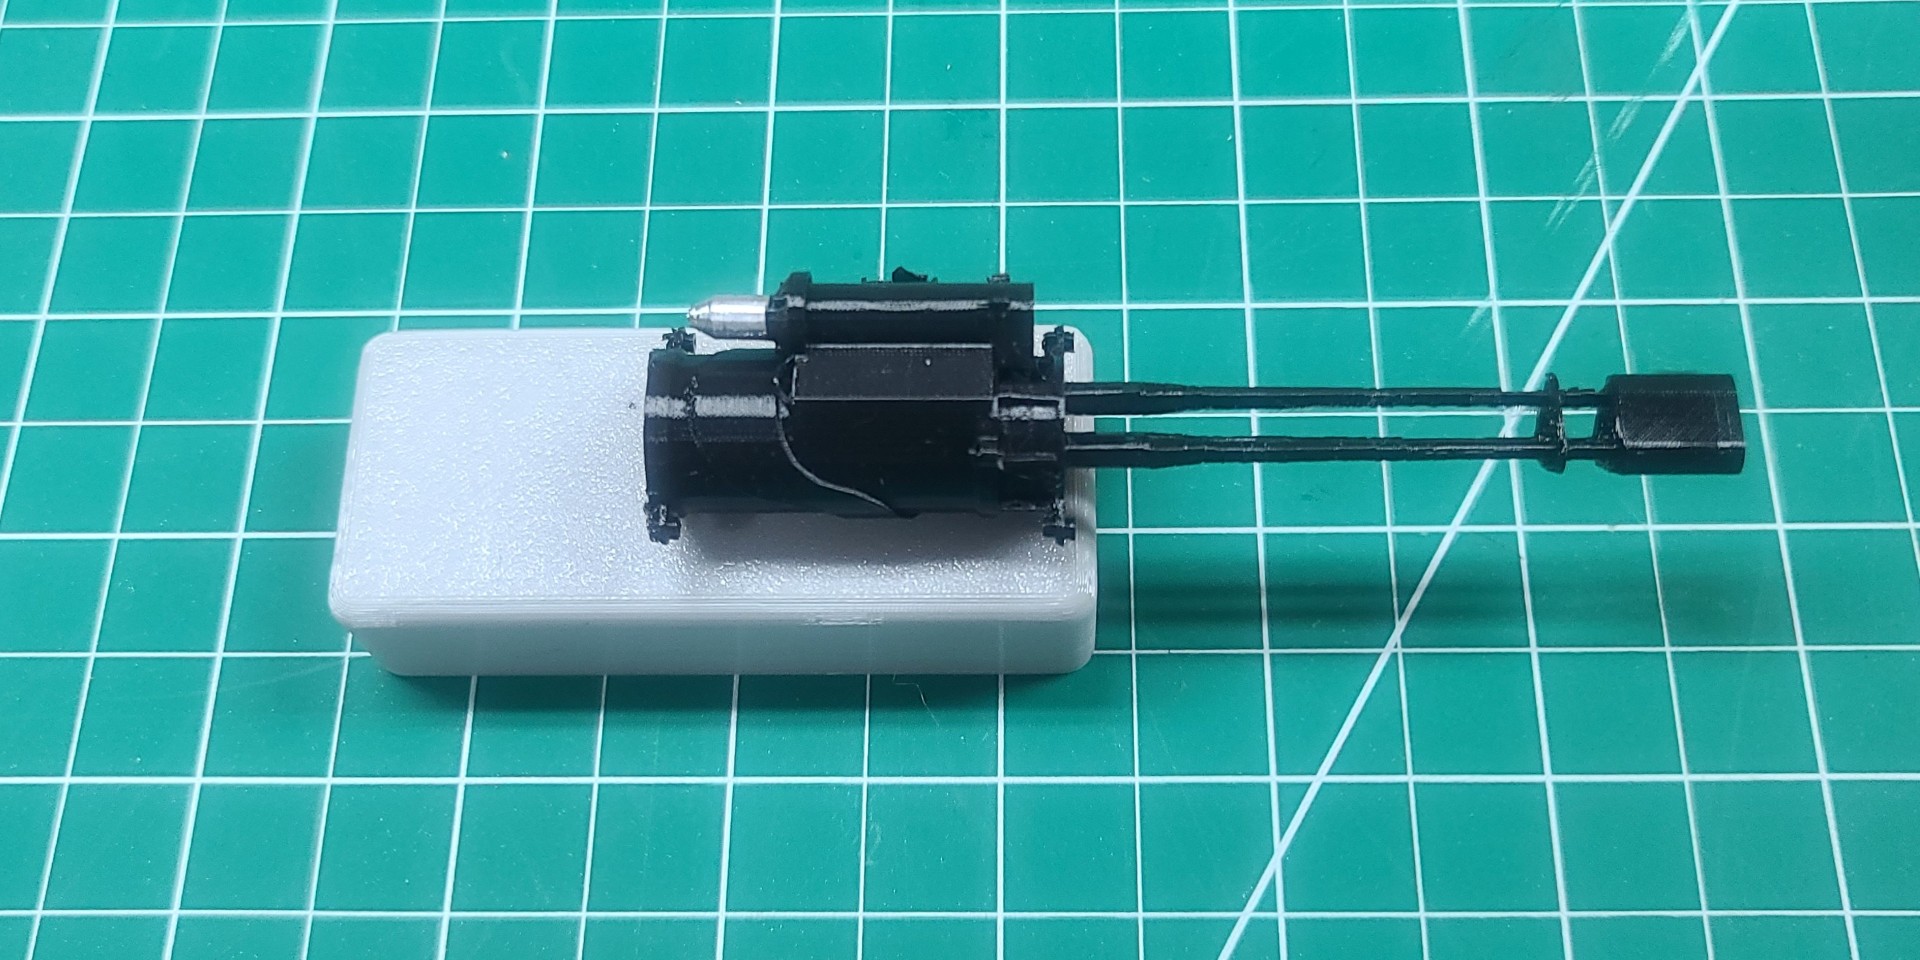
The other item was to come up with something to cover the front of the BadAss 2814-980Kv Brushless Motor so it would look more like the actual Pratt & Whitney R-2800-27 (Wasp) engine. After searching the web, I was able to find a couple free STL files of the Wasp engine, one in a “high poly count”, and another in a “low poly count.” I imported each of these into Creality Print, scaled them to the 1/15th scale size I needed for my A-26 nacelle, and cut them so I would only have the front face of the engine which I could place around the front of the BadAss motor. I then moved the STL files into Fusion 360, where after converting them to solid bodies, I was able to make the opening in the center of the engine for the BadAss motor to pass through. The resulting Wasp 3D model is shown in the left image below, and the model set-up in Creality Print in the right image. When printed, which will take 3 hrs. and 4 mins., this engine model will be mounted on the inside of the 3D printed nacelle cowling. Well, that's the plan at least.
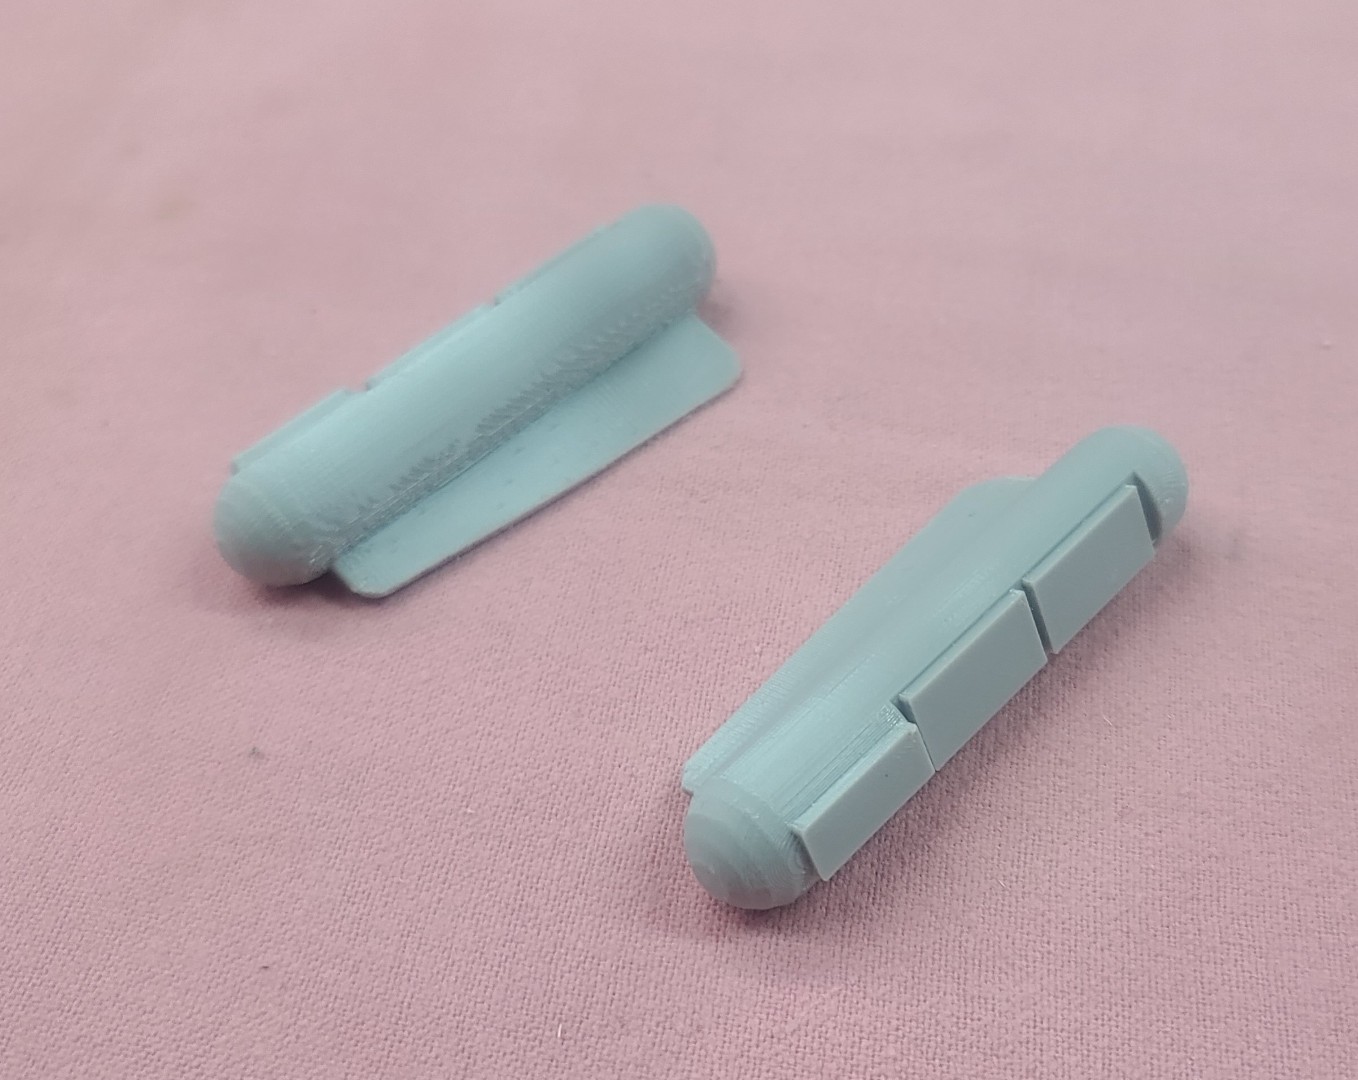
As shown in actual aircraft images and my fuselage side view plan, the A-26 has a twin 50 caliber General Electric W35 remote-controlled dorsal turret gun, and a similar twin 50 caliber remote-controlled ventral turret gun. I decided to make a 3D model of these for my A-26 build. Using images of the W35 turret gun that I found on the internet, I first drew up sketches in Fusion 360 for the turret base and gun housing. I then found an STL file for the Browning 50 caliber machine gun and imported just the gun barrel part into my Fusion 360 file. After building 3D model parts from the sketches for the turret base and gun housing, my completed gun turret 3D model is shown in the left image below and I exported the STL file for use later.
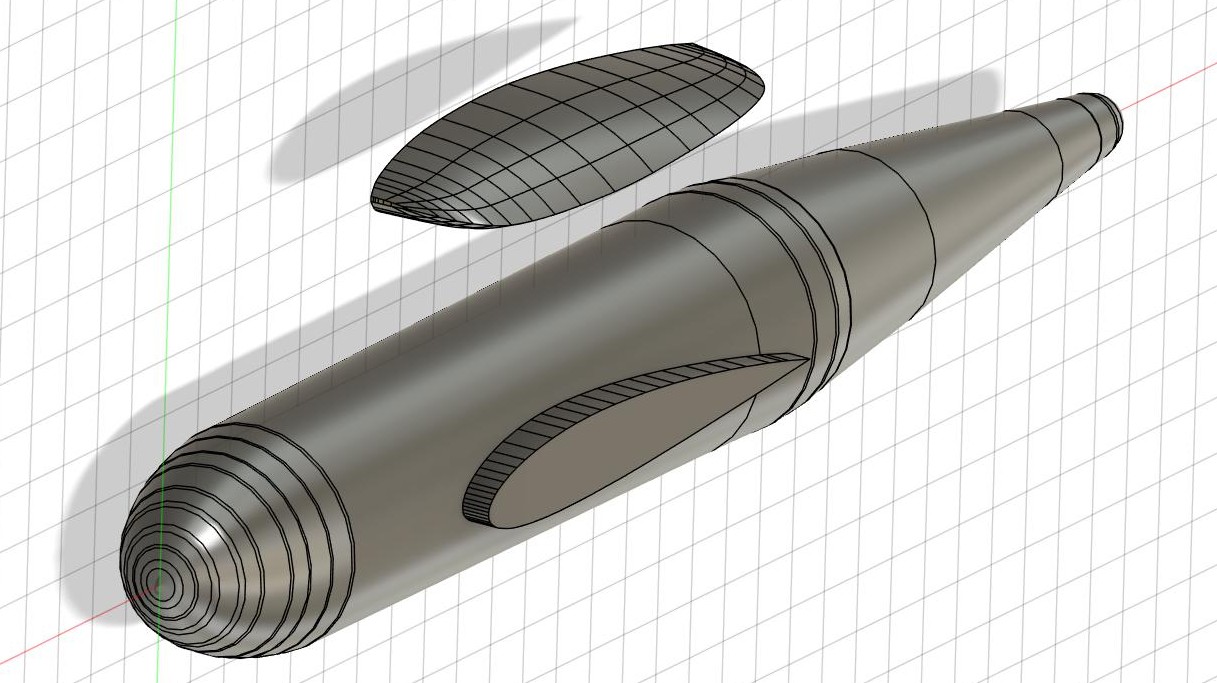
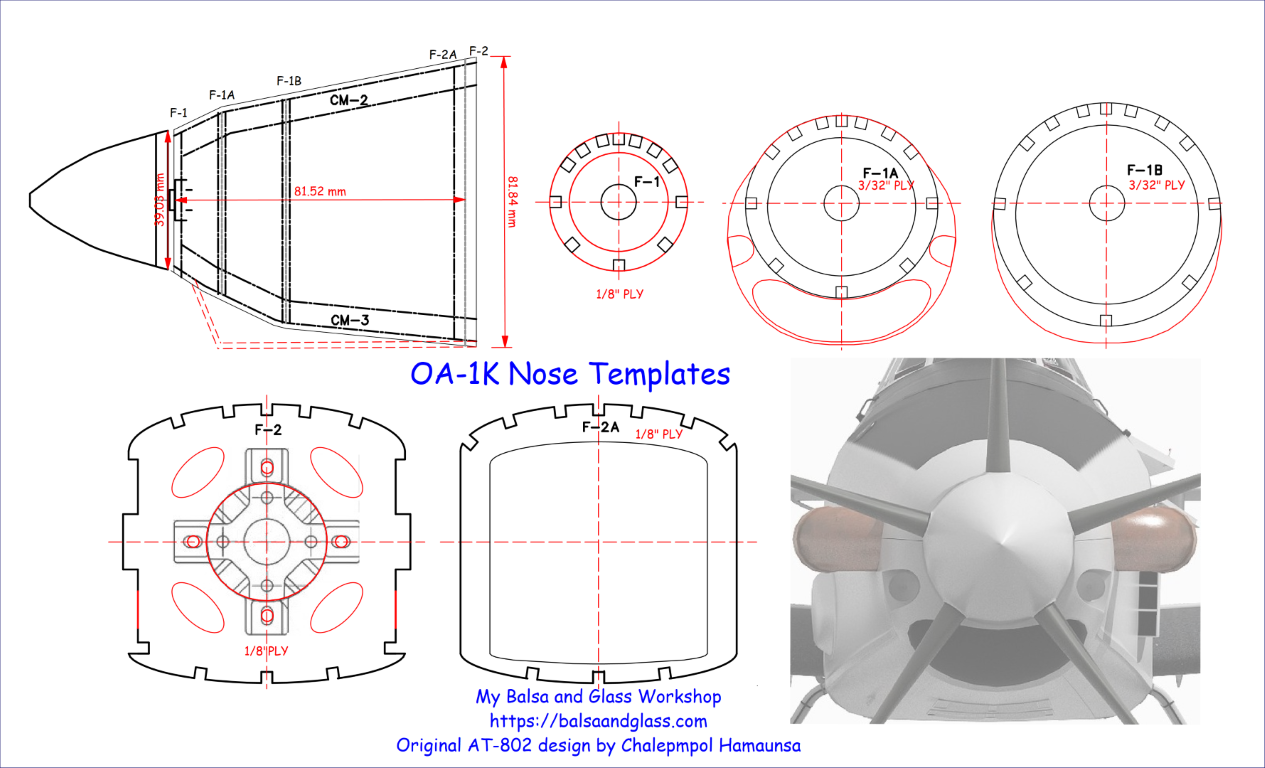
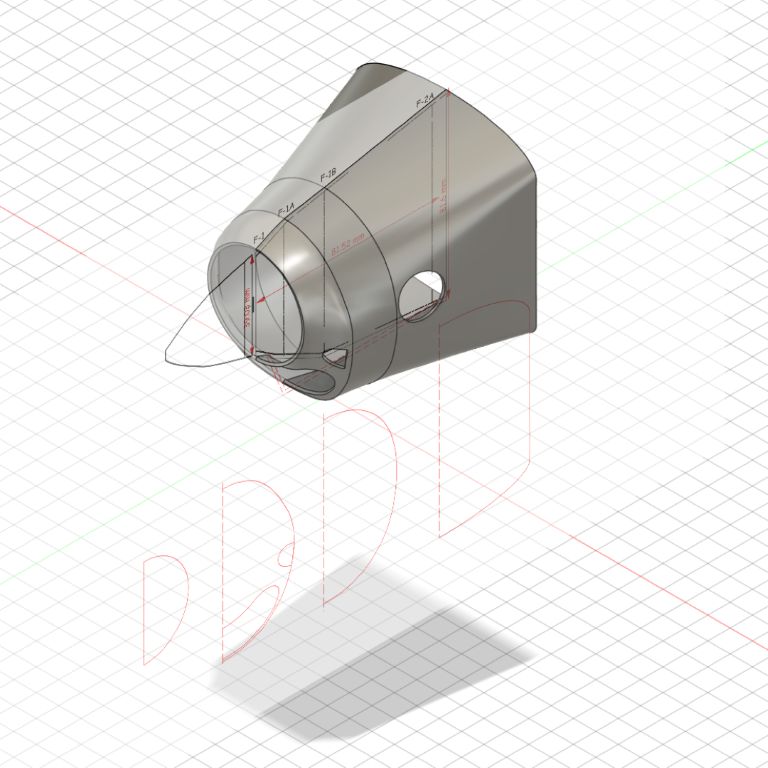
Again, as shown in actual aircraft images and some of the other A-26 plans, the A-26 has a cone shaped “direction finder” antenna on the top of the fuselage just forward of the dorsal fin. To 3D model this antenna, I first started with the UHF antenna model I built for my 1/15th Semi-Scale OA-1K Skyraider II, modified the top part of the antenna using a side view of the antenna cone from one of the other A-26 plans, and scaled it to a 1/15th model of the real antenna on my reference A-26 3-view drawing. The resulting antenna 3D model is shown in the right image below, and I exported the STL file for use later.
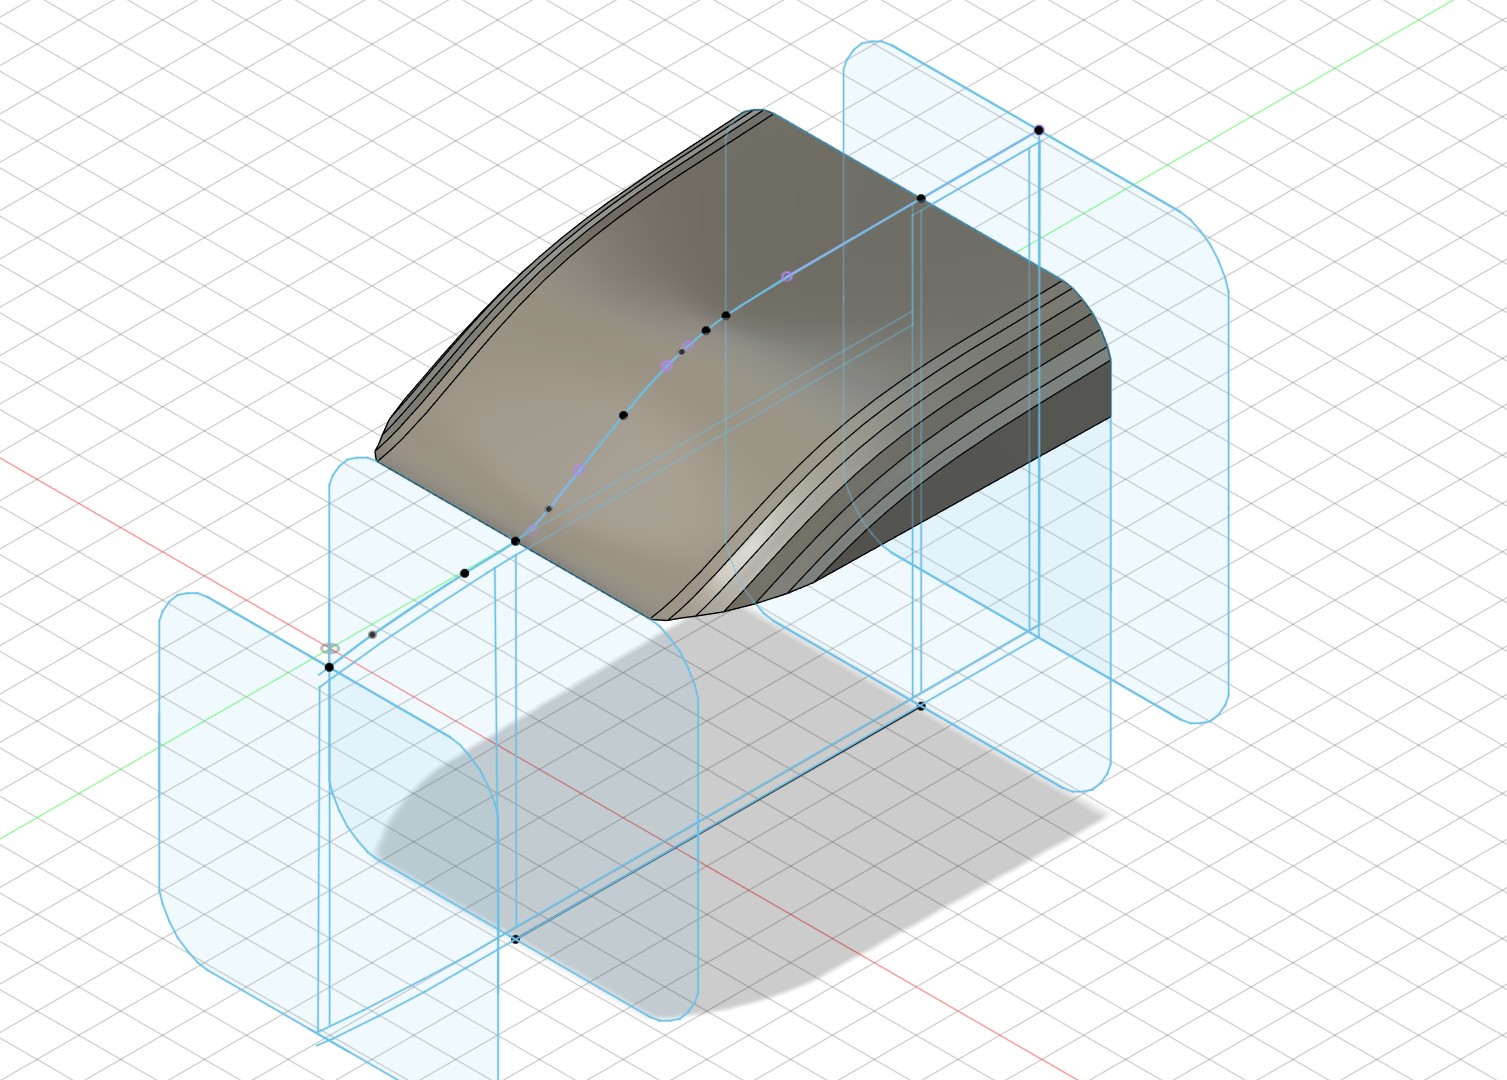
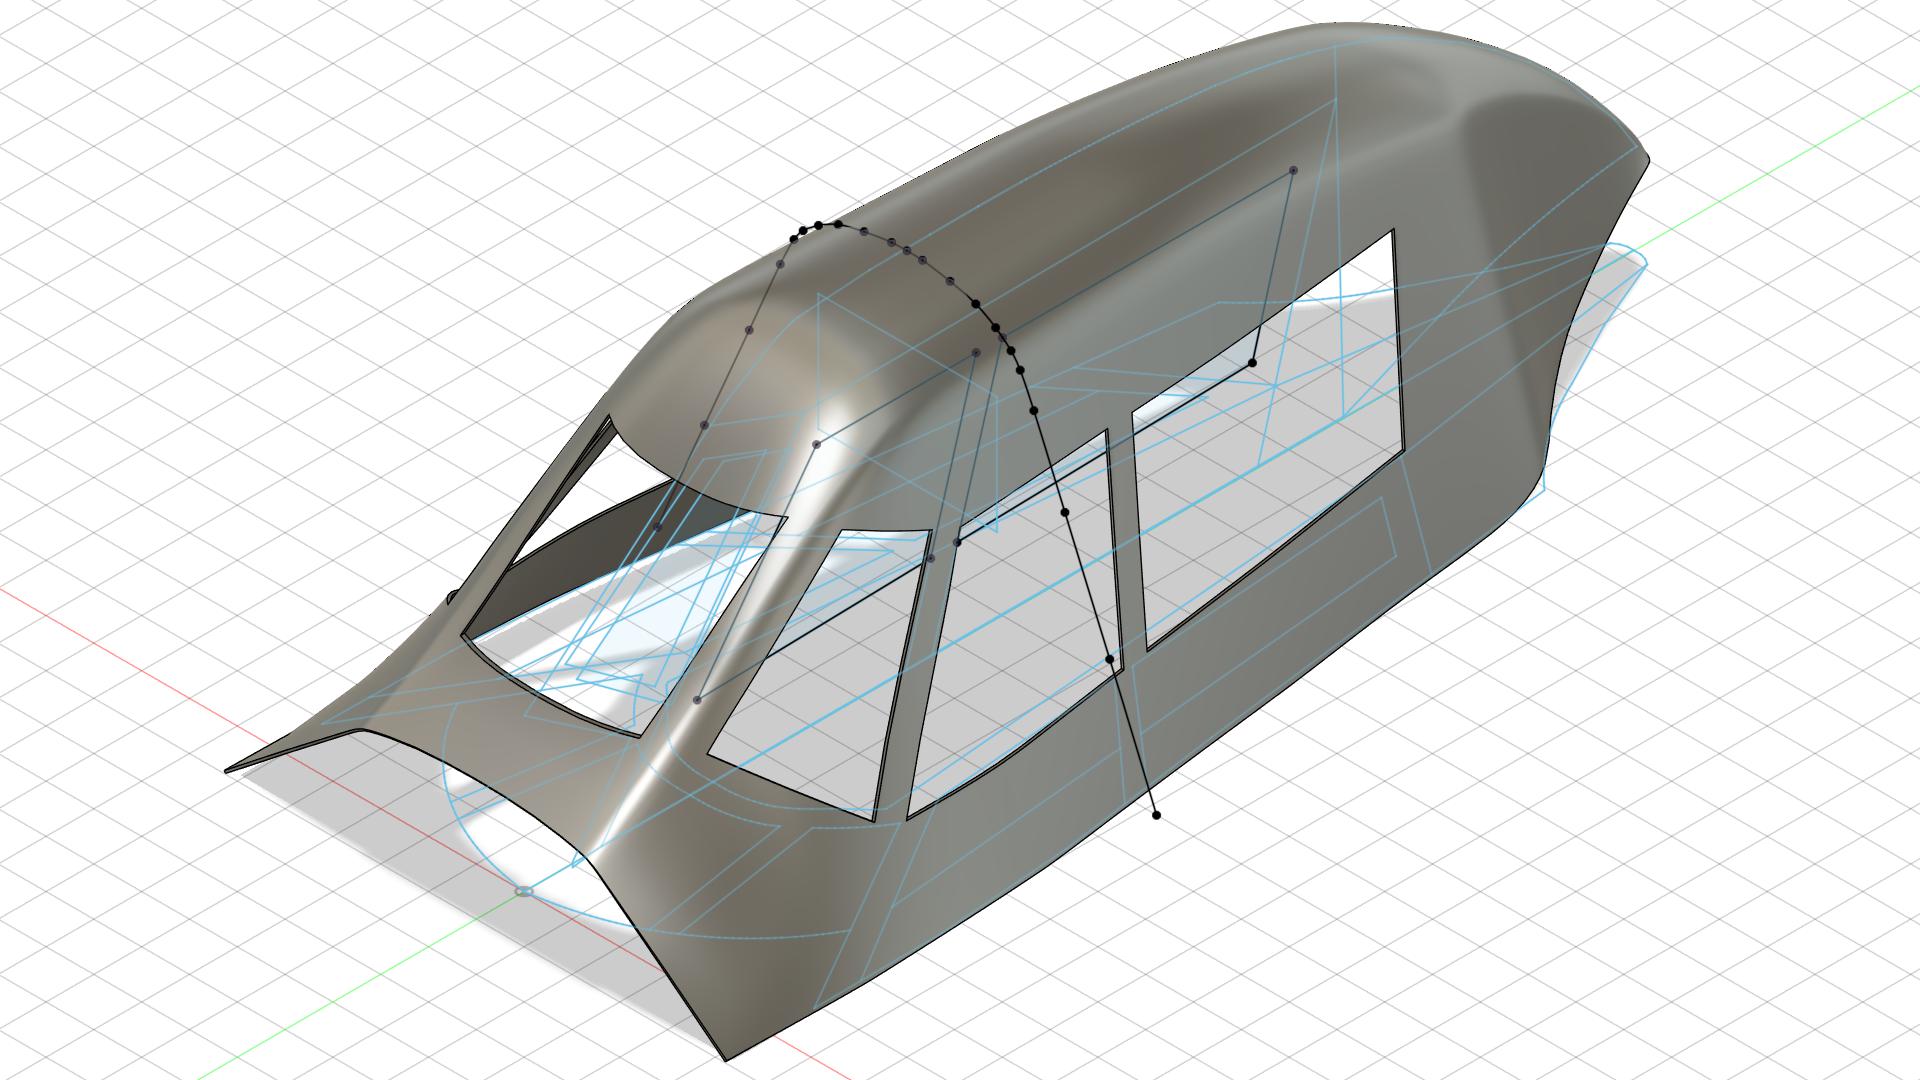
Now for a 3D model of the cockpit canopy. Starting with my A-26 fuselage 2D plan and the 2D templates for fuselage formers F2 through F5, I imported the DXF files into Fusion 360 and built sketches to set up the profiles for each of the formers. Using the former “profiles” and a couple “rails”, I “lofted” a 3D fuselage body section between formers F3-F4 and then cut that fuselage body section so I would end up only having the section of the cockpit canopy as shown in the image below. This will be 3D printed using transparent CR-PETG filament and glued to the top of the balsa/ply fuselage between formers F3 & F4.
There are two parts of the wing which can be made using 3D models; the standard wing tip, and an optional A-26K wing tip tank. Using my 2D Wing Plan, I extracted the profiles for the two types of wing tips, and the profile of wing rib R10, and then imported them as DXF files into Fusion 360. For the standard wing tip, I used the “mesh” design approach to develop the 3D model. And for the optional wing tip tank I first “extruded” the R10 profile, “rotated” the tip tank profile around its centerline, and then joined the two together into a single body for the tip tank 3D model. Each of the wing tip models are shown below, and I exported the STL file for use later in my A-26 RC model scratch build.
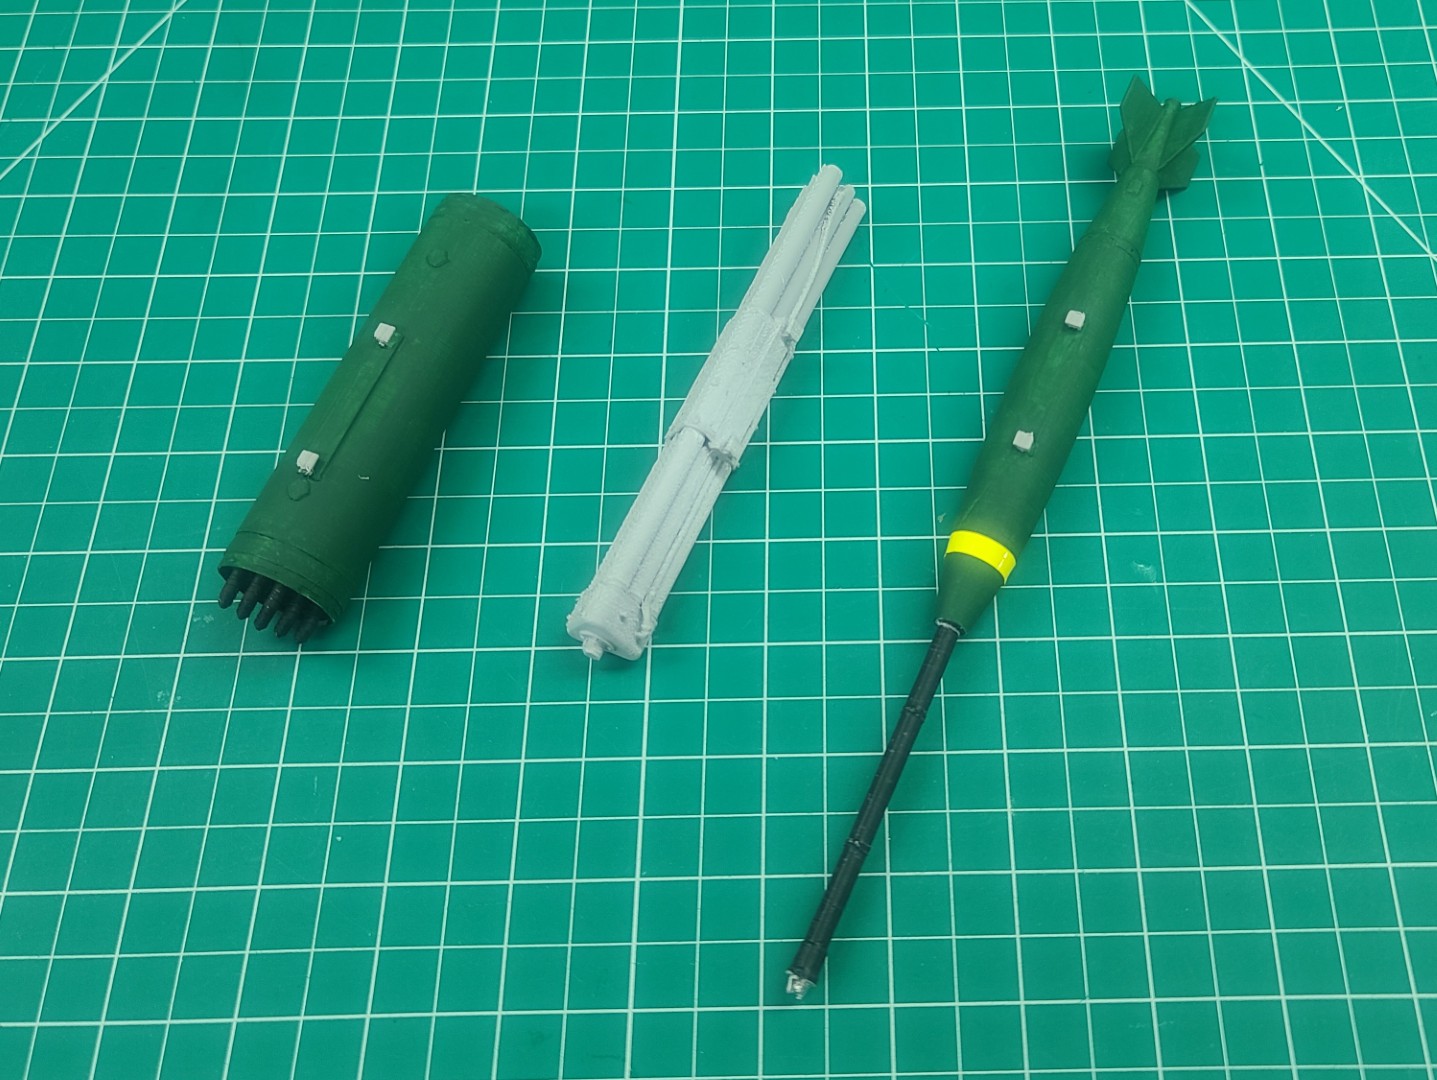
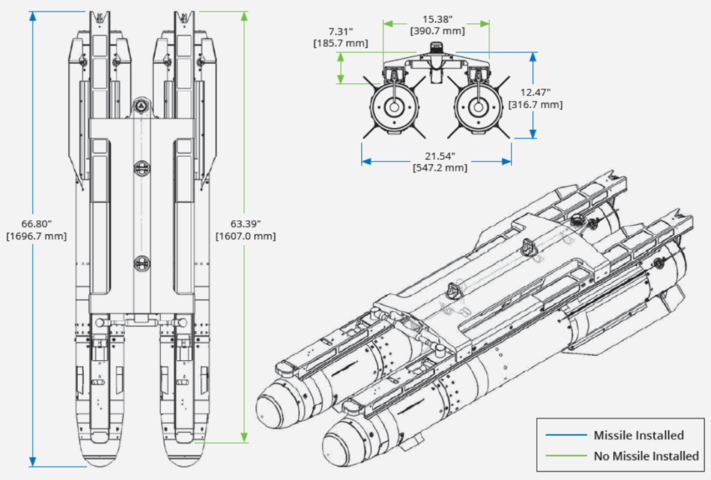
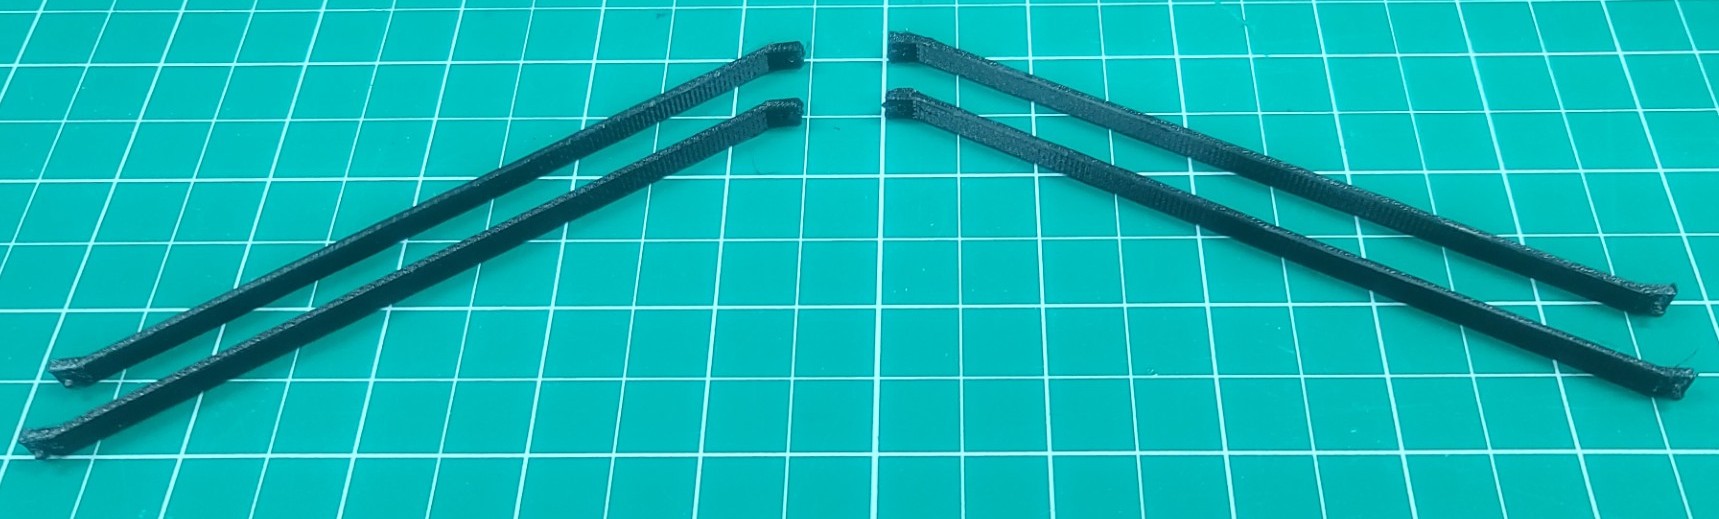
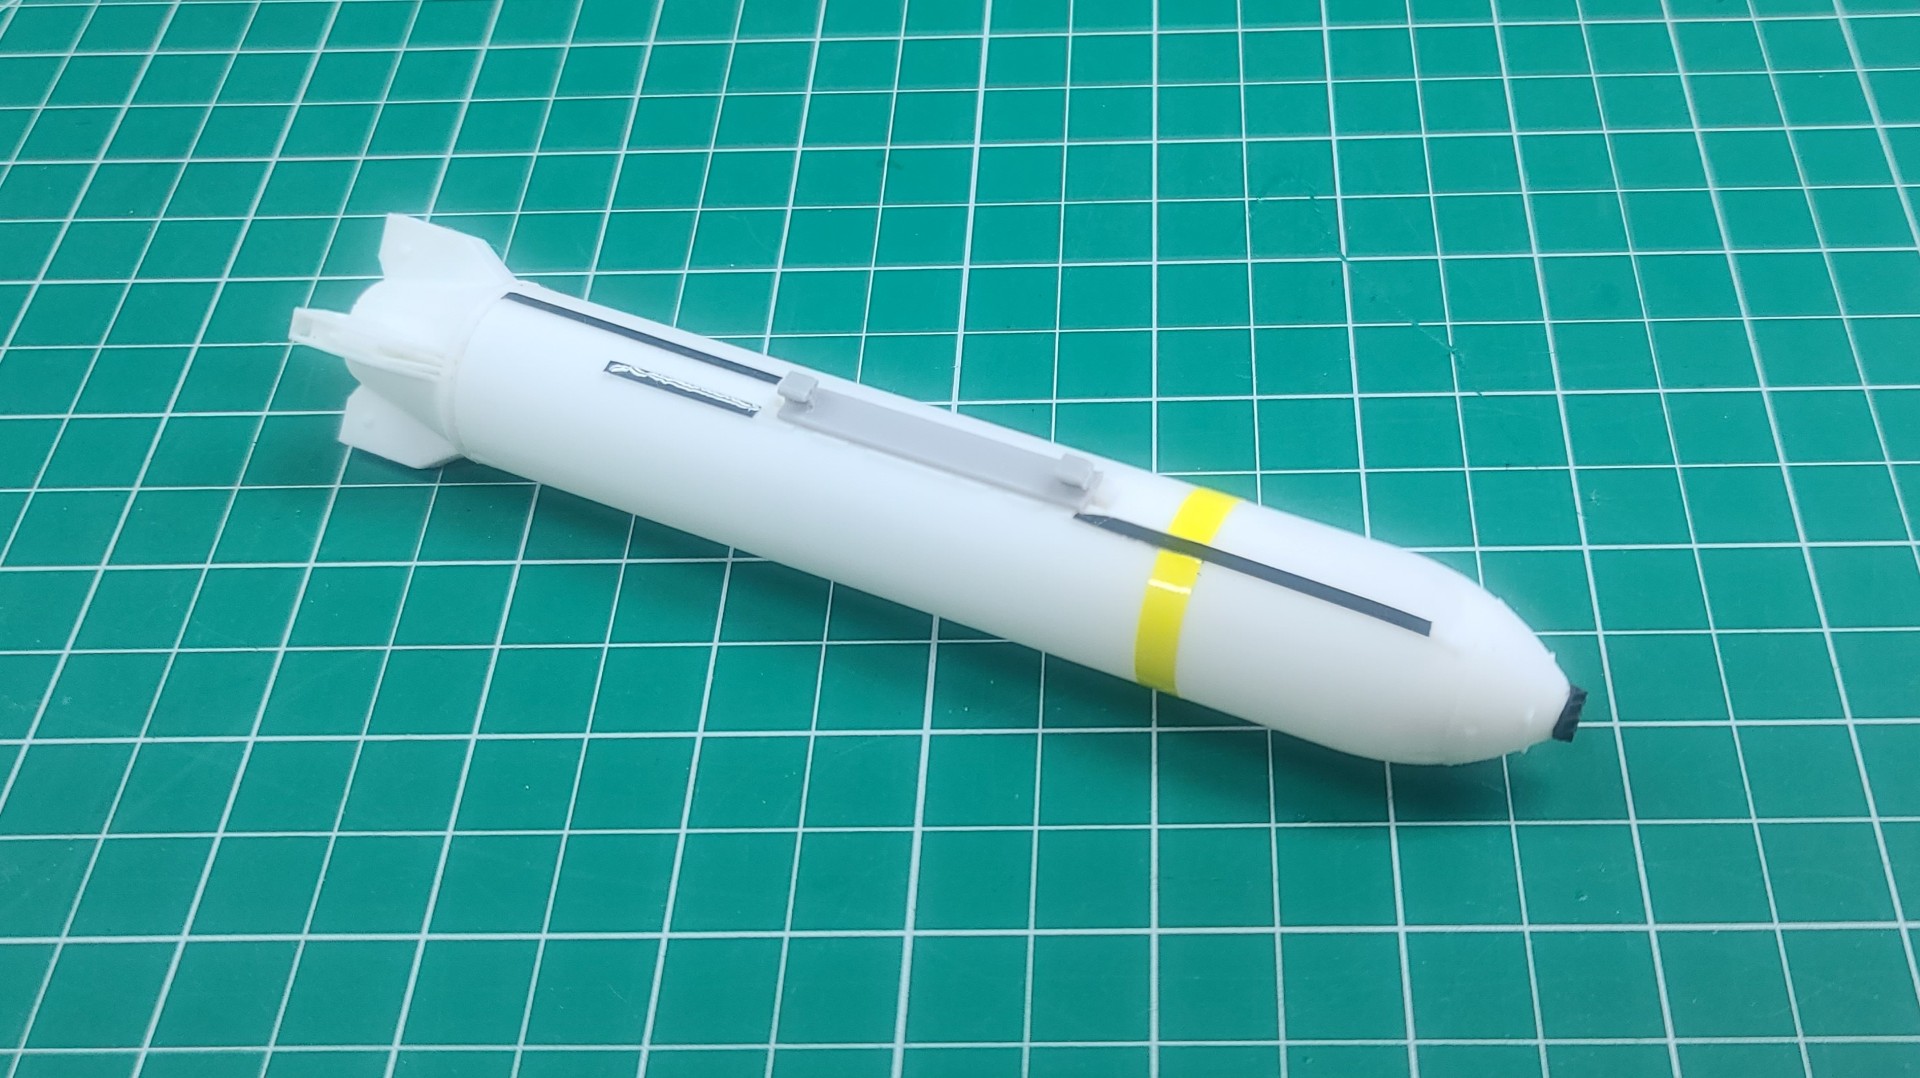
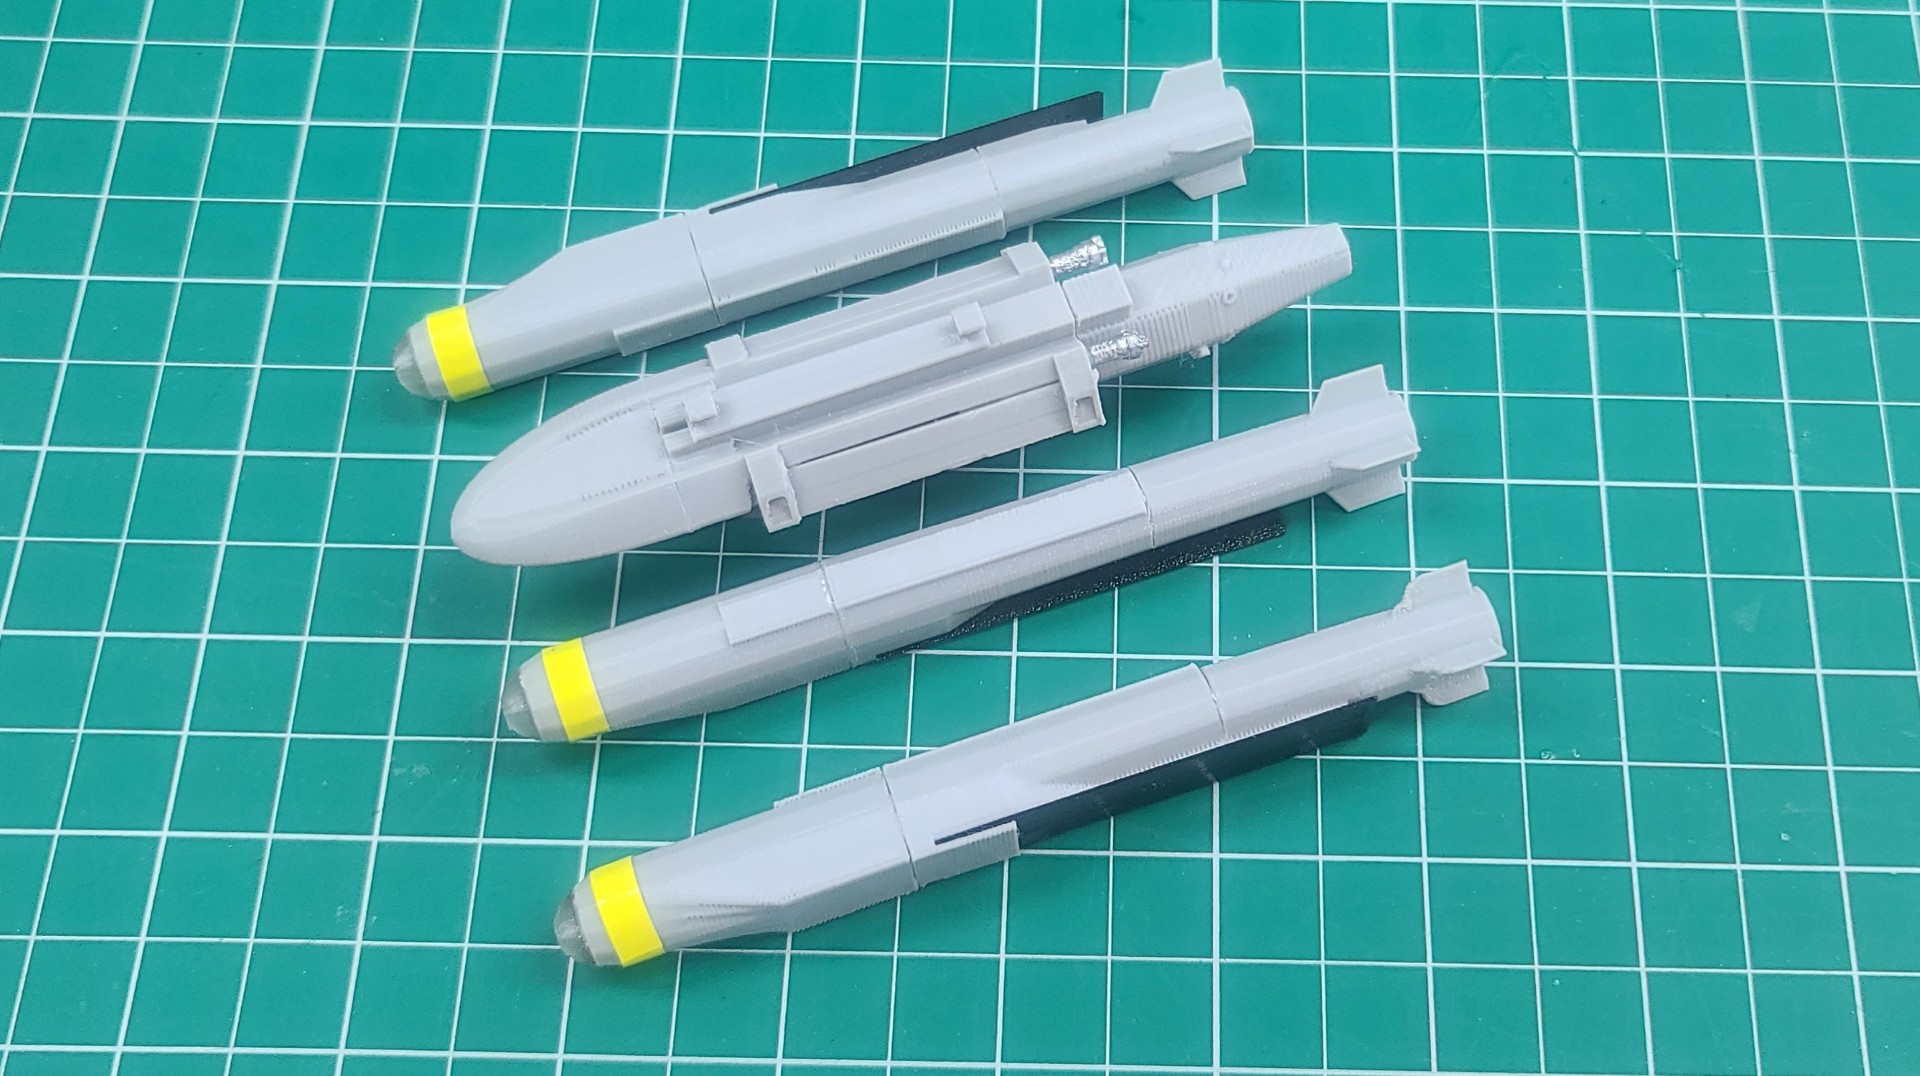
As shown in the image below, there were several types of weapons carried under the wings of the A-26 during its service in Vietnam and other conflicts. I was fortunate to find 3D models for each of the weapons in this image. Starting with the inboard wing station just outside of the engine nacelle is a BLU-27 Napalm Incendiary Bomb. The next station outward has a MK82 500lb Bomb with MAU-93 slick tail & M1A1 "Daisy Cutter" fuse extender/M904 fuse. The third station holds a SUU-14/A Bomblets Dispenser, and the final outboard station has a LAU-3 19-Round Rocket Launcher.
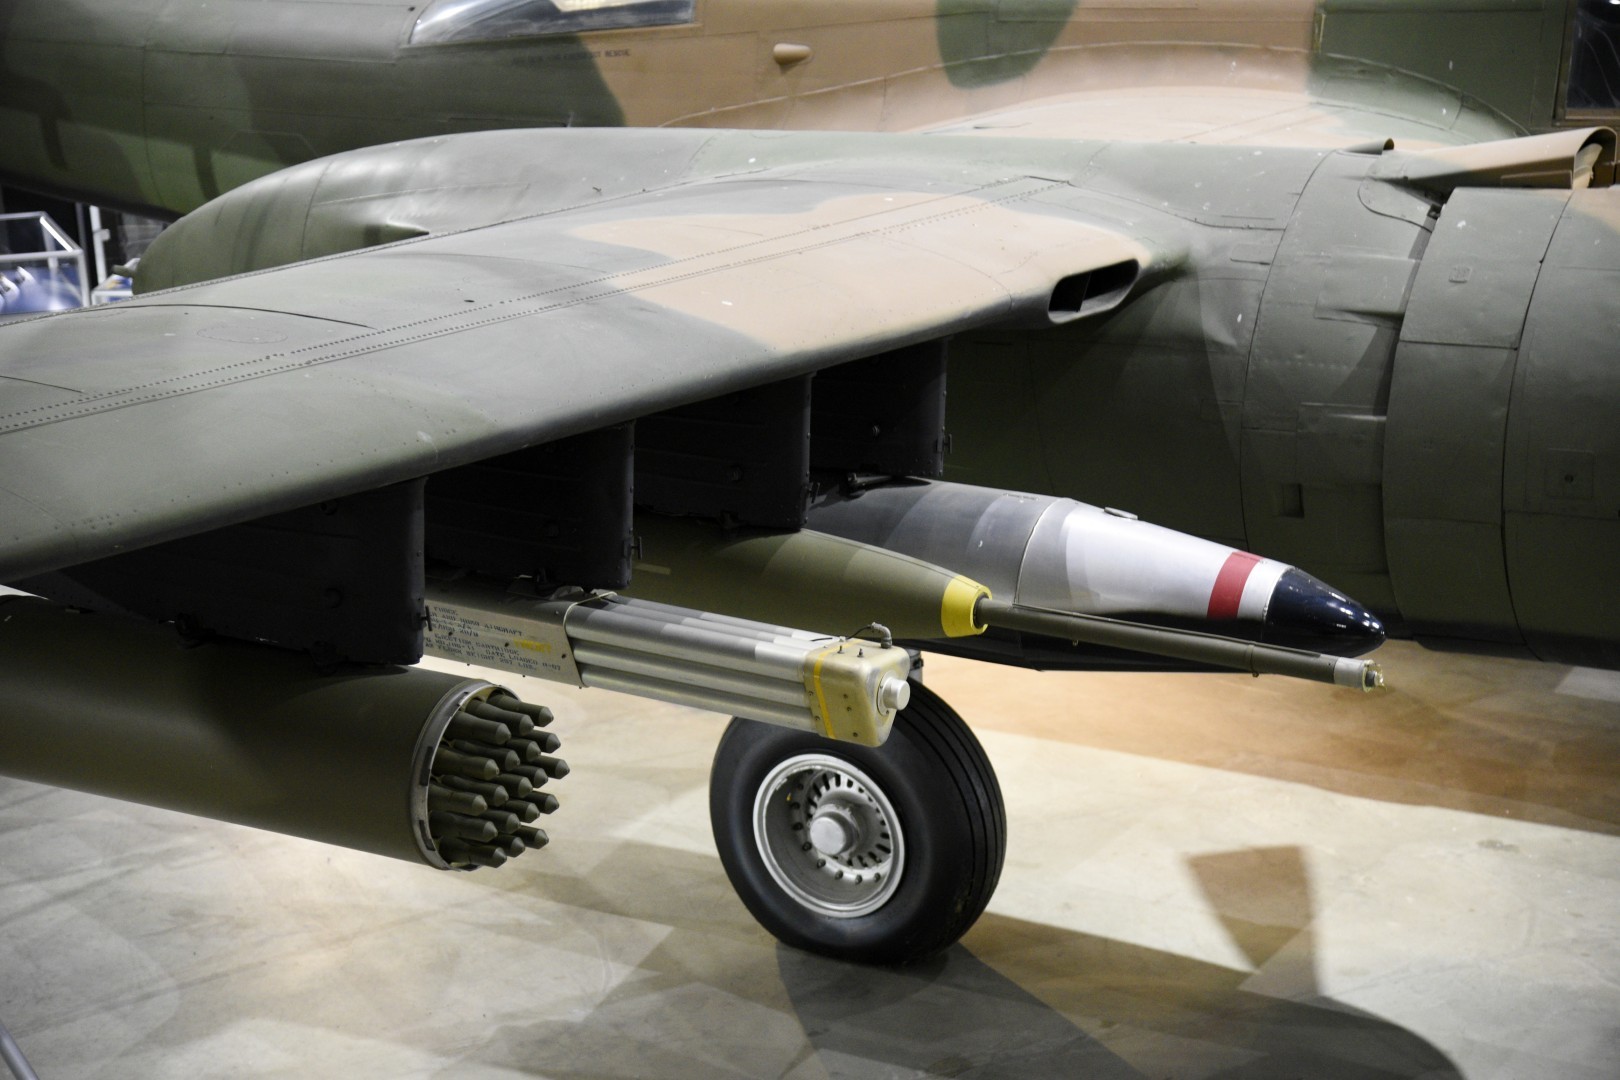
Using these four 3D models, I rescaled each to match my 1/15th scale A-26 Invader RC model, and then imported them into Fusion 360 to modify the mounting lugs so they could be mounted to the weapon stations pylons using the same rail system I used on my OA-1K. Then each weapon model was imported into Creality Print where I setup the print files using Gray Creality Hyper-PETG with a 0.4mm nozzle and 0.2mm layer height.
Given my A-26 will only have three weapon stations on each wing, I decided to not print the BLU-27 Napalm Incendiary Bomb. The next image below shows the other three weapon models I discussed above. After 3D printing a pair of each, I painted them and added yellow tape to match the configuration of actual USAF “live” weapons. These should fit the bill very well I think.
Stay tuned for more to come!!!
A-26 Invader Build Description.
See All Images Taken During my A-26 Invader Scratch Build.
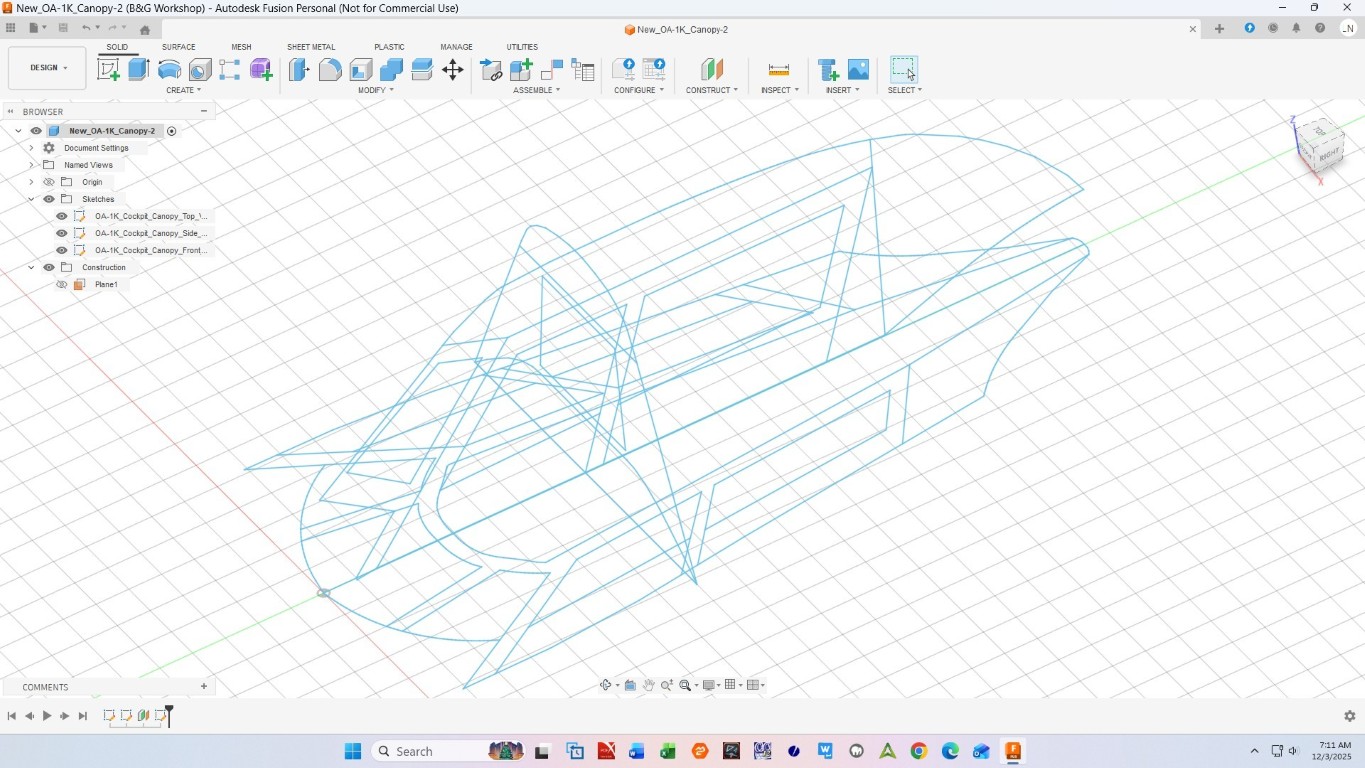
OA-1K Skyraider II 3D Modeling Efforts
In all my 37+ years of building Balsa RC Models, I had never entertained the idea of using 3D Modeling & Printing to build some of the parts for my RC scratch builds. Well, all that changed when I decided to scratch build the OA-1K Skyraider II.
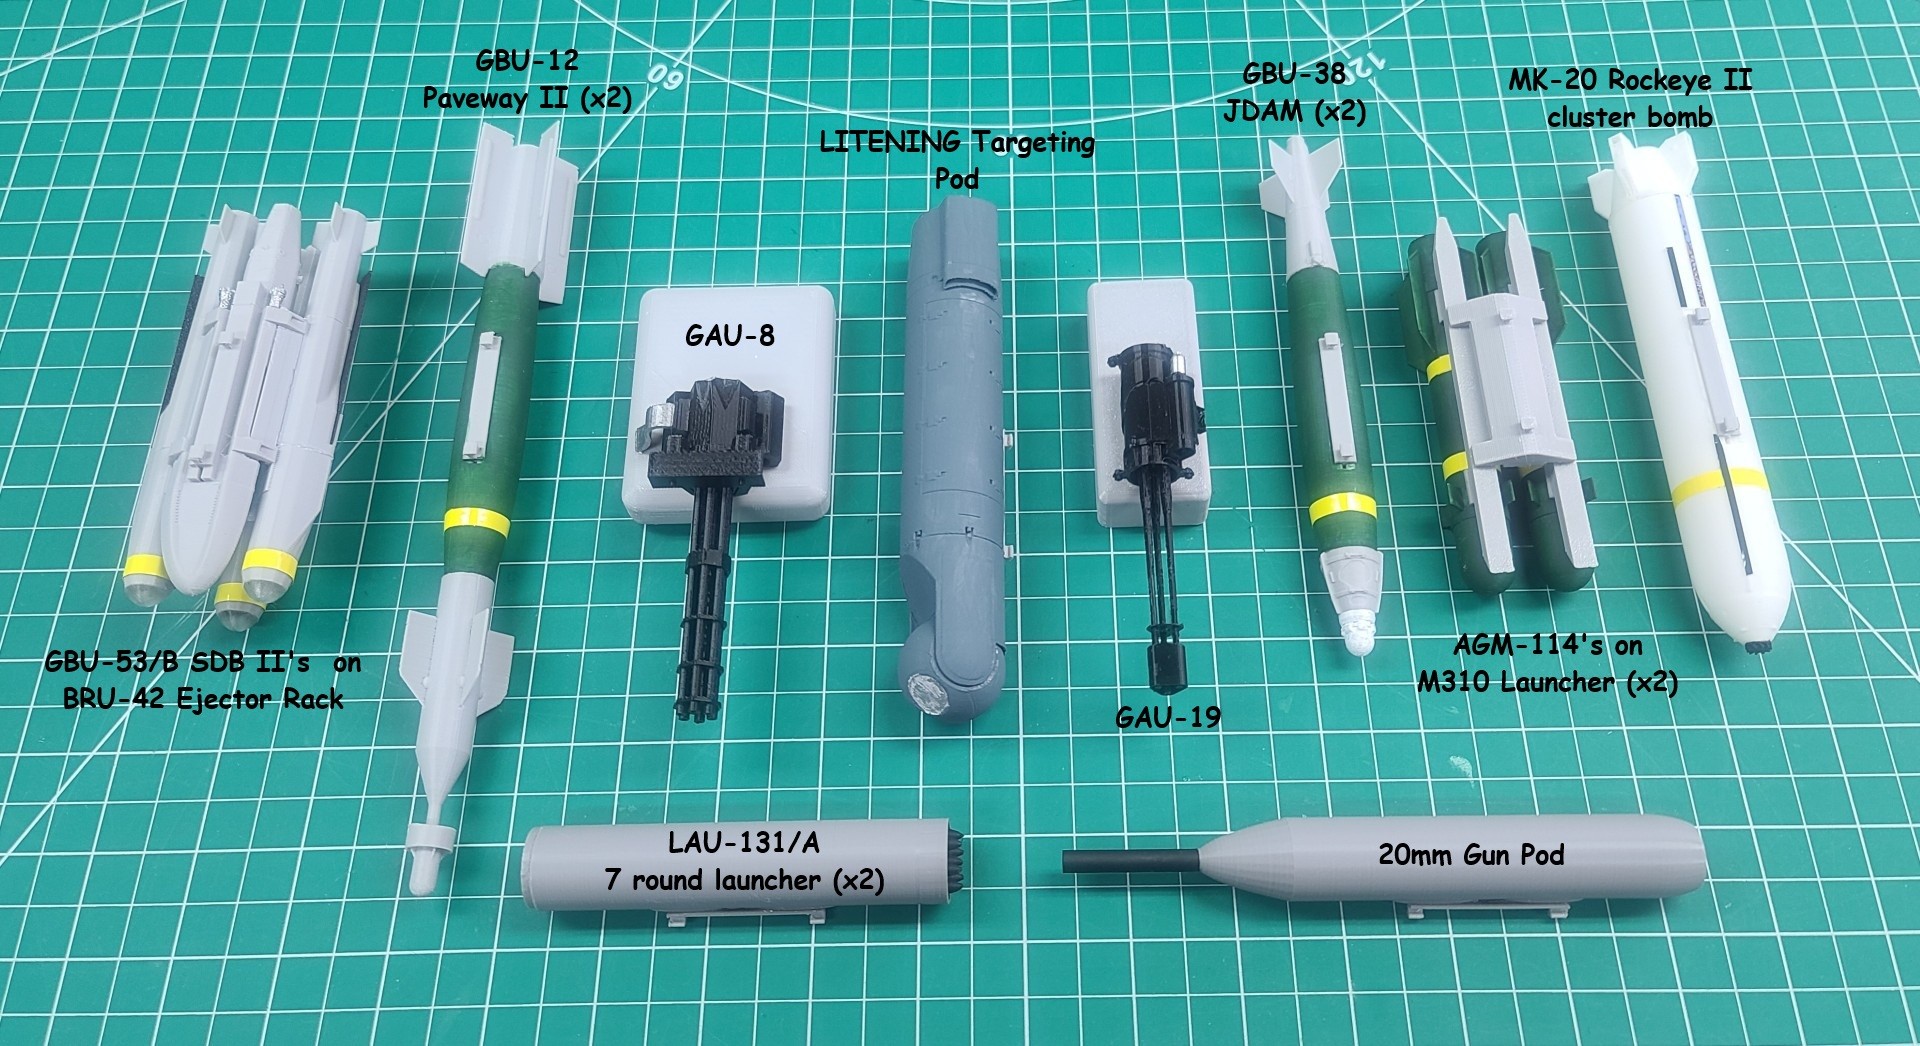
Given that my OA-1K scratch build would require a wide selection of ordnance and a targeting pod hanging below it's wing, this presented a new problem as to just how I would build those. So, I started looking for some ordnance models to purchase, which rapidly introduced me to all the stuff available using 3D Modeling & Printing. The more I searched the web for related information the more I realized that I needed to learn how to build 3D models and generate the files I would need for 3D printing.
To do this I first needed to learn how to use a 3D CAD program that would produce the “STL” (stereolithography) file required for 3D printing. So, I was off again learning yet another new computer program and jumping feet first into the world of 3D modeling.
As you can see from the images below, I have spent many hours learning how to build 3D models and learning how to use a very nice Creality Ender-3 V3 3D printer to produce the various 3D printed parts I needed for my OA-1K Skyraider II scratch build. To learn more about what all I have learned, and produced, please take a few minutes to page down through my "OA-1K Skyraider II 3D Modeling Efforts" document.
OA-1K Skyraider II 3D Modeling Efforts.
OA-1K Skyraider II Build Description.
See All Images Taken During my OA-1K Skyraider II Scratch Build.
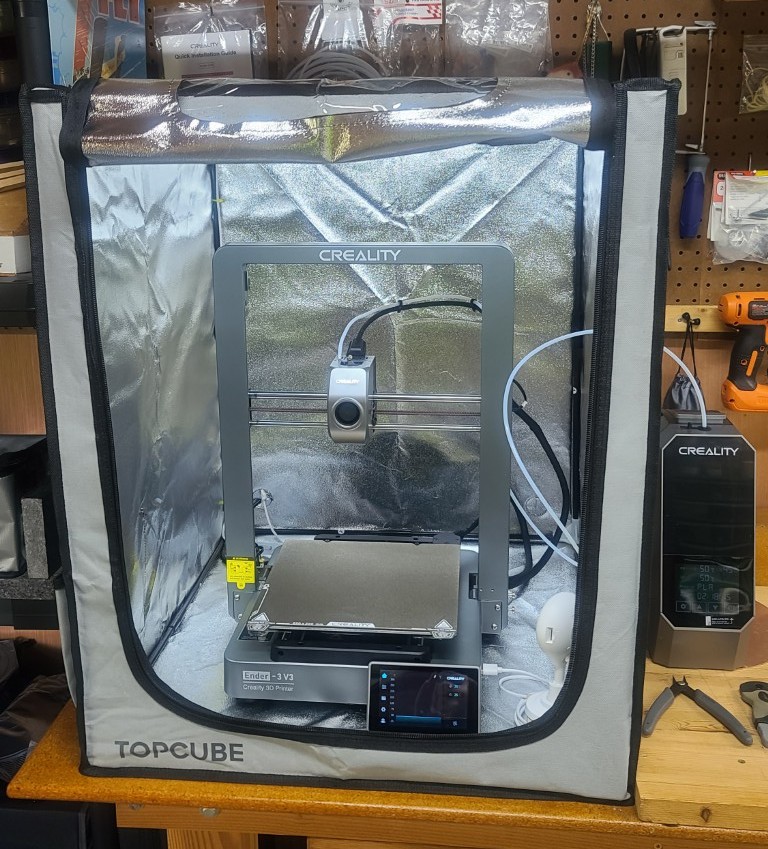
First 3D Models off My Ender-3 V3 Printer
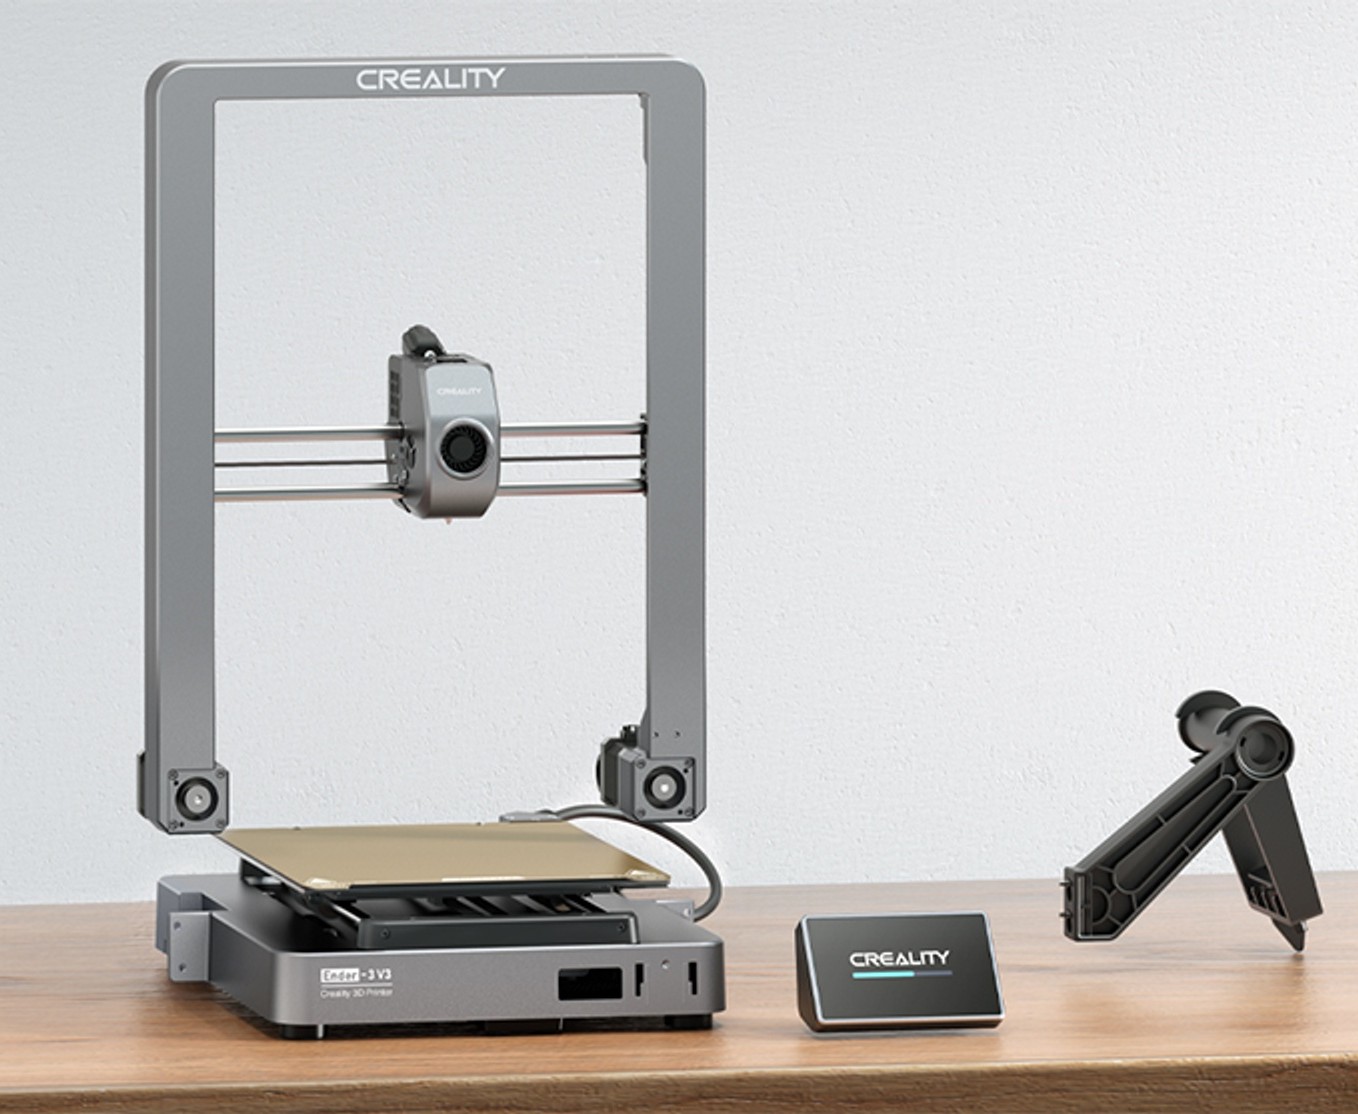
Setting up the Creality Ender-3 V3 printer was straight forward, simple, and clearly explained in their instructions. The Ender-3 V3 comes in highly pre-assembled modules. Even a first-time 3D printer user like me can put it together within 10 minutes. What is really nice is the one touch auto-calibration feature. I would recommend putting some thread lock on the machine screws that connect the gantry to the base.
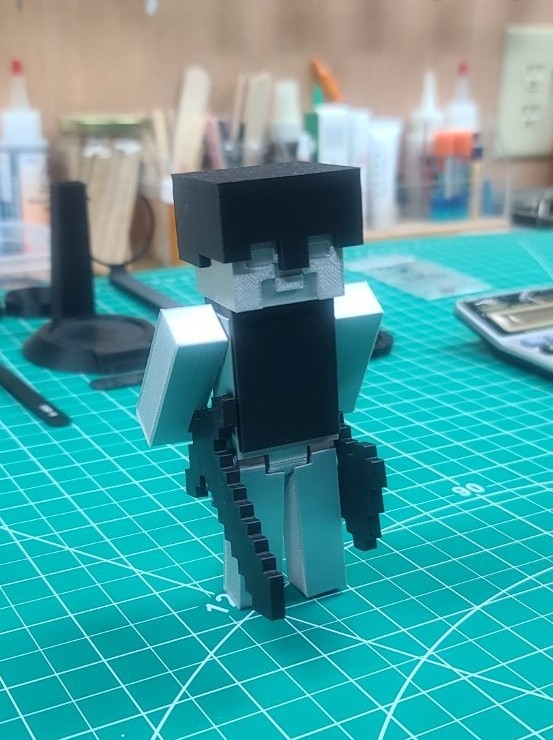
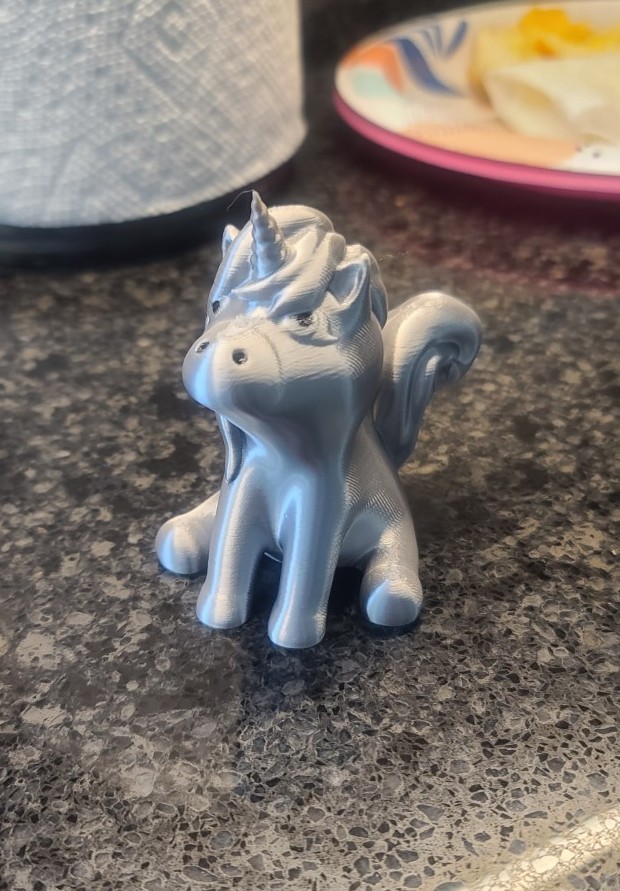
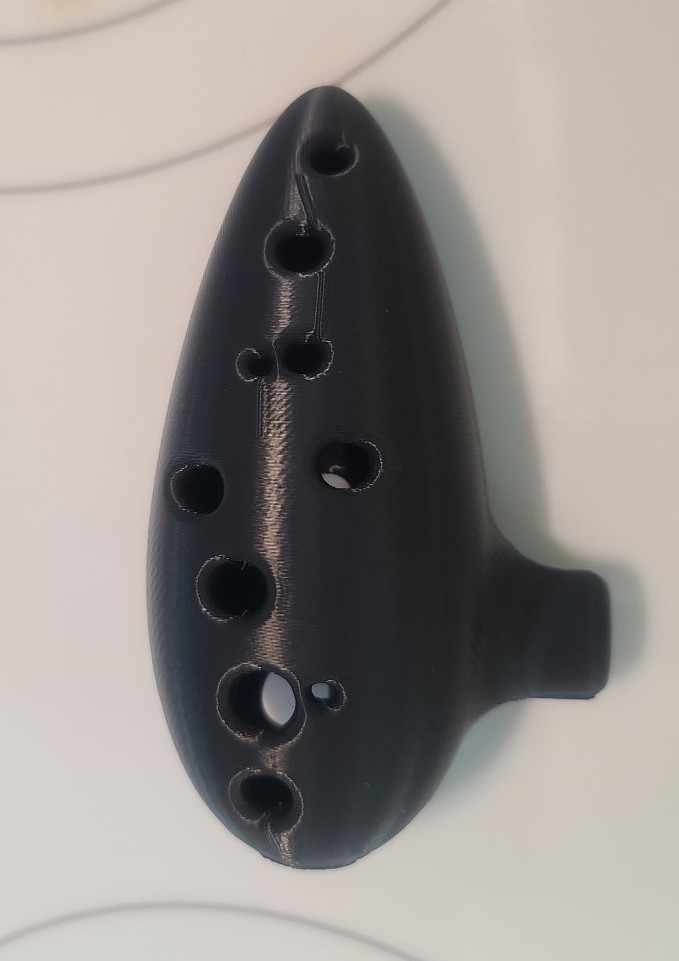
To try out my new printer I searched the web to find a couple models I could make for my grandchildren August and Everly, and their father (my youngest son) Ryan. For Gus I found Minecraft Steve by LinkMertens on Thingiverse, for Everly I found a Cute Unicorn by Hannah Bauer on Printables, and for Ryan I found a Musical 12 Hole Ocarina-flute on Thingiverse.
I took each of the 3D model STL files, ran them thru Creality Print 6.2, and the three images below show you the first 3D models off my new 3D printer. Gus and Everly are now looking forward to finding other models I can print for them, and Ryan needs to learn how to play the Ocarina. The Ocarina (otherwise known as a potato flute) is a wind musical instrument; it is a type of vessel flute. Variations exist, but a typical Ocarina is an enclosed space with four to twelve finger holes and a mouthpiece that projects from the body.
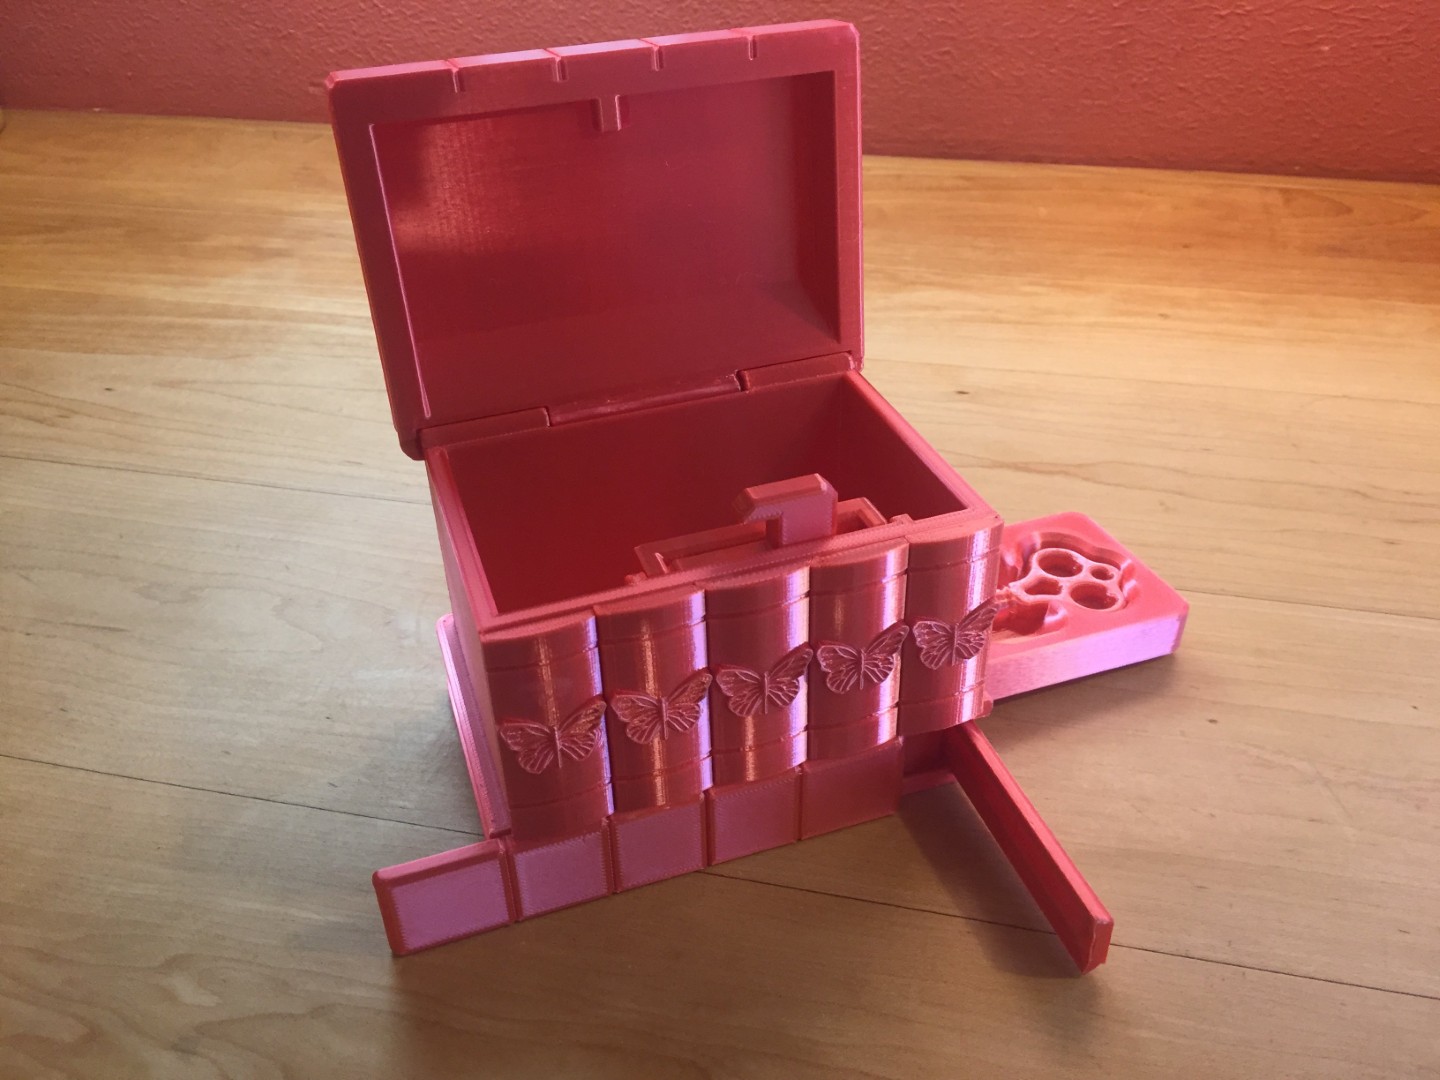
Secret Butterfly Box
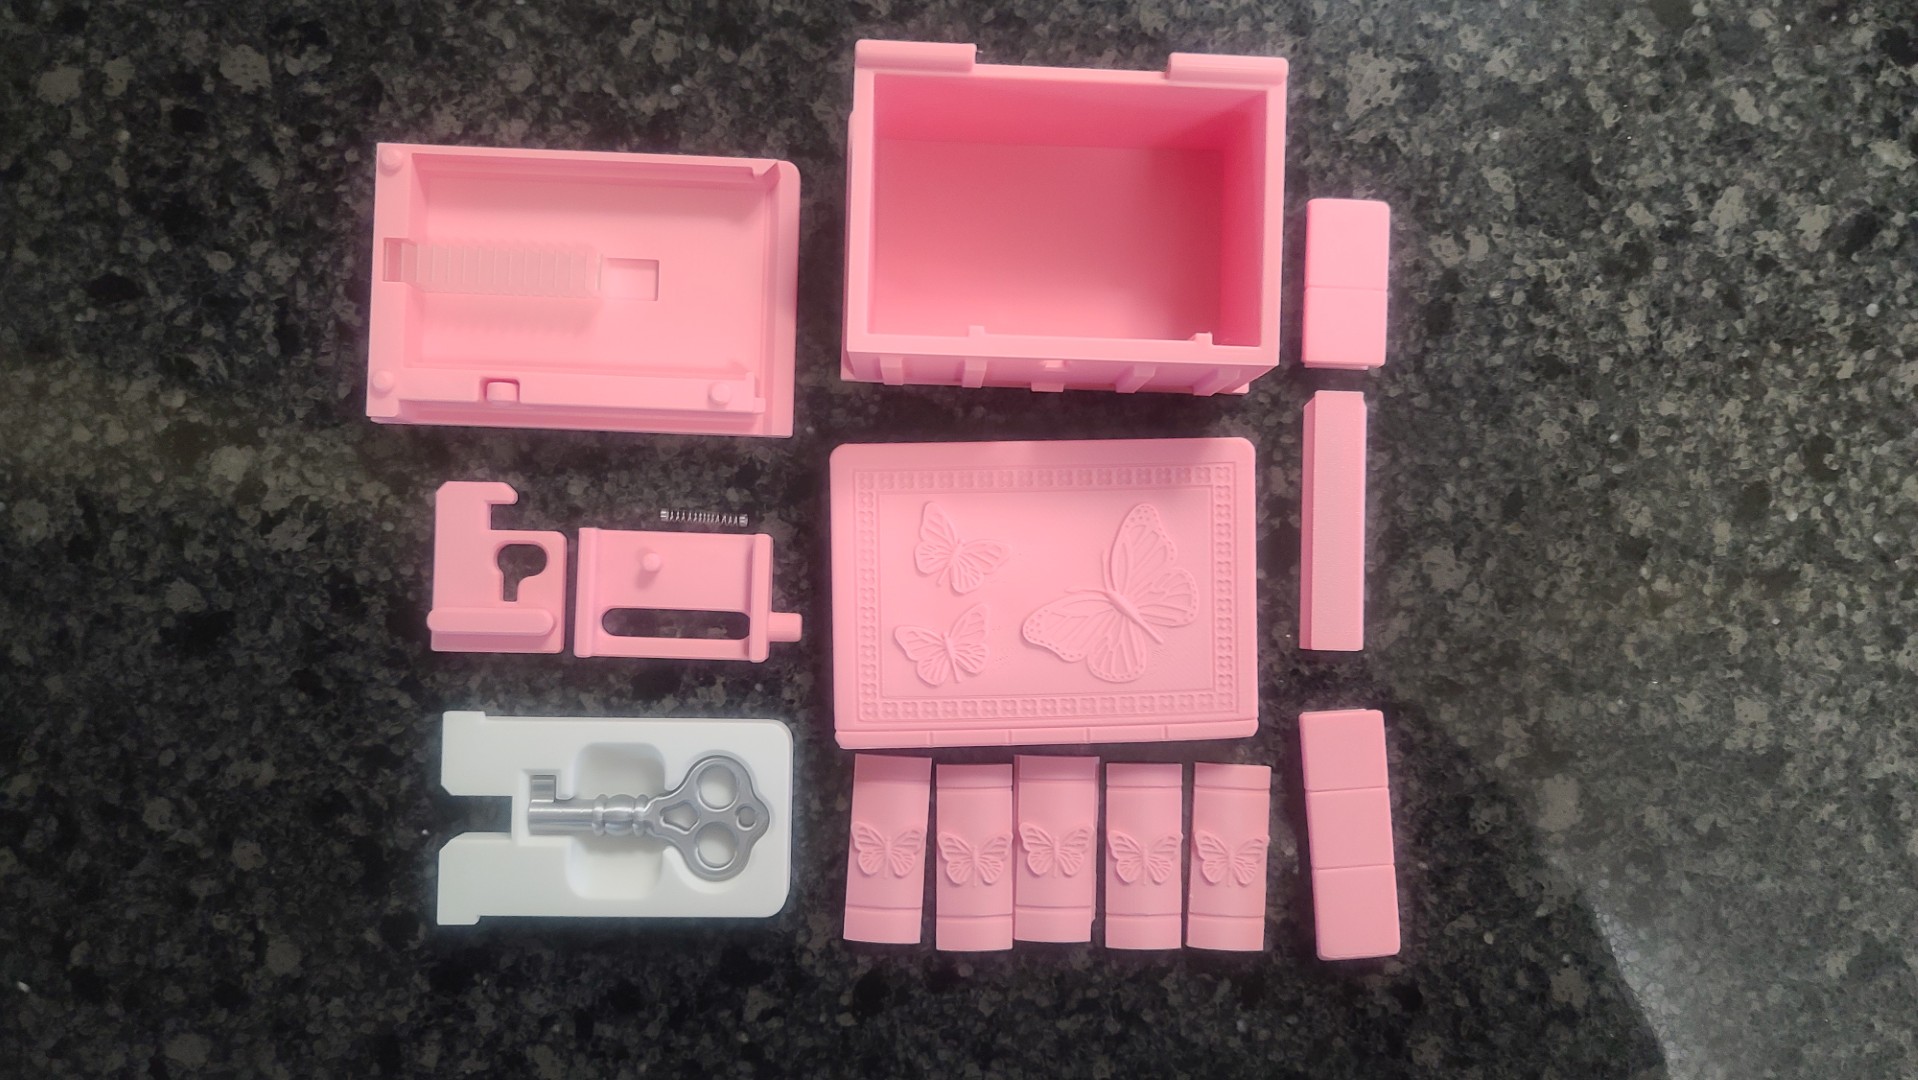
While I was busy printing out all the parts needed for the Dark Techno Isopodius Transport/Tank, Carolyn next found a very nice 3D model for our granddaughter Everly. As shown in the images below, for our second project we will work together to build a Secret Butterfly Box. This was designed by 3DPRINTINGWORLD and found on the web @: Thangs.com.
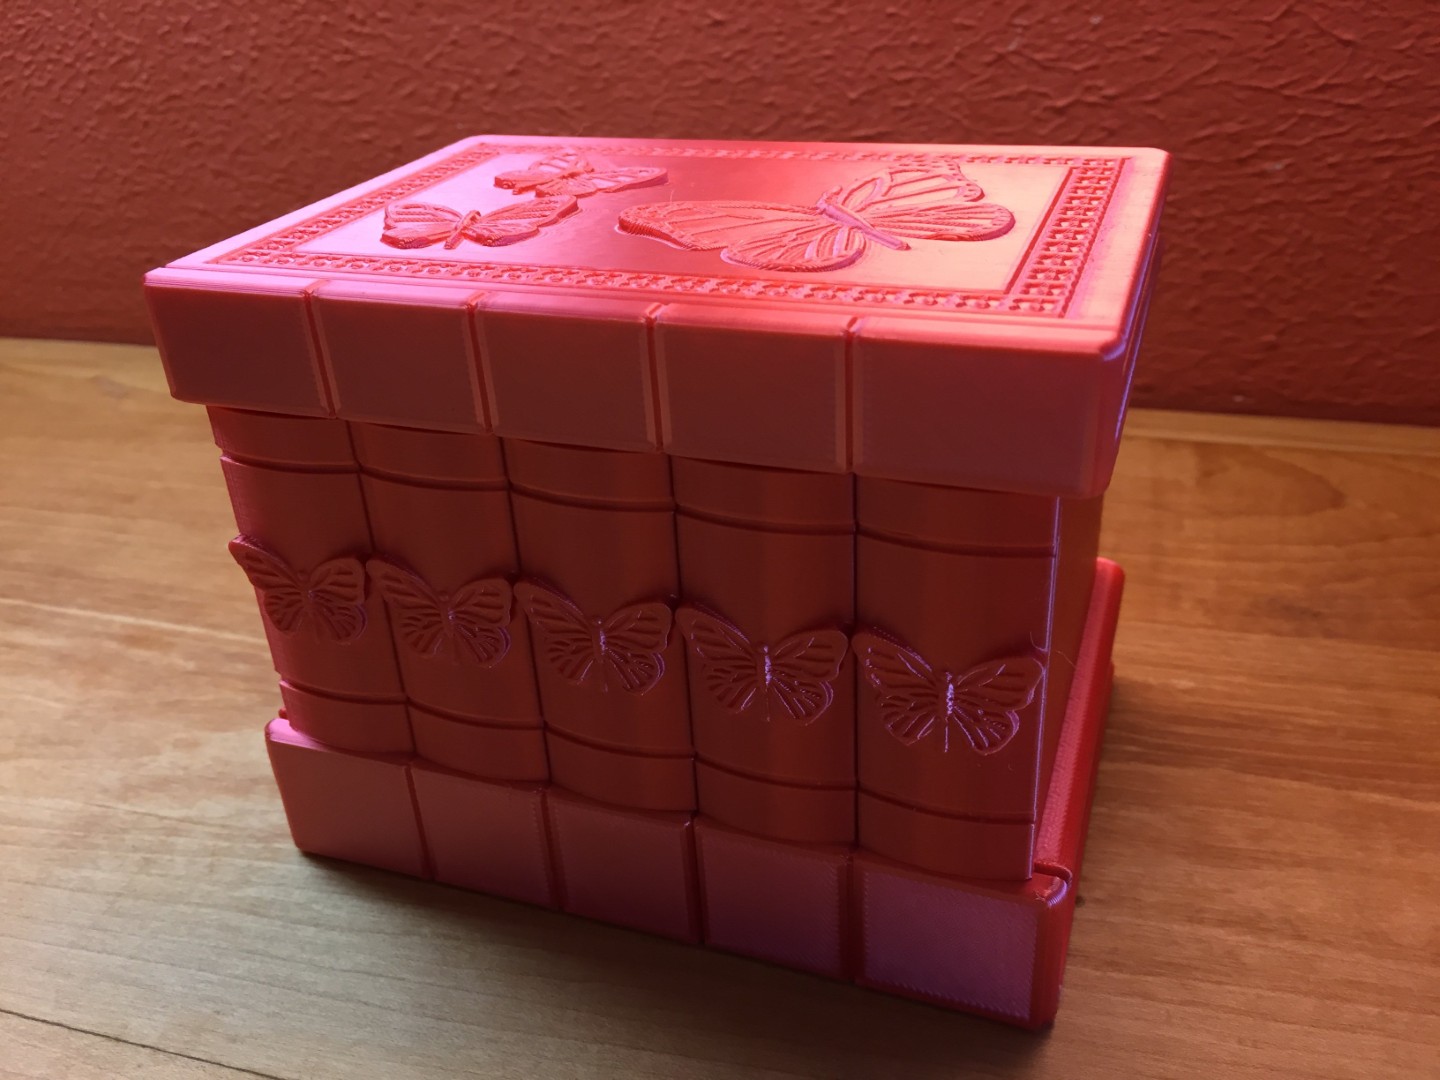
Source of Images: Thangs.com.
This is a remix of the Korean Secret Box. Its a secret puzzle box. There is a secret way of opening it... First you must find the hidden key... Then you must find the key hole...
According to the designer, once we have all the parts printed, we can view the Assembly Video containing the assembly instructions. Besides the printed parts we will need one piece of 1.75mm filament 5 inches long, a standard pen spring, and some super glue. There also is a How to Open Demonstration Video.
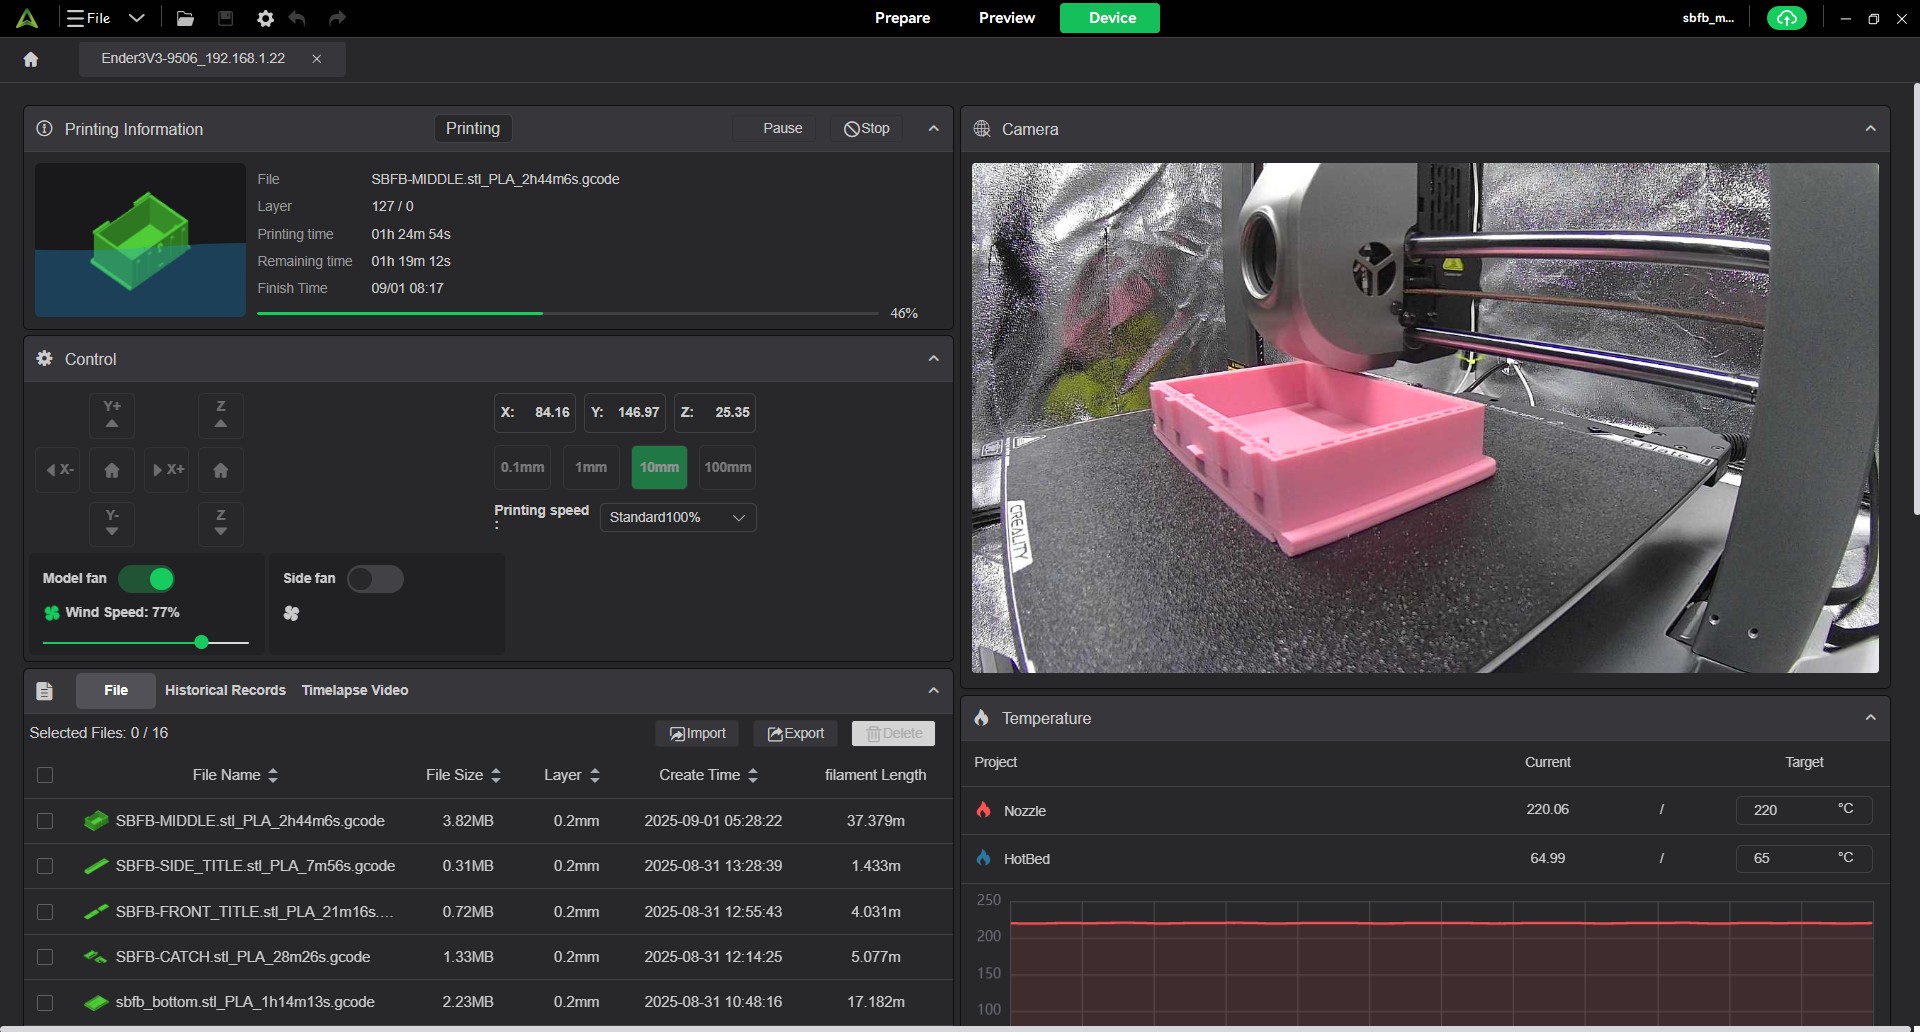
I started this project 3D printing the spring with Clear Creality Hype-PETG, and then the key with Giantarm Silk Metallic Silver PLA 3D printer filament, a 0.4mm printer nozzle, and my custom Creality Print 6.2 slicer settings for Silk PLA. Once those were finished I then printed the key tray using Creality White Hyper-PLA. All of the remaining 13 parts for the Secret Butterfly Box were printed with Pink ELEGOO PLA+ 3D printer filament using a 0.4mm nozzle.
The left image below is a screen shot from Creality Print of the print status for the box middle section. As you can see in the upper left of the image, this was taken at 1 hour 25 minutes into the print, with 1 hour 19 minutes remaining, or 46% complete. The right image shows the results of all the 3D printing. Now to review the Assembly Video and put this project together.

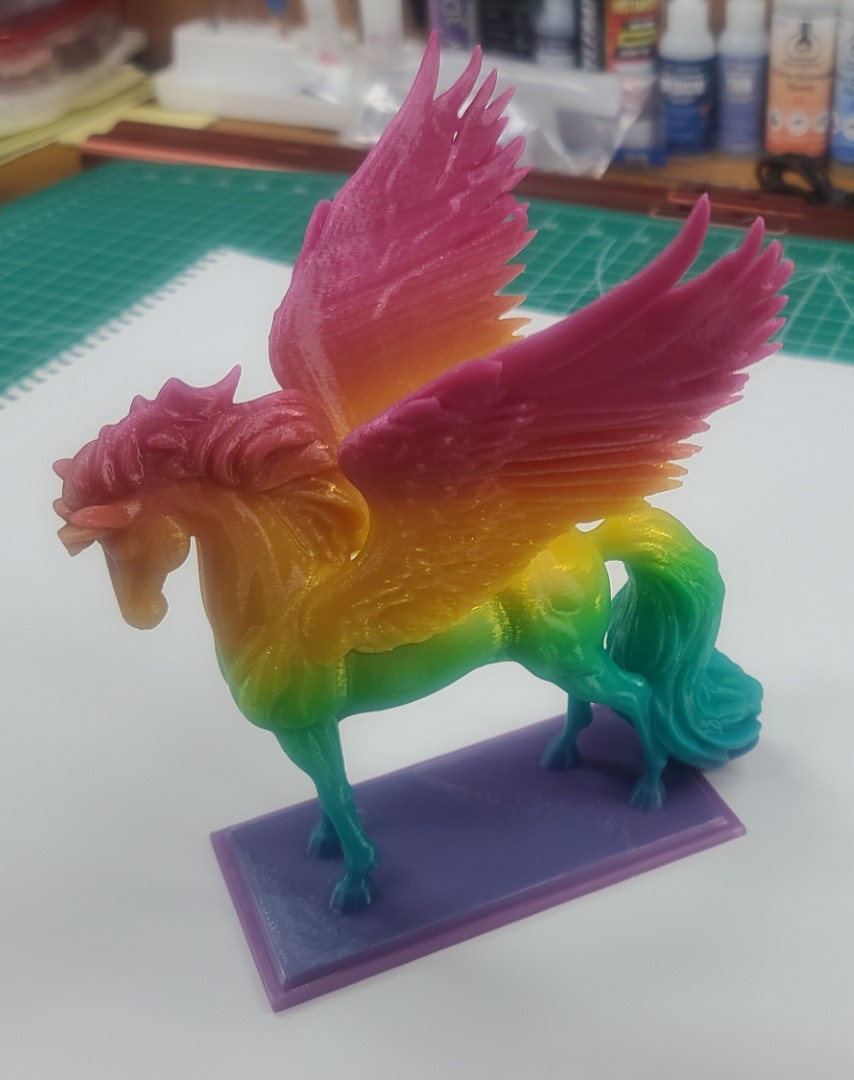
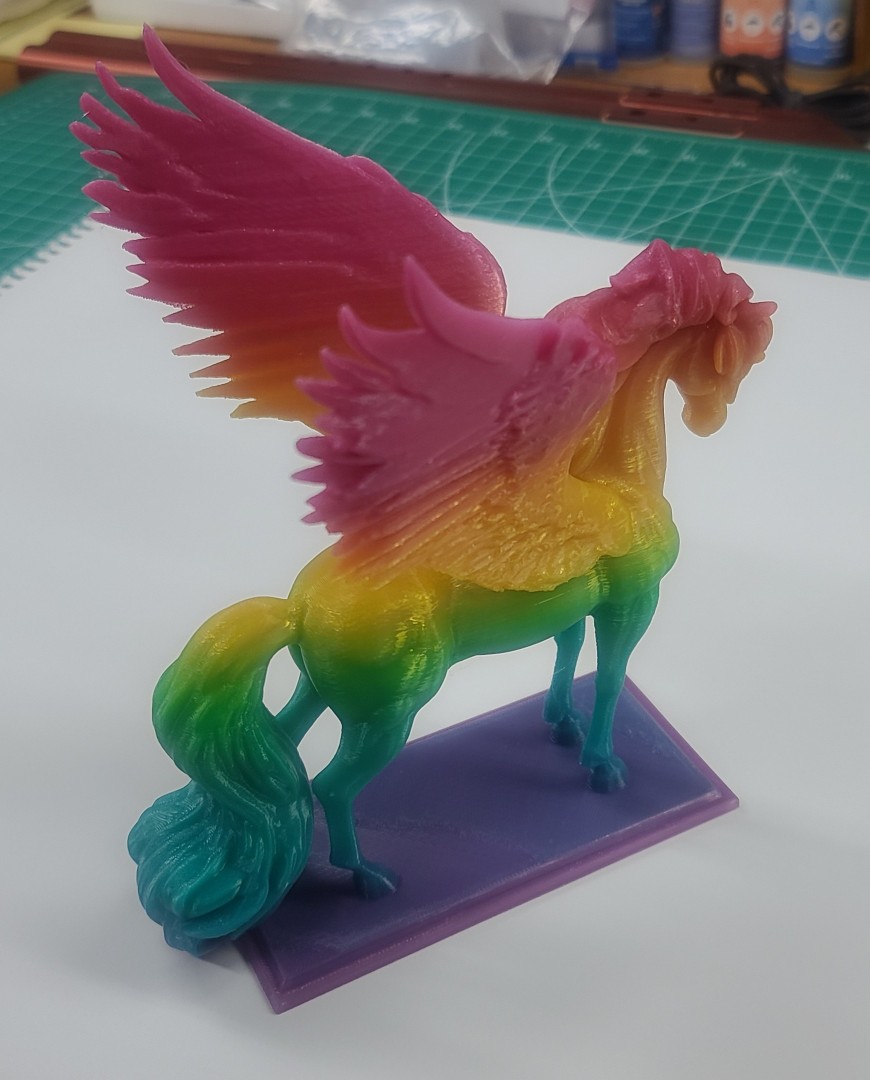
Majestic Pegasus Statue
During a recent web search I found a very nice 3D model for my granddaughter Everly. She loves horses, so when I stumbled on the Majestic Pegasus Statue on Makerworld.com, I just had to make this a new 3D project. The free model is from the “Triple G Workshop” and had many very nice comments, ratings, and images from other 3D modelers.
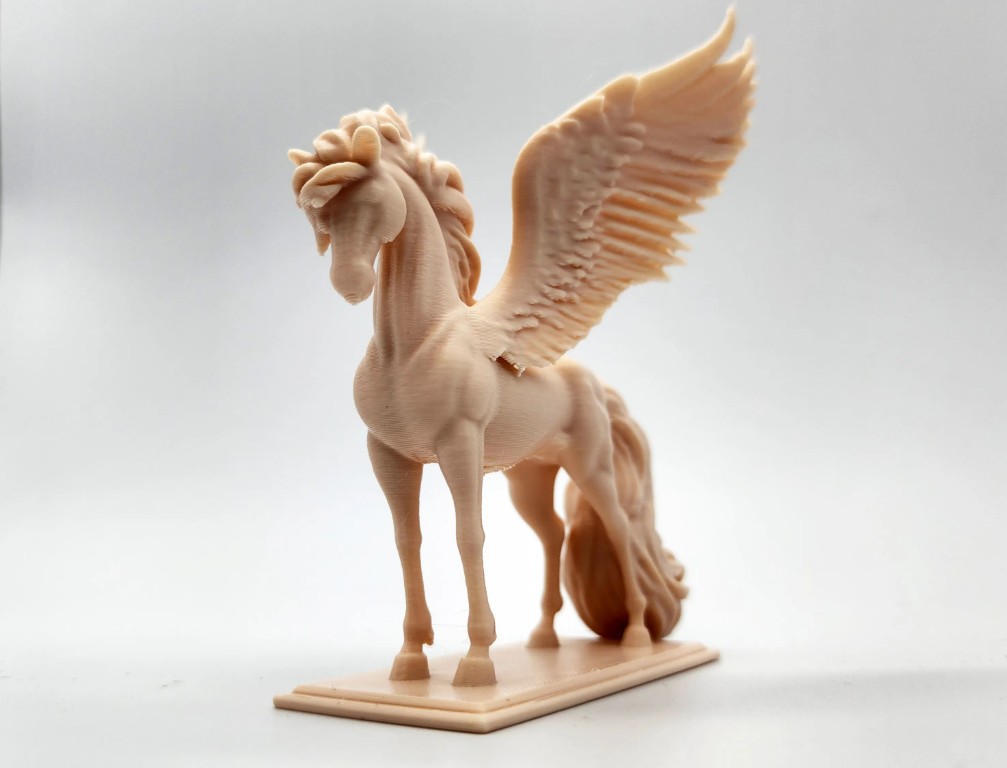
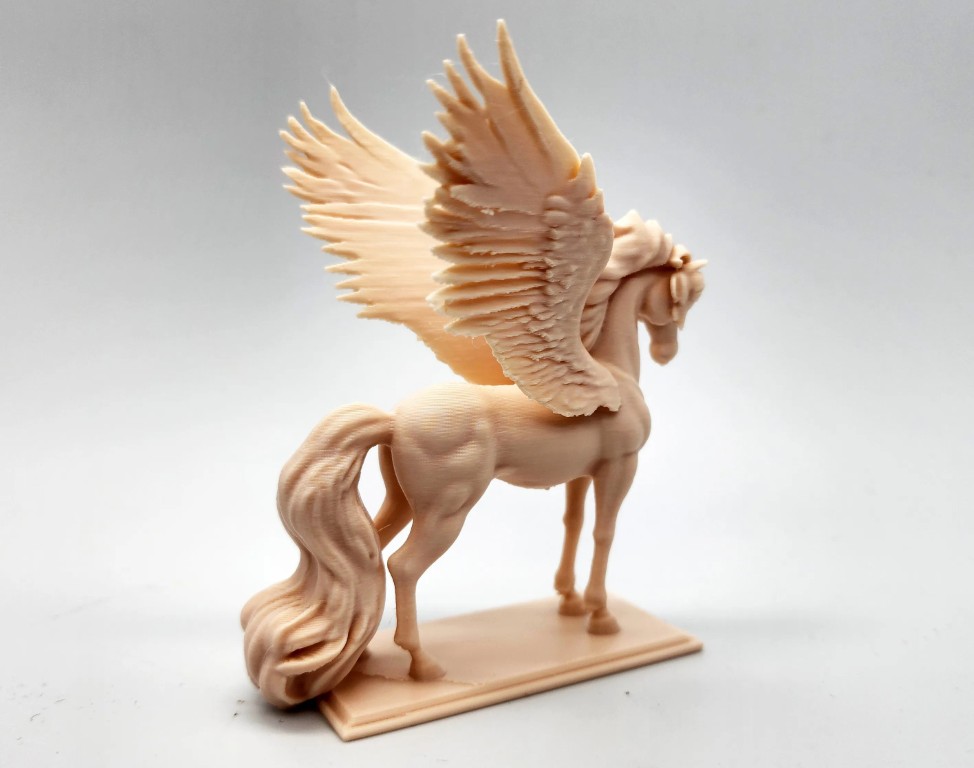
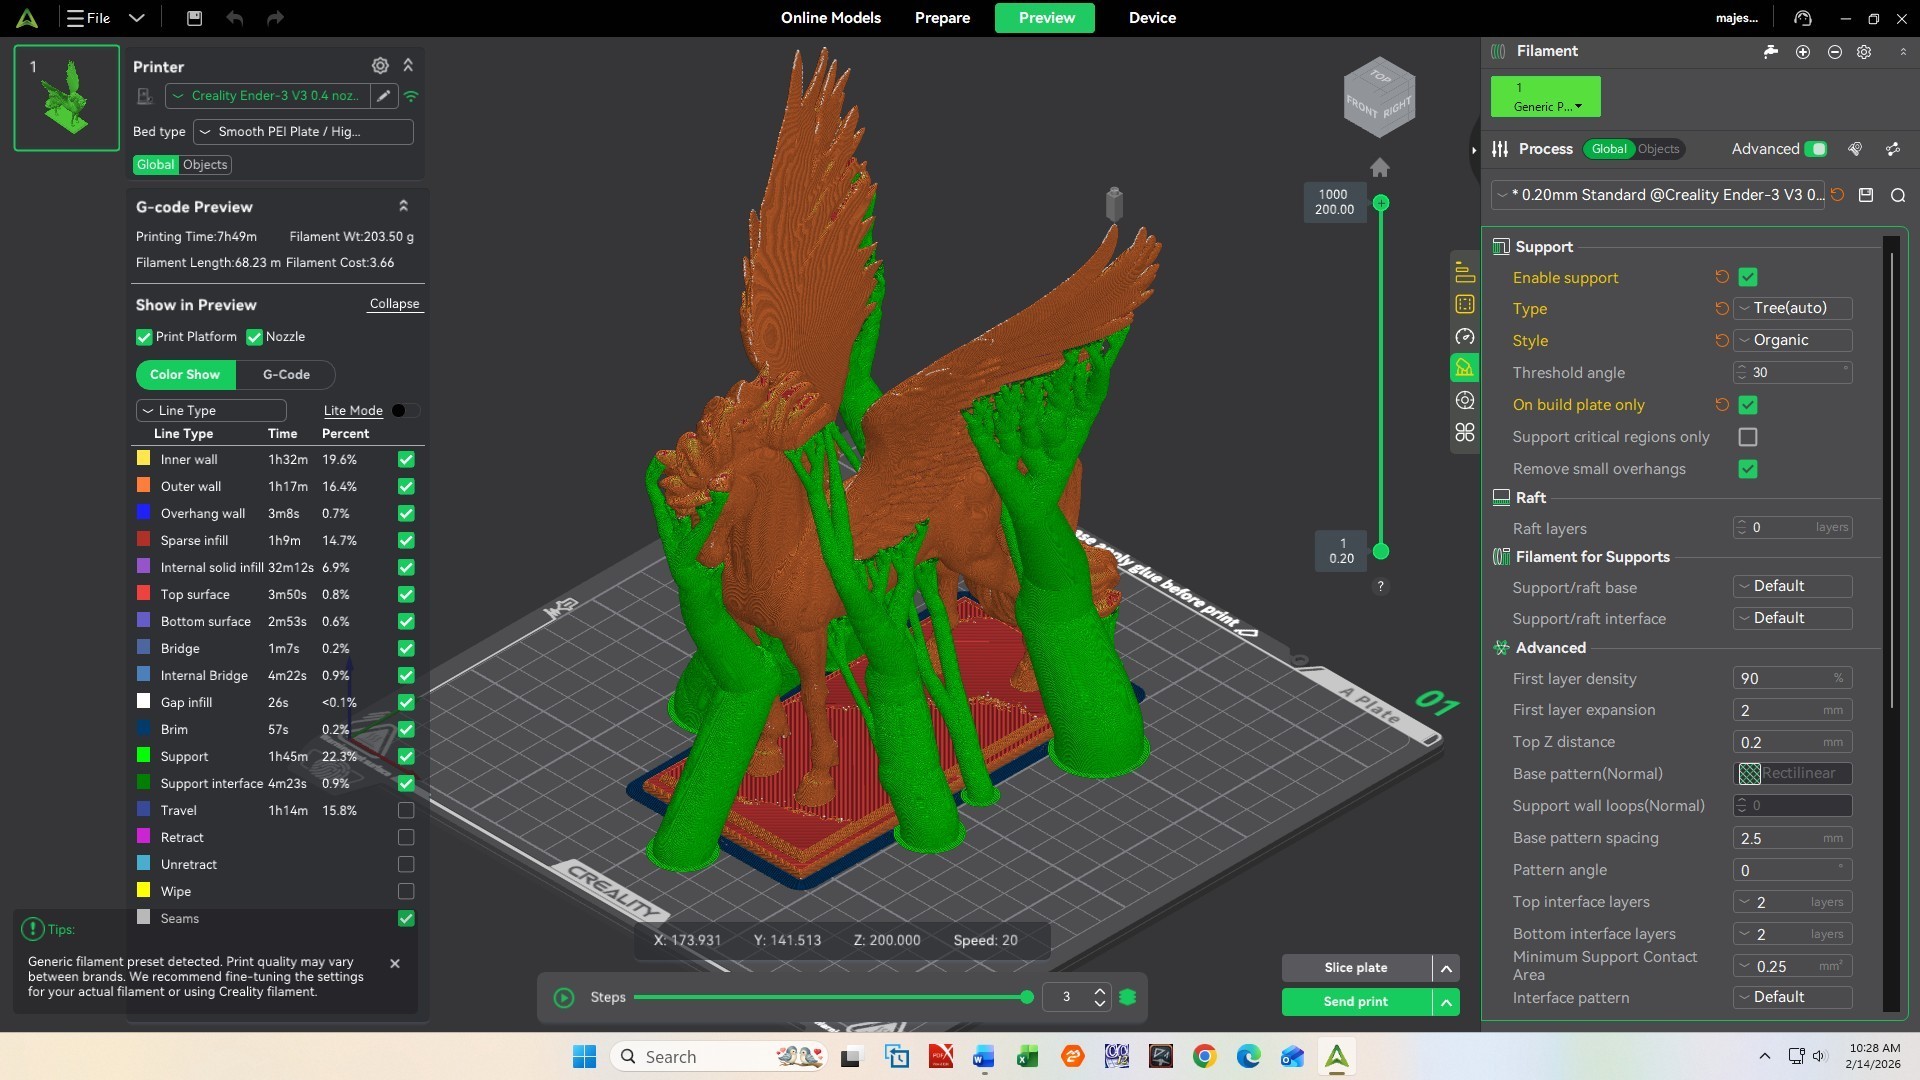
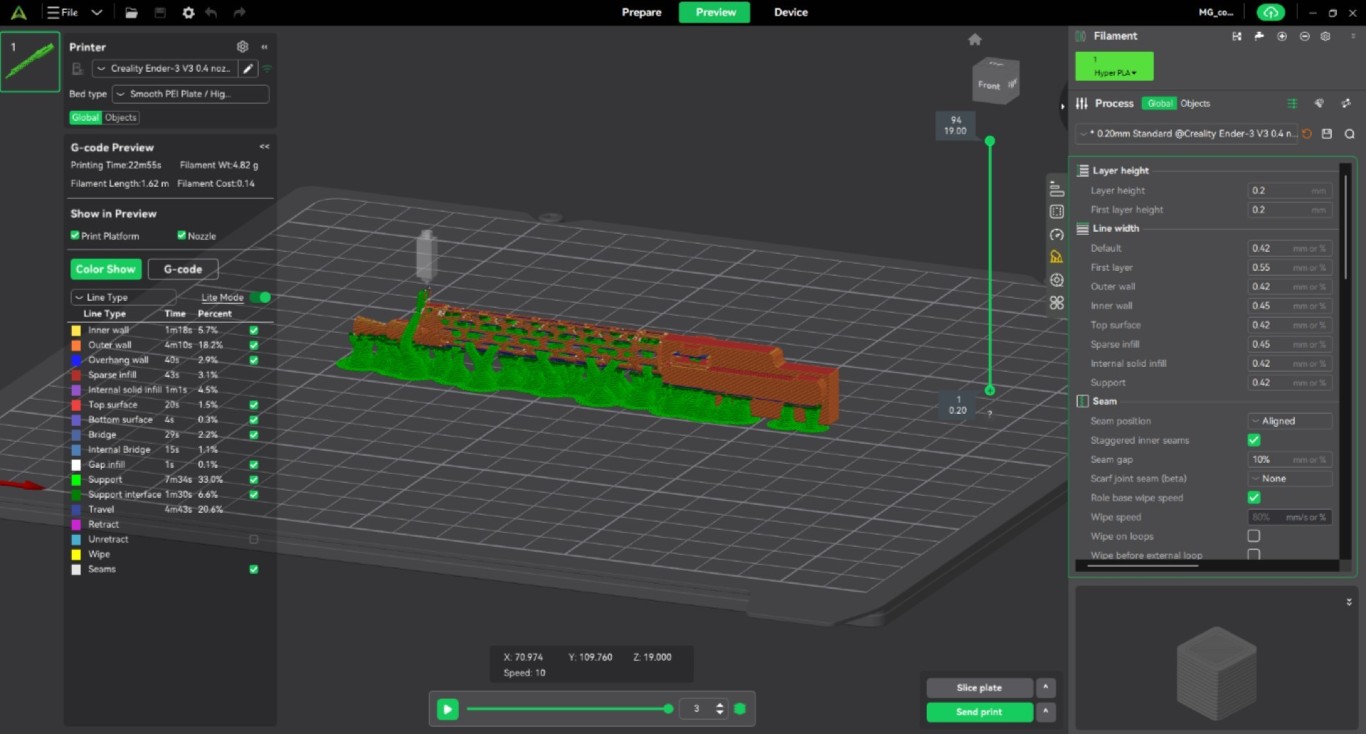
This project was printed from a single STL file (23.7 meg) on my Ender-3 V3 printer using some Panchroma Gradient “Translucent Rainbow” PLA filament I had received for a Christmas gift from my oldest son and daughter-in-law. I set up the model in Creality Print at a 200% scale with a profile of Organic Tree supports on the build plate only, a 0.2mm layer height, with 3 walls and a 16% sparse infill density, using a 0.4mm nozzle. As you can see in the Creality Print screen capture image below (Click on the image to enlarge), this resulted in a print time of 7 hours 49 minutes, using 68 meters of filament at a total weight of 203.5 grams.
After carefully removing all the tree supports, as shown in the next two images my resulting 3D model turned out pretty nice. I think Everly will be very happy.
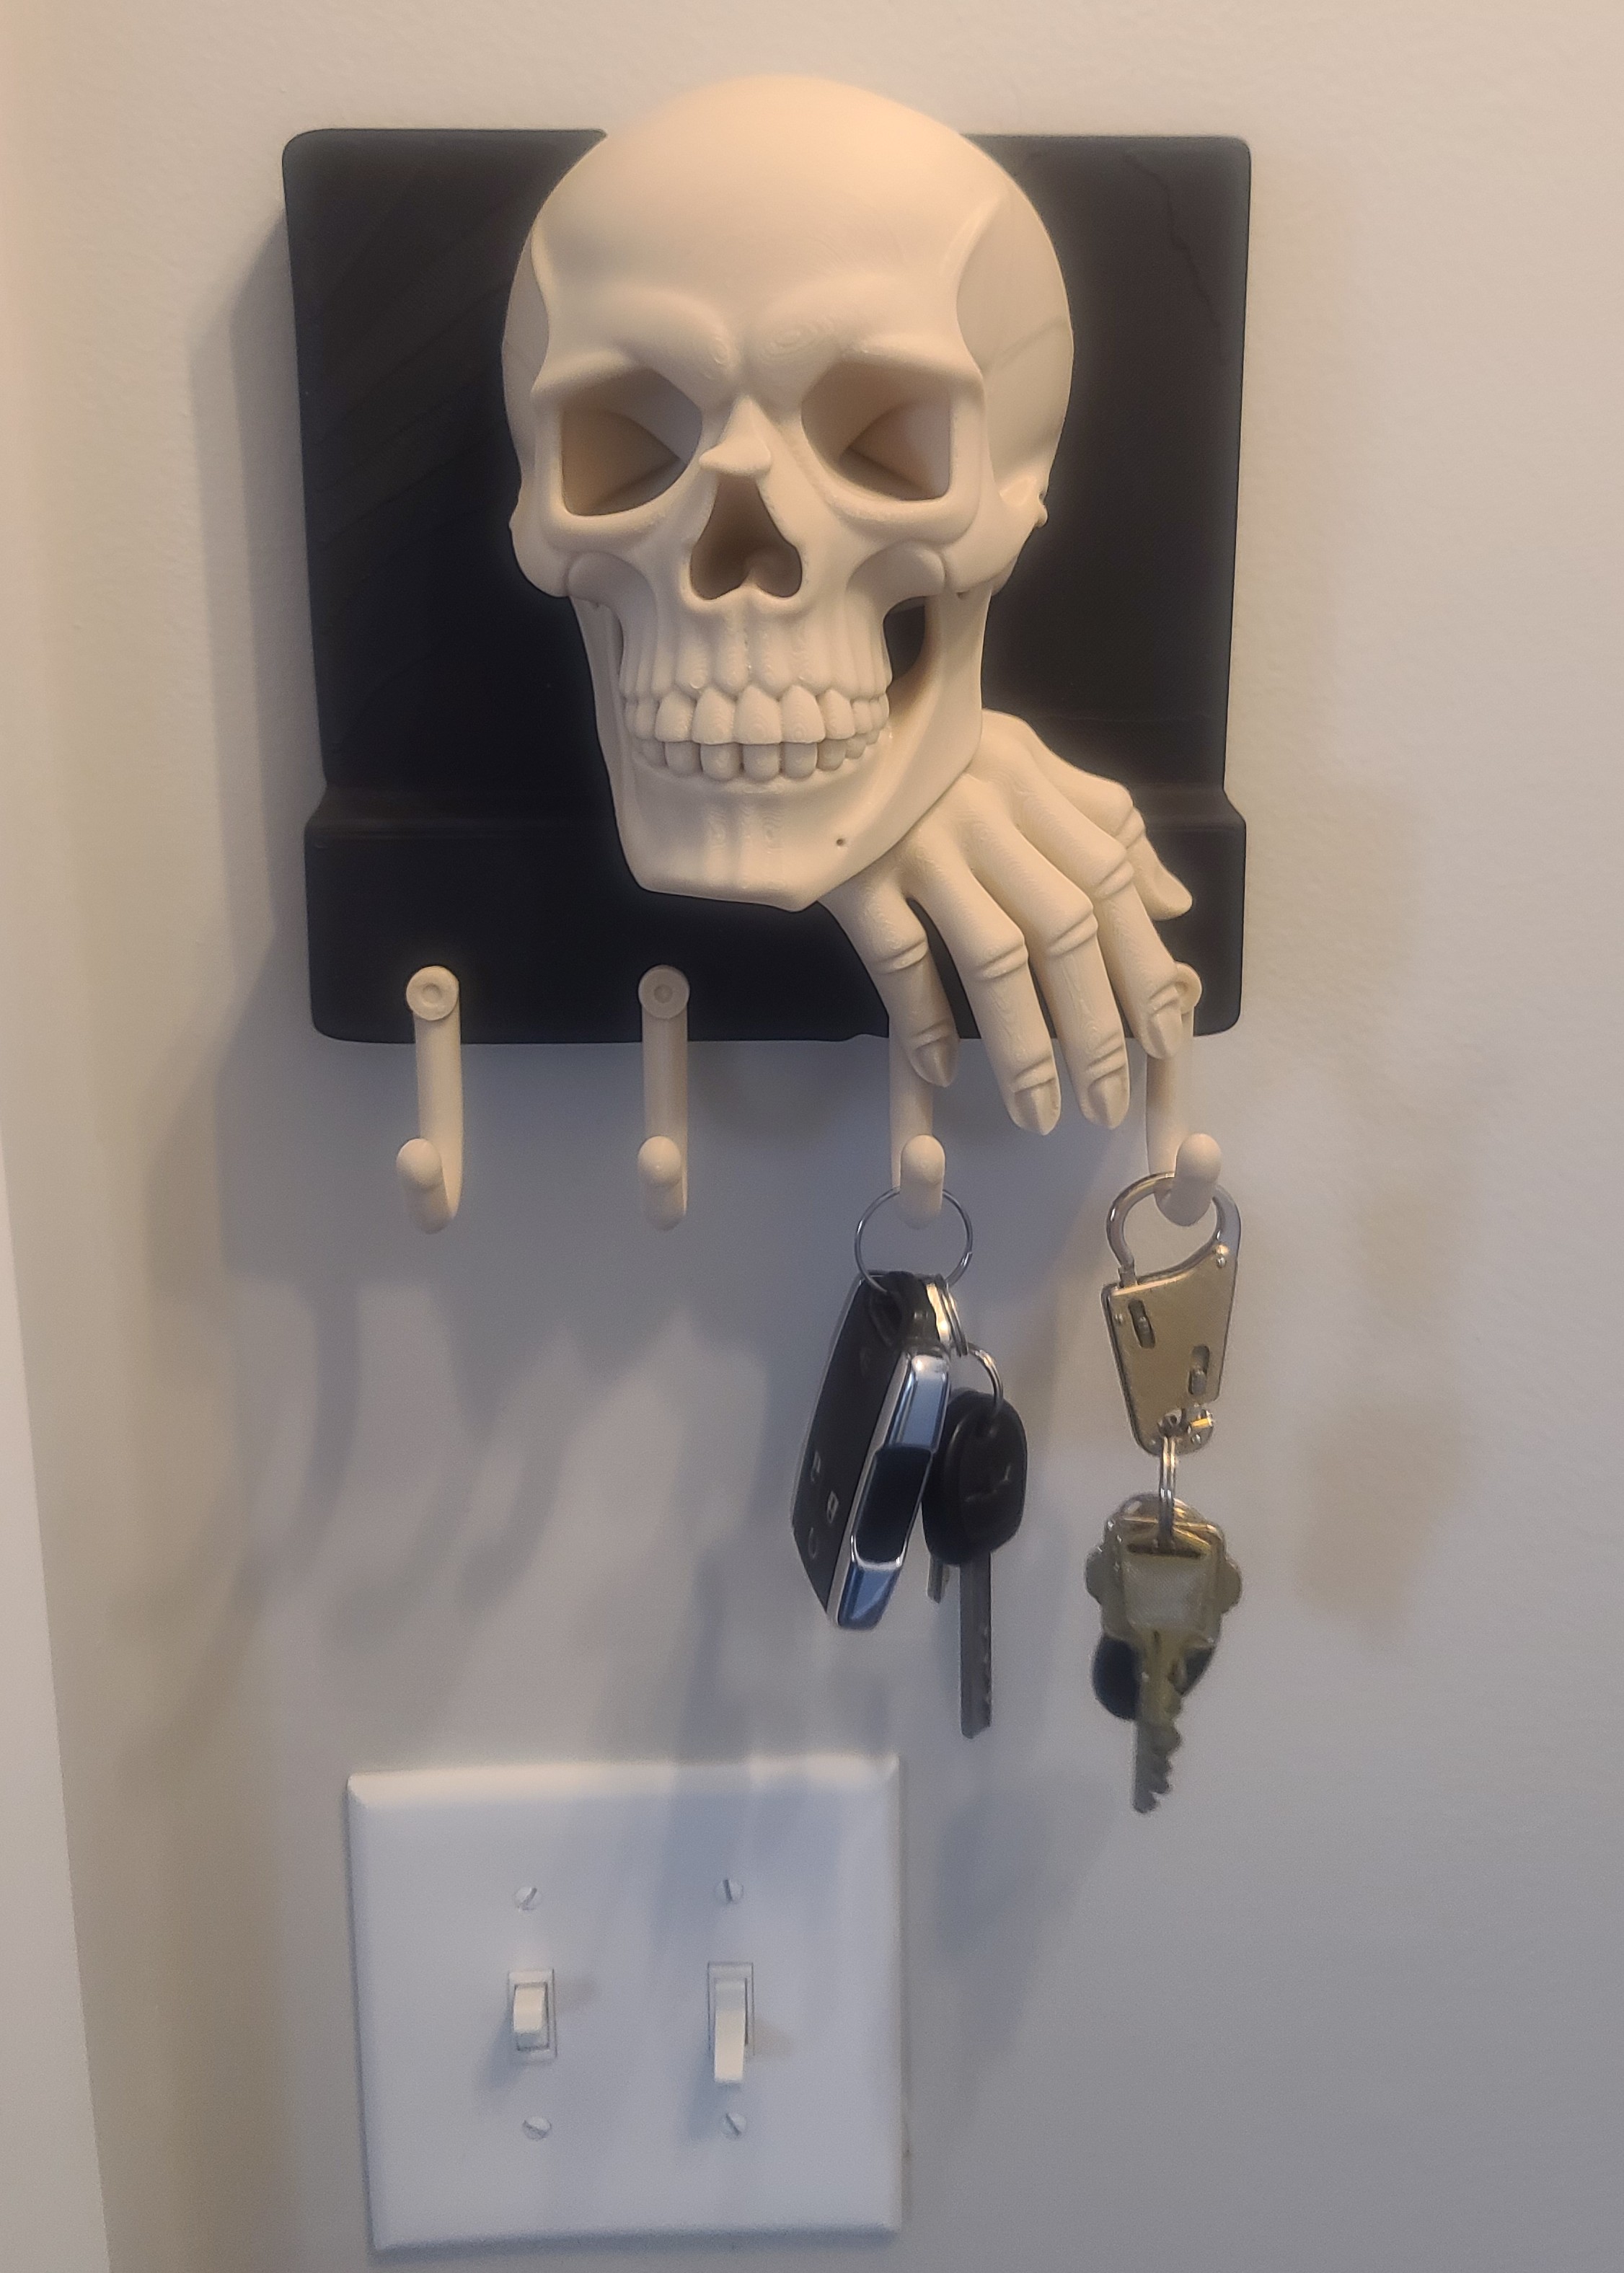
Haunted Skull Key Holder
This project is a gift for my daughter-in-law. She loves Halloween and has all kinds of decorations she puts out each year, so I figured I'd make her something she could add to her collection. I found the nice wall mounted Haunted Skull Key Holder in the left image below @ Cults3D. This is from EternaForm3D, and I believe it is a remix.
I setup the single STL file in Creality Print 6.2 using a 0.4mm nozzle, 0.2mm layer height and eSun PLA+ Bone White filament. The only modification I made was to slice off some of the backside to remove the protruding skull so the final piece would hang flat against the wall. Even at a 200mm/s print speed, the single piece part you see in the right image took 8 hours and 21 minutes to print. I think it turned out pretty nice, and I know she will love it. After painting the stone background with some flat black acrylic paint, the final model was mounted to a wall in their TN home as seen in the last image below.

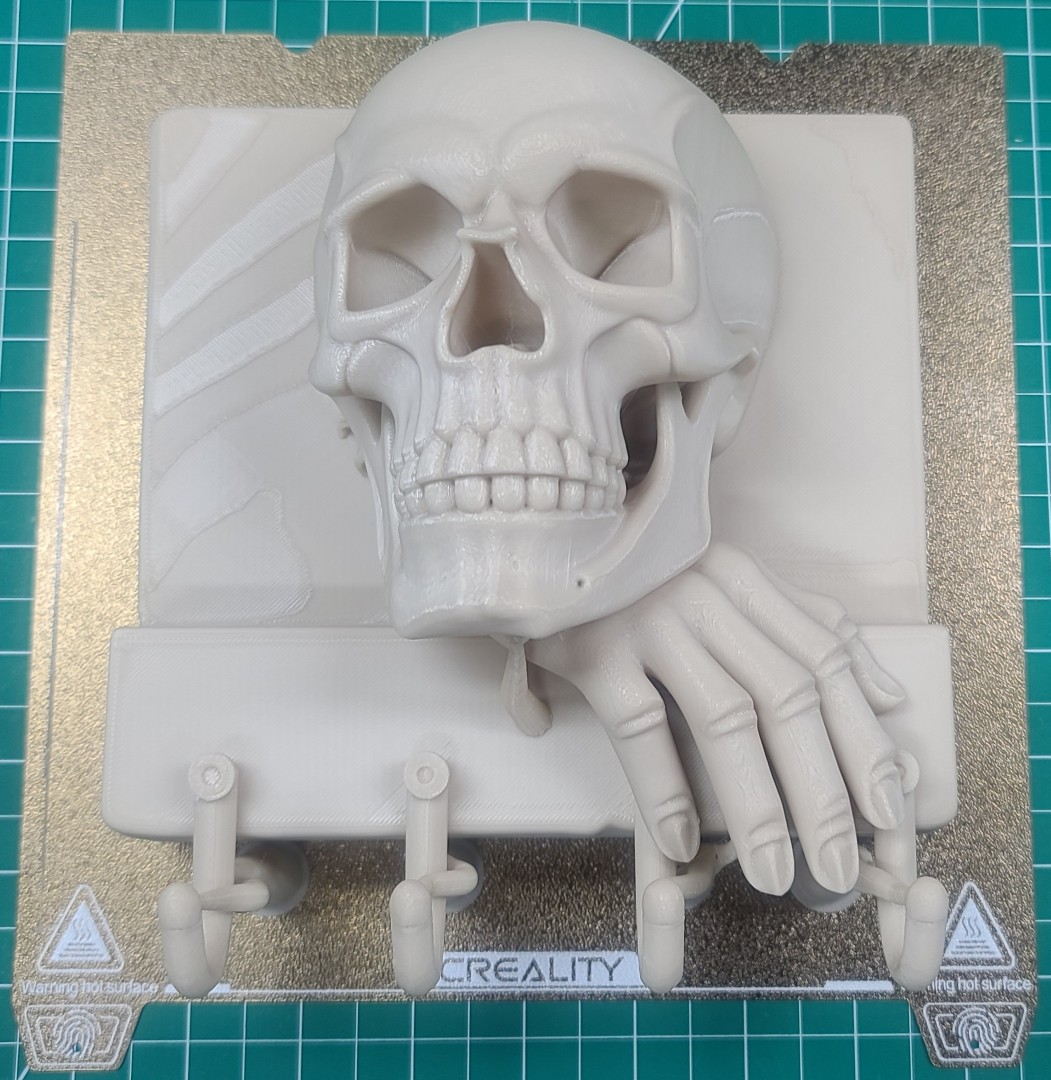
Source of Left Image: Cults3D Haunted Skull Key Holder Webpage.
Beetle “Ring Holder” Boxes
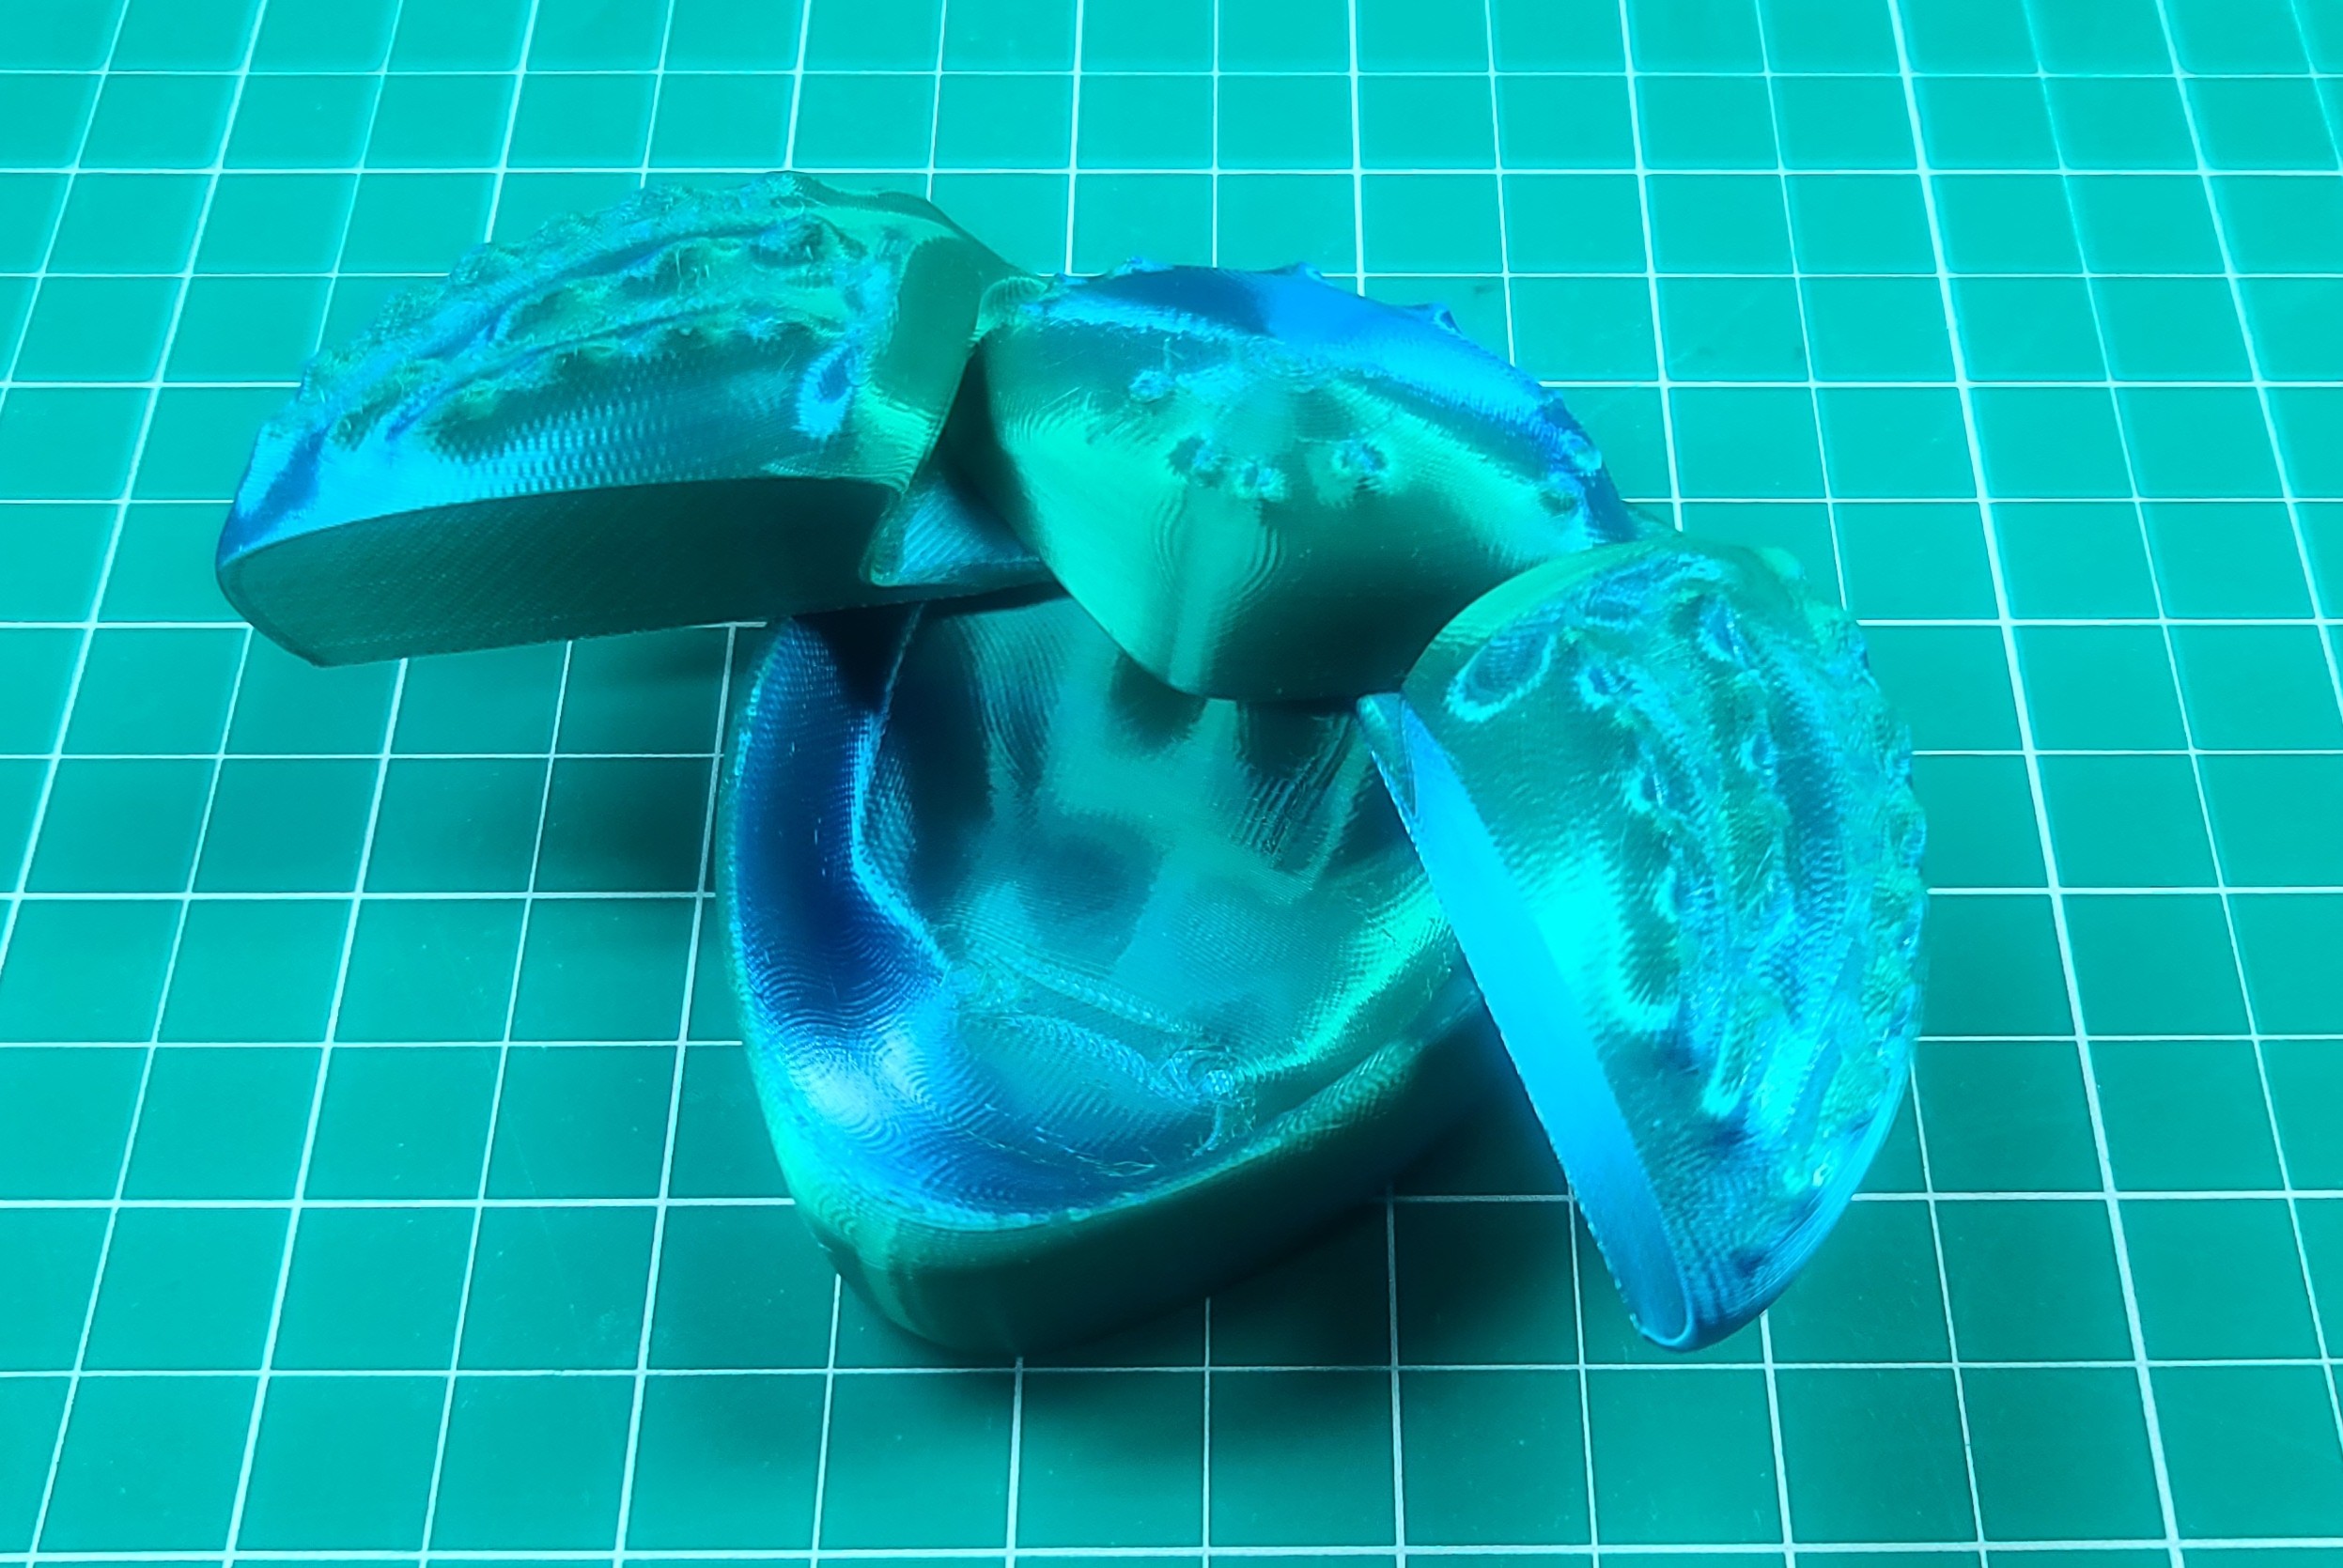
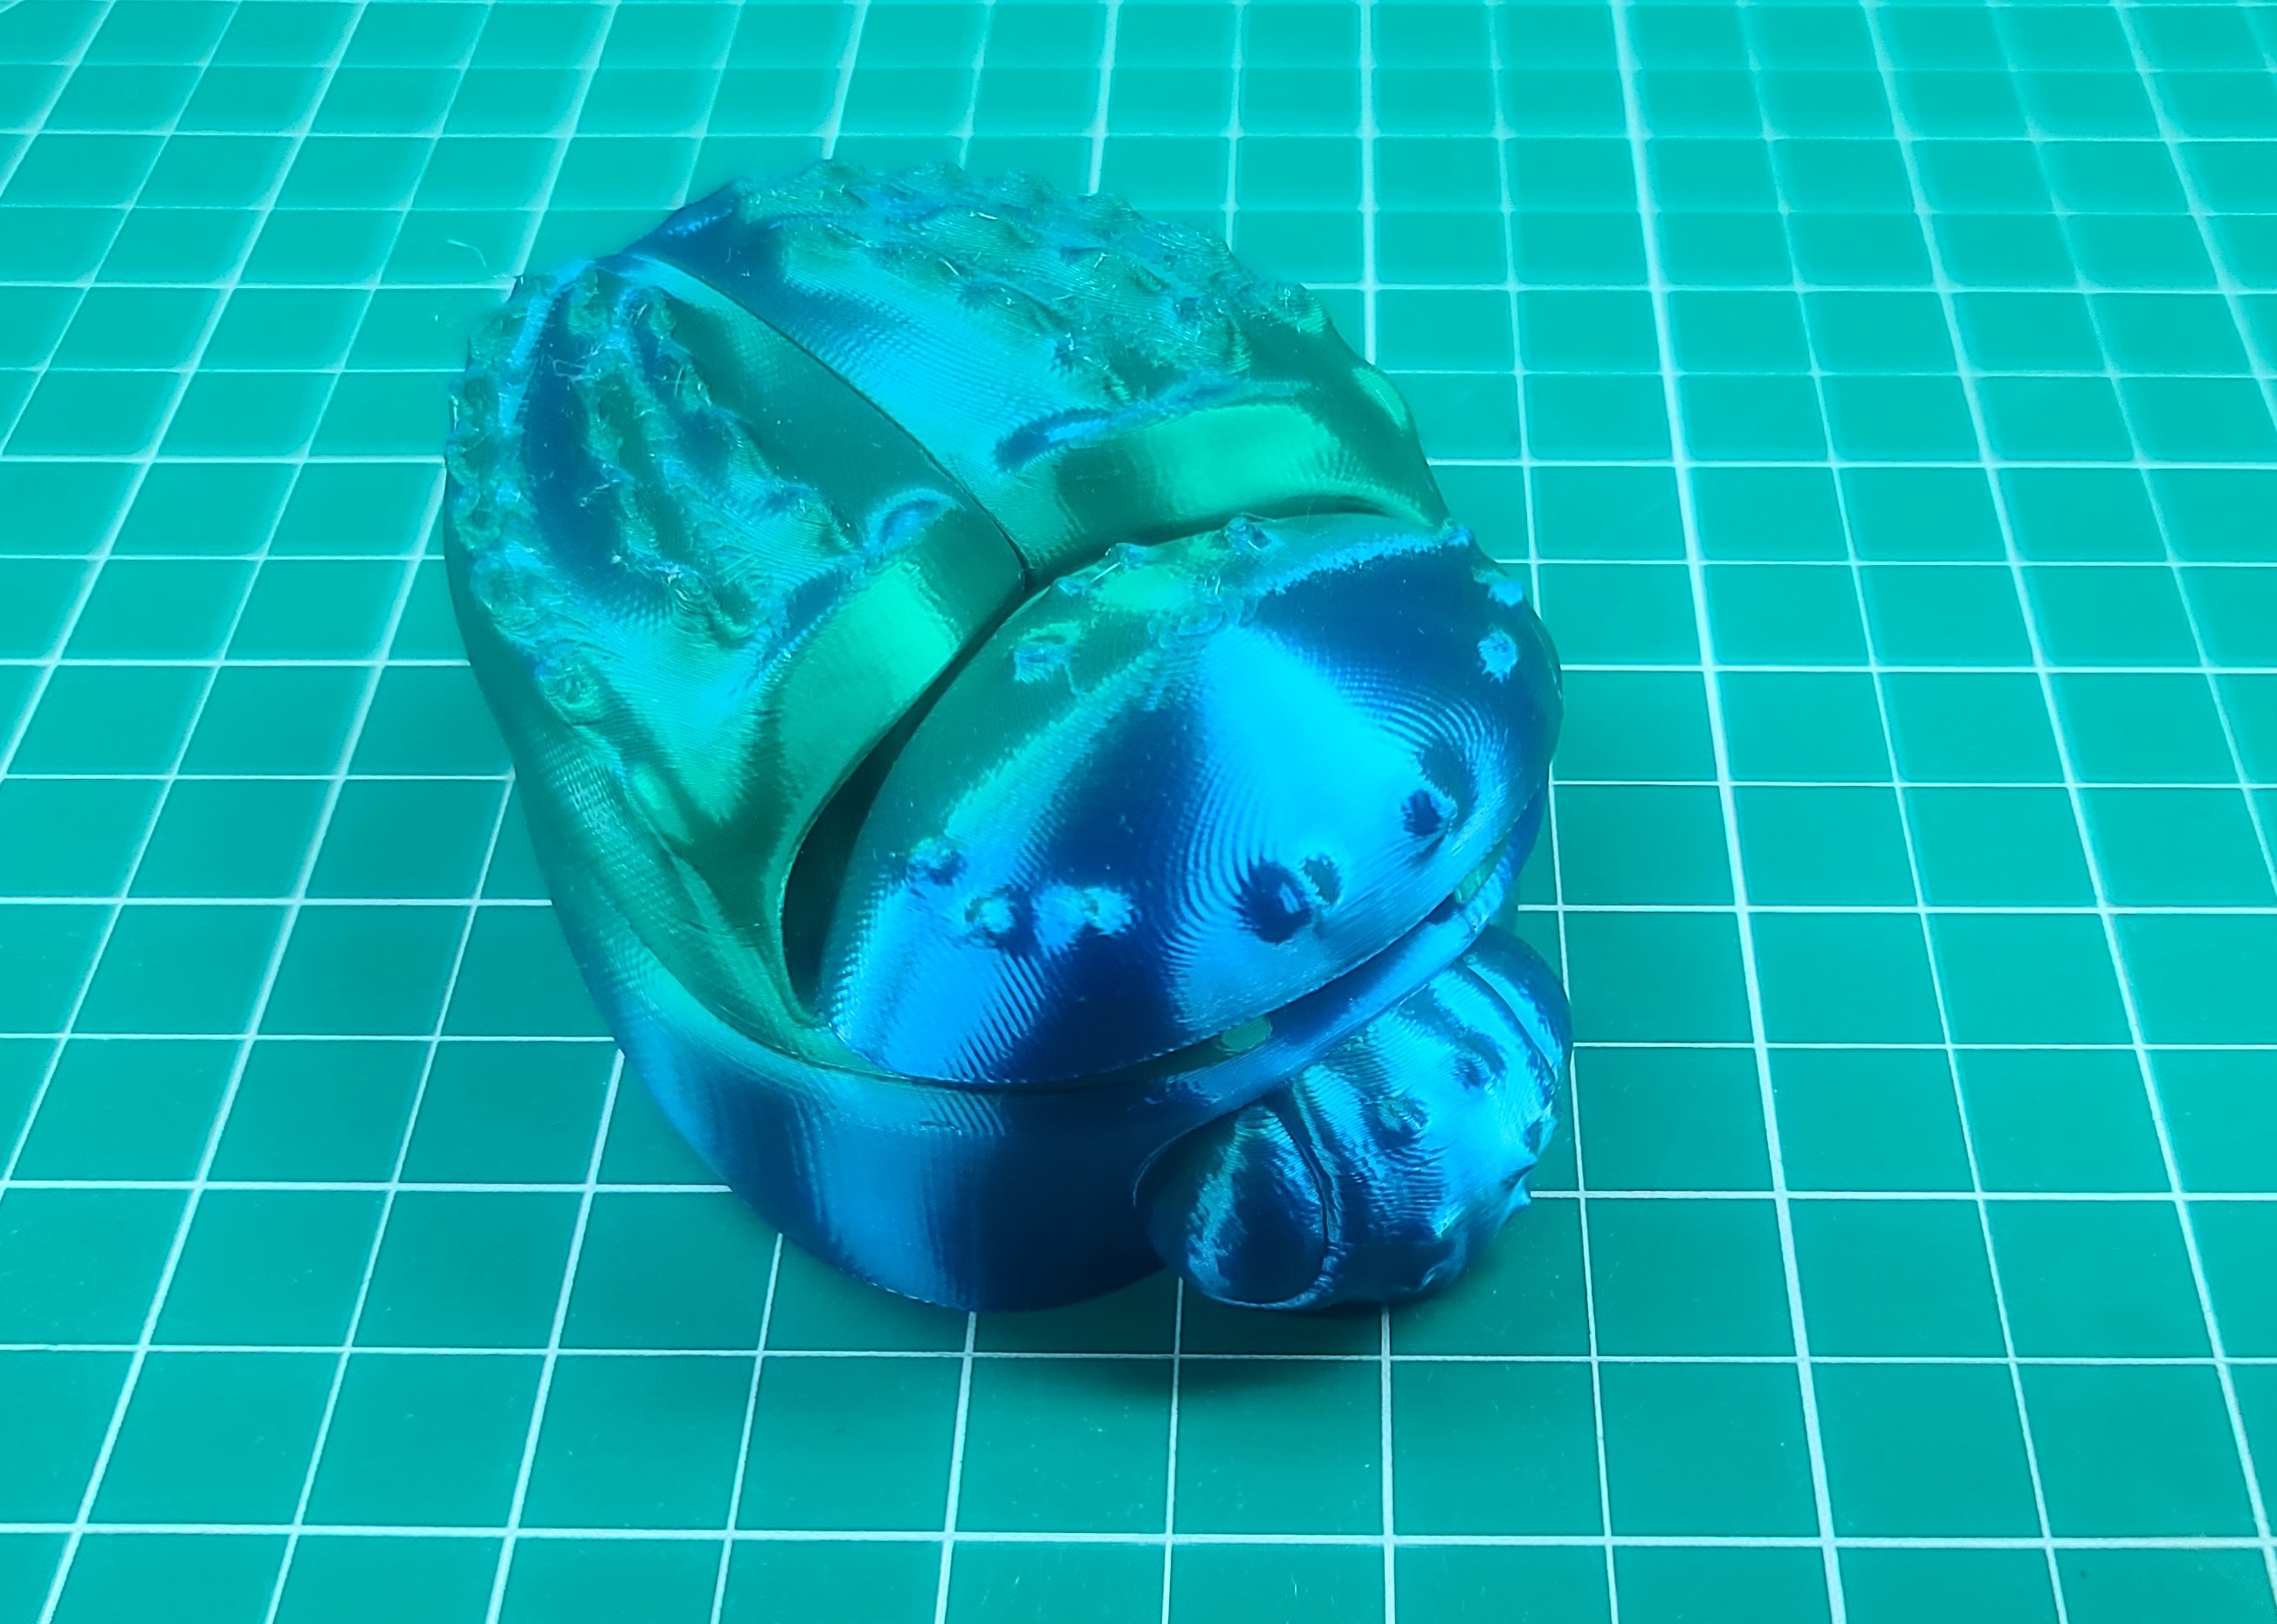
Carolyn found a couple more items that she wanted me to print out for Christmas gifts. The first one is a ring holder modeled as a Beetle. The STL files can be download for free from Cults3D, and comes in three parts that easily fit together! At 100‰ scale it fits a small ring. I 3D printed this model using my Creality Print 6.3 0.1mm Silk-PLA profile settings with a 0.4mm nozzle and ELEGOO Dual Color Blue Green Silk PLA filament. You can order this shiny 3D printer filament on Amazon or the Elegoo website. Total time required to 3D print all three parts shown in left image below was 6h 32m due to the thin 0.1mm layer height and slow print speed (50mm/s) needed to obtain a nice shiny finish using Silk-PLA. The final results after assembly are shown in the middle and right images below.
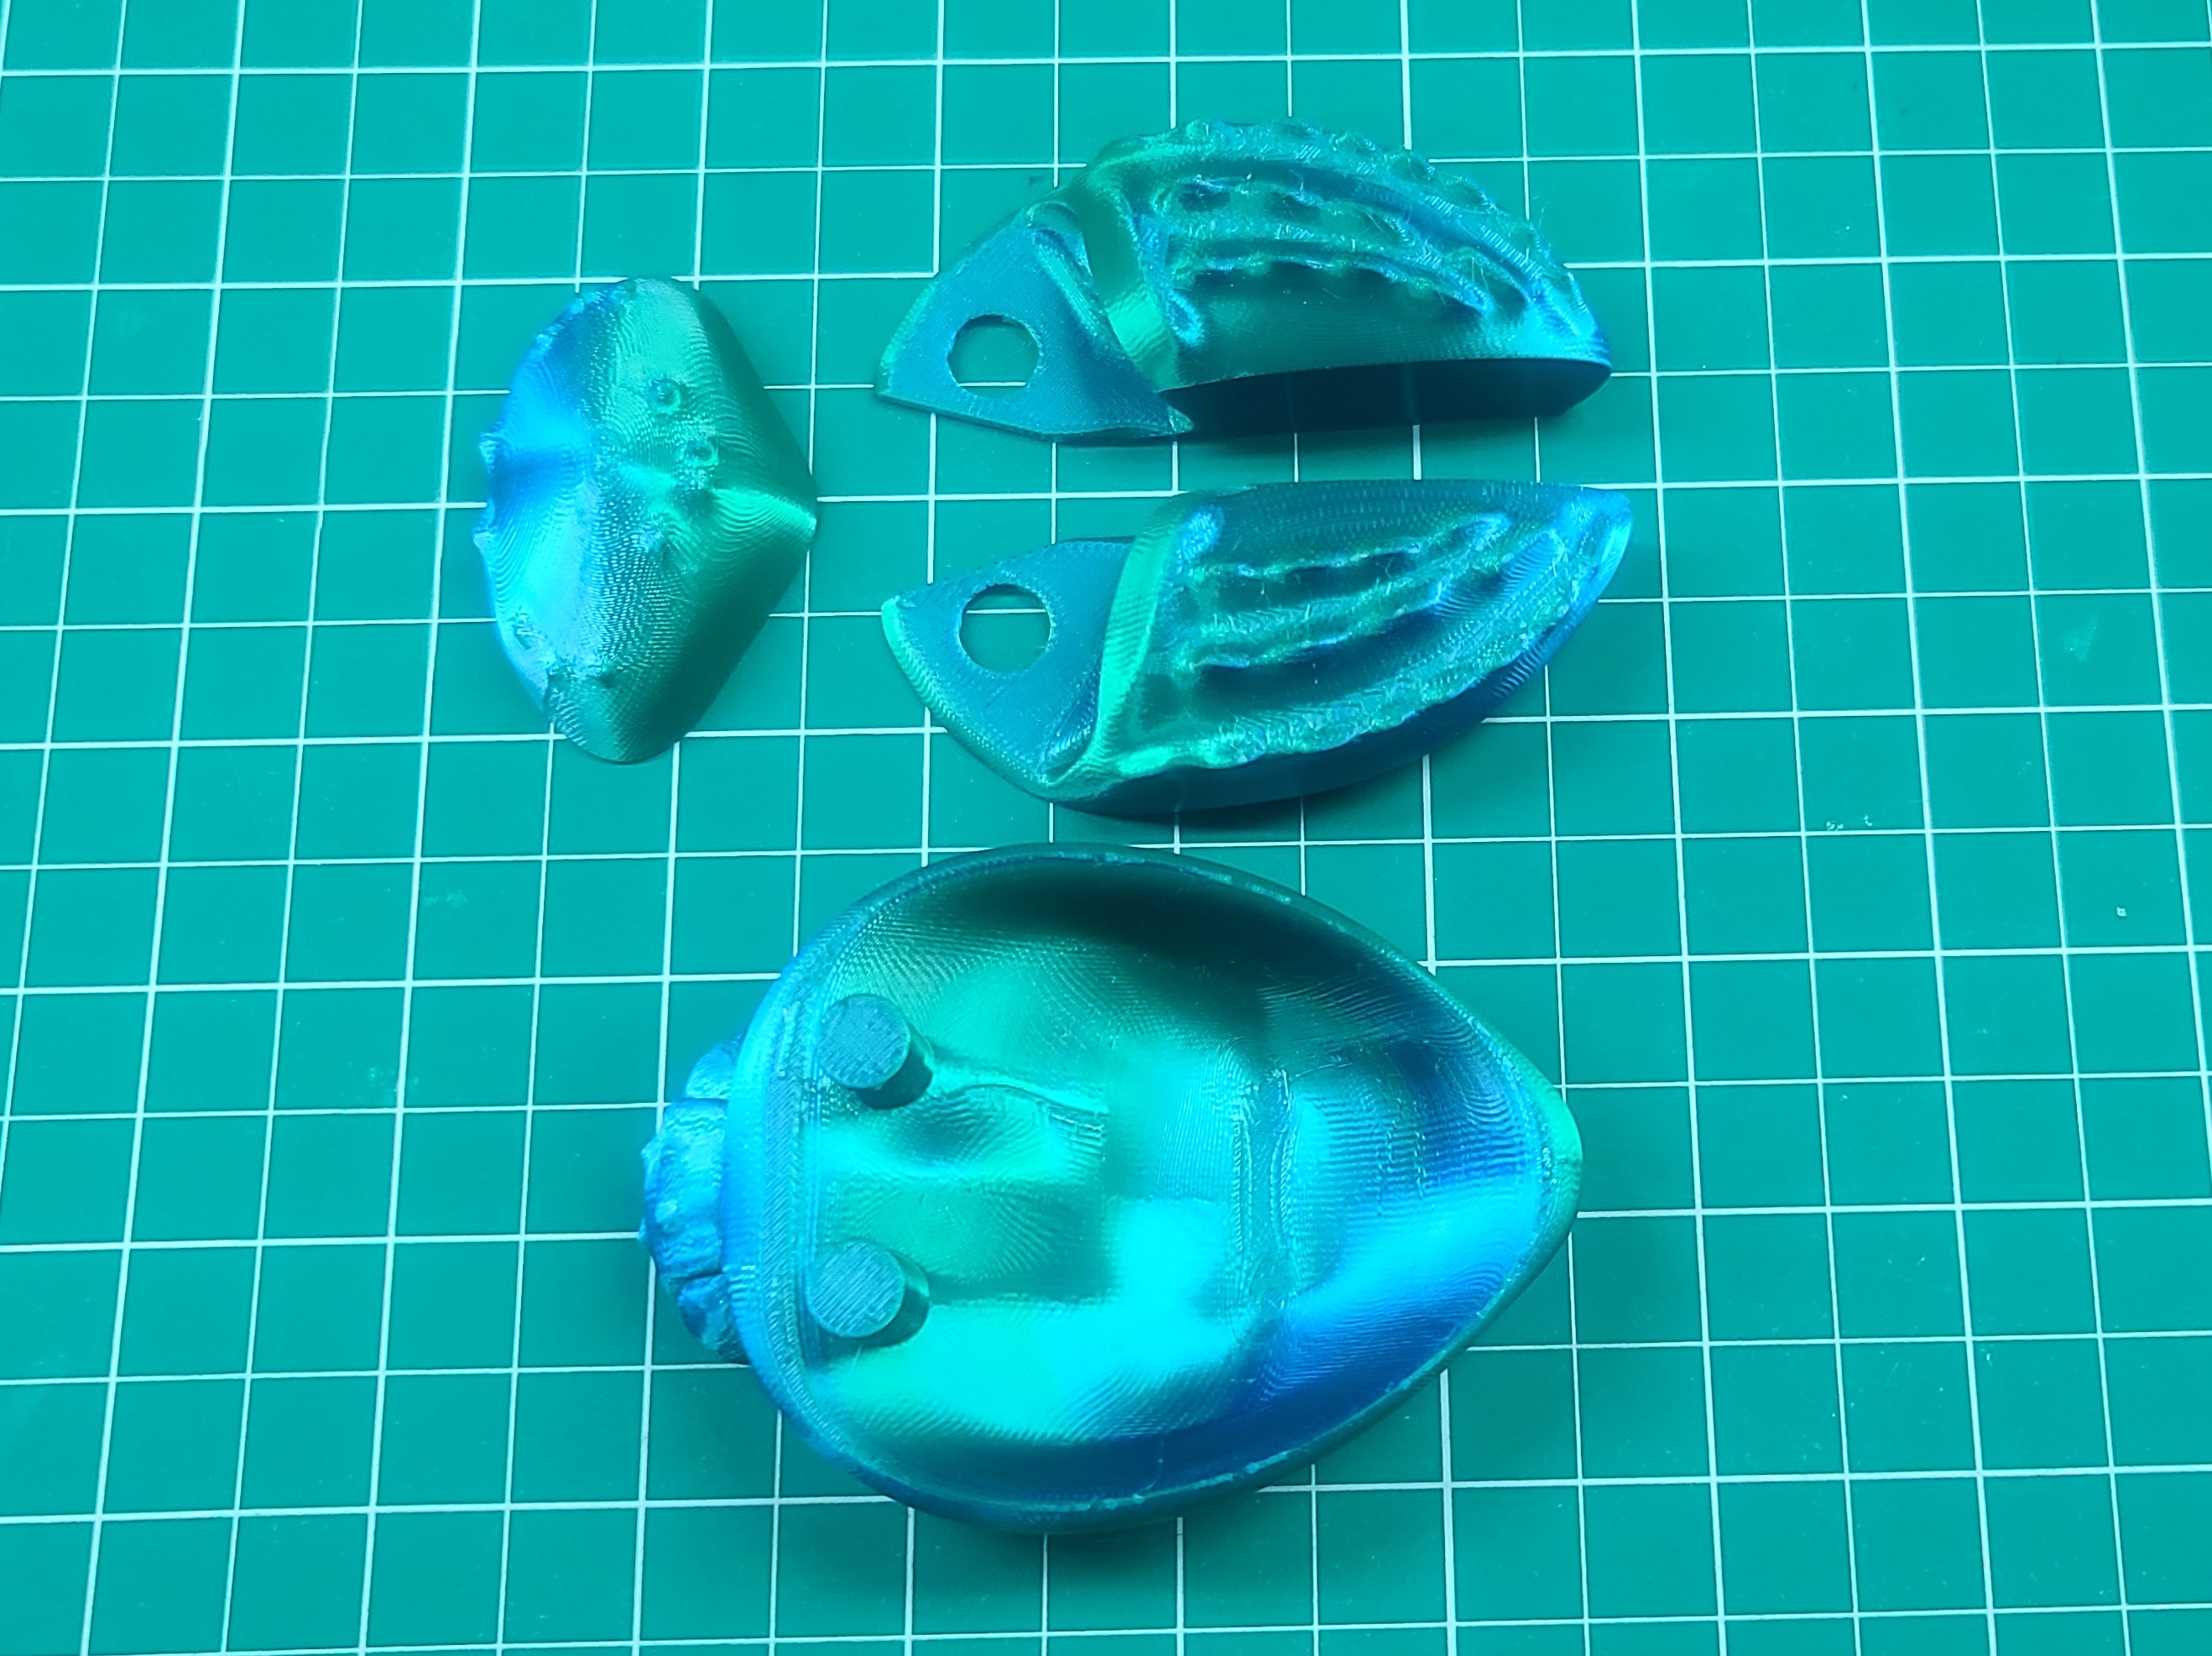
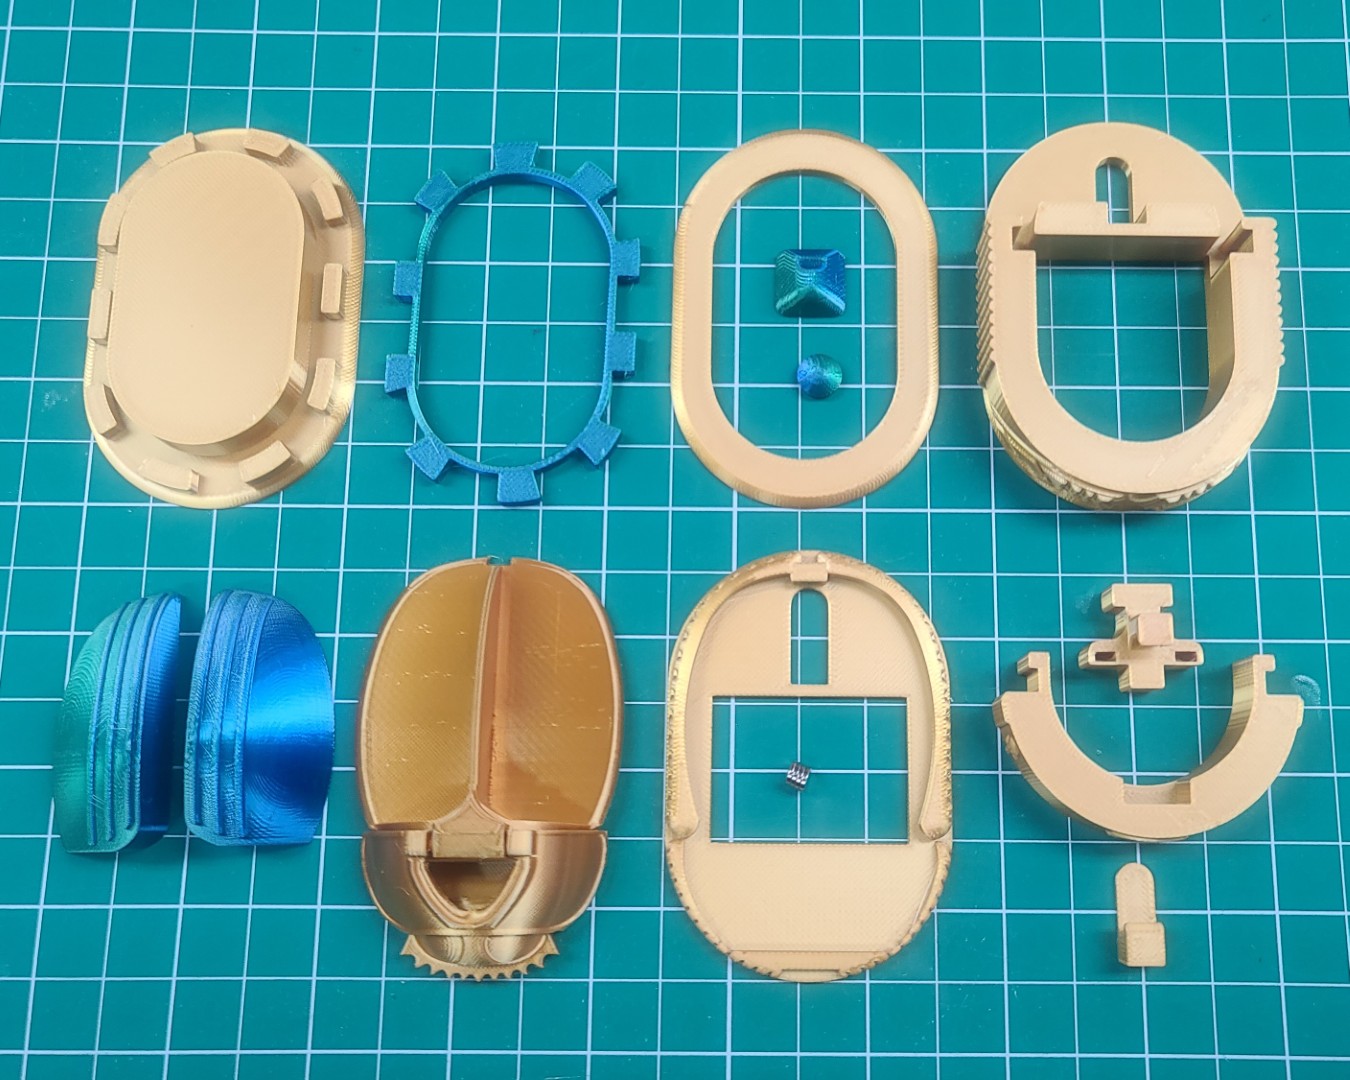
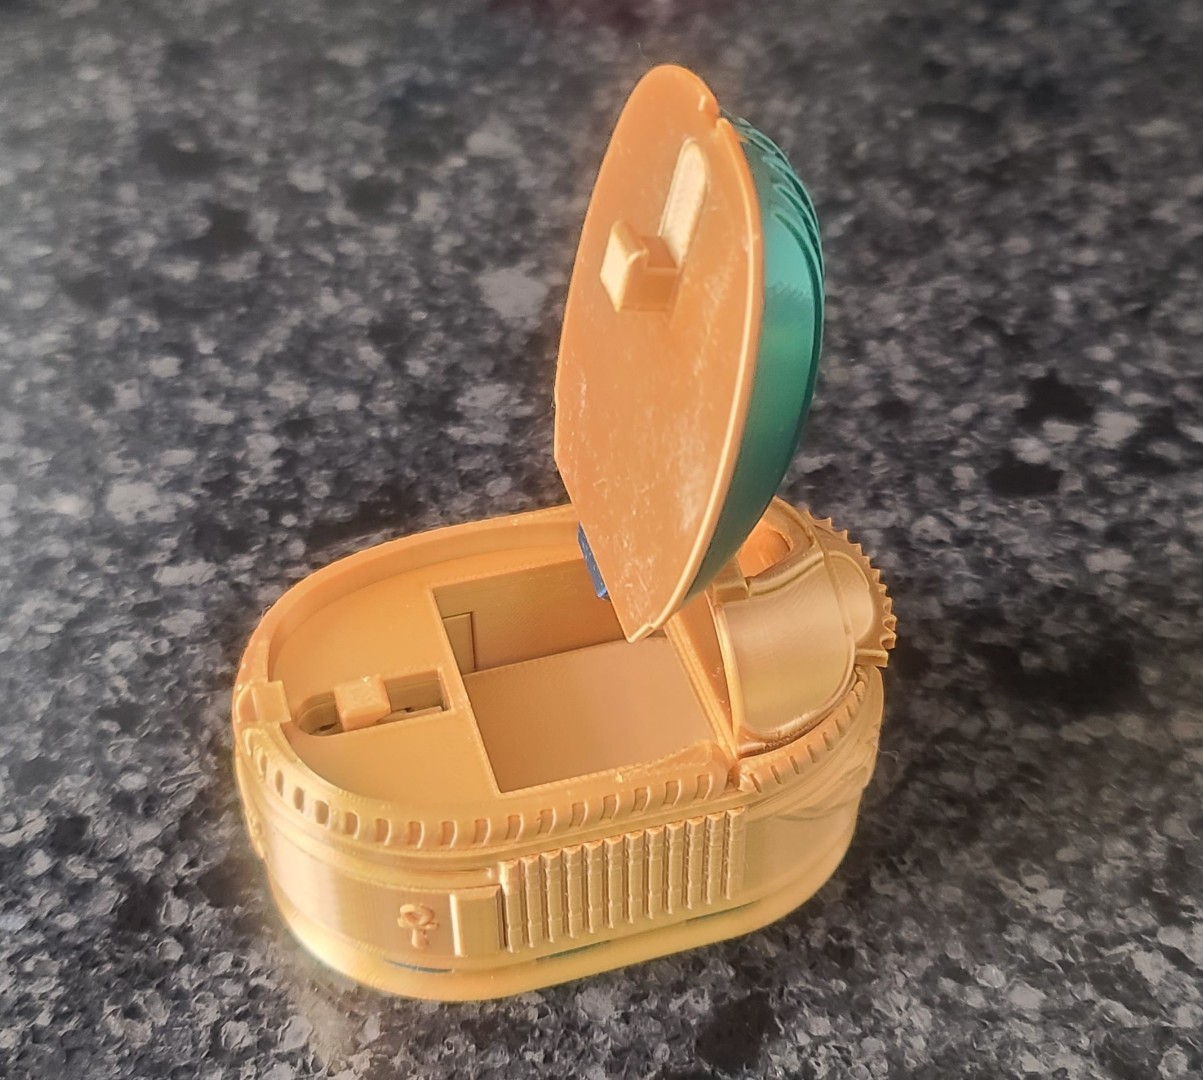
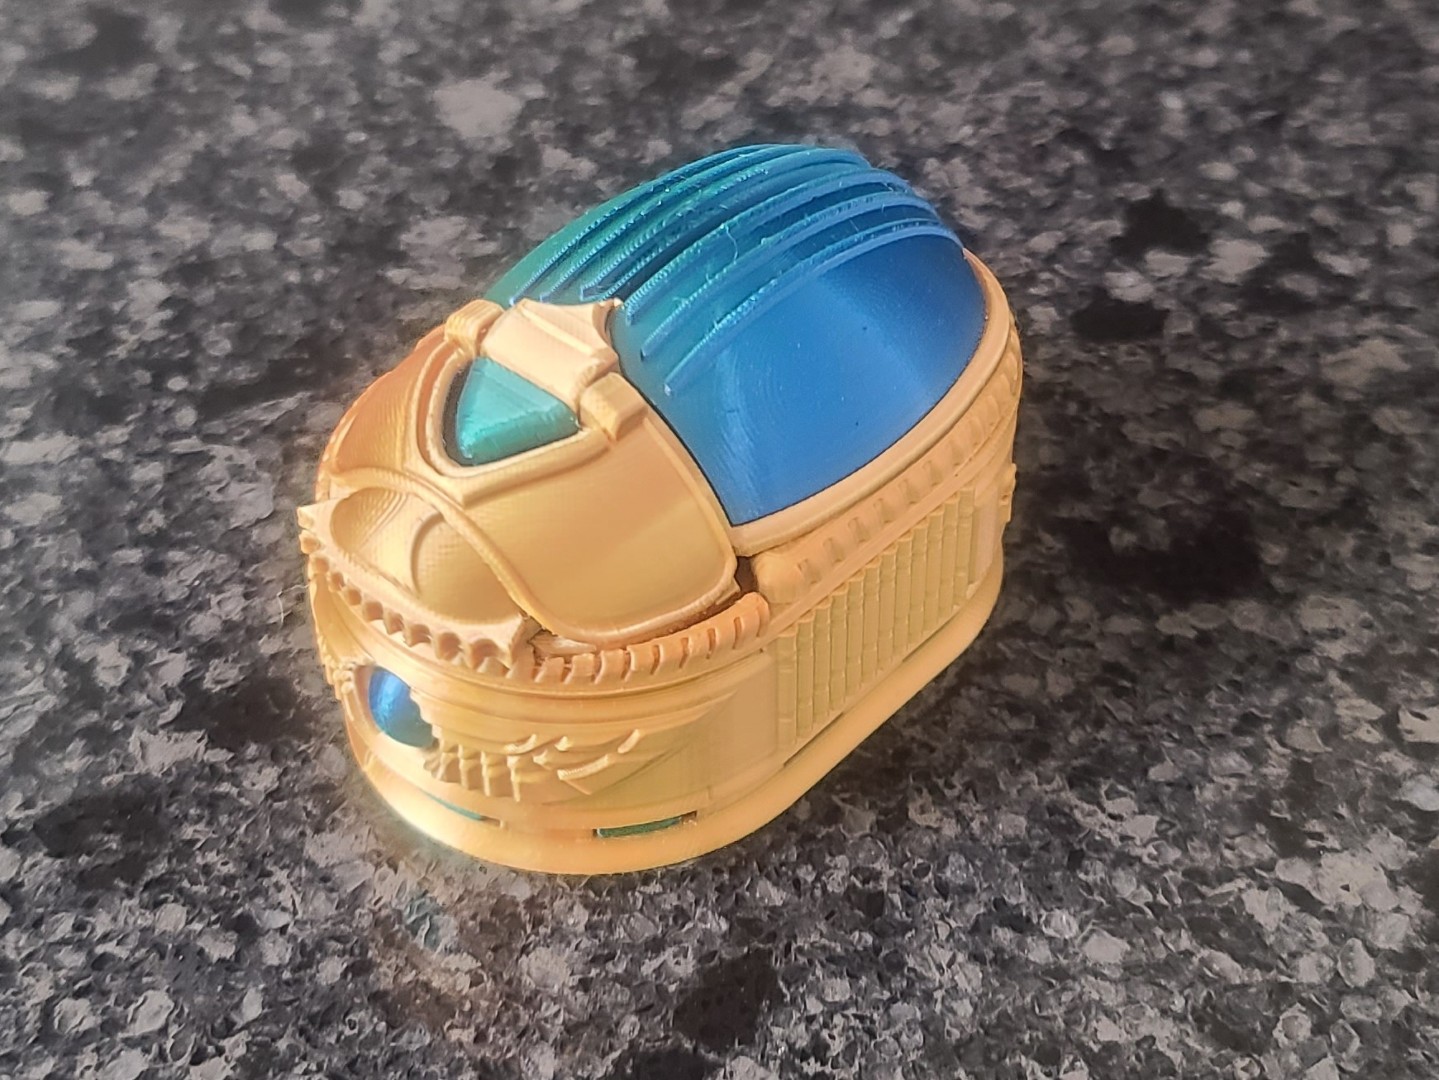
The other item is also a ring holder, but this time the model is a Scarab Beetle Box styled after the “Egyptian Revival” of the 19th and early 20th centuries rather than Ancient Egypt. To the ancient Egyptians, the scarab beetle was symbolic of the sun (Ra) moving across the sky every day (the beetle rolling a ball of dung was seen to represent this). This model has a stylized beetle with a winged Ra between his two front feet. The STL files and assembly instructions can be download for free from Thingiverse. There also is a Remix available at Scarab Beetle Box Remix, that adds holes for mounting four neodymium magnets (4x2mm) to a couple parts.
This model comes in 12 parts that easily fit together, and at 100‰ scale it fits a ring. The Scarab Beetle Box is a small model with a secret compartment which is accessed by pulling back a “secret drawer” and opening up the beetle's wing case. The box is locked by closing the wing case and pushing the drawer back into place. For this model I again 3D printed using my 0.1mm Silk-PLA profile settings with a 0.4mm nozzle. For most of the model parts I used GIANTARM Gold Silk PLA filament, and for the small jewels and wings I used ELEGOO Dual Color Blue Green Silk PLA filament. Total time required to 3D print all 12 parts shown in left image below was 11h 46m, again due to the thin 0.1mm layer height and slow print speed (50mm/s) needed to obtain a nice shiny finish using Silk-PLA. Some much for having a 3D printer capable of 600mm/s print speeds! The final results after assembly are shown in the middle and right images below.
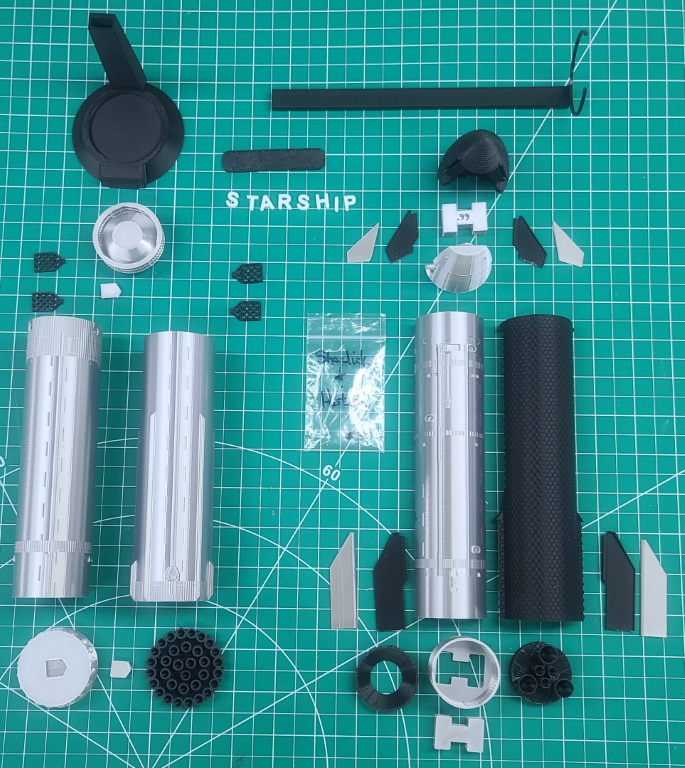
SpaceX Starship 1:200 Scale Model
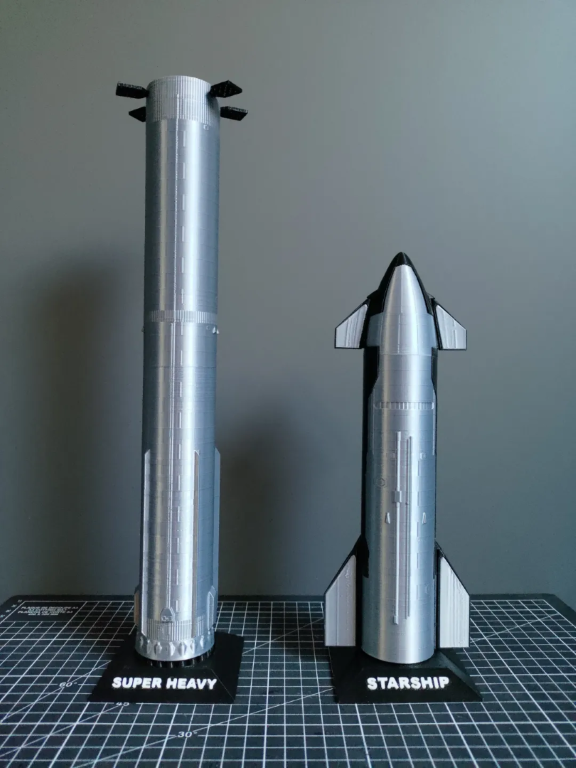
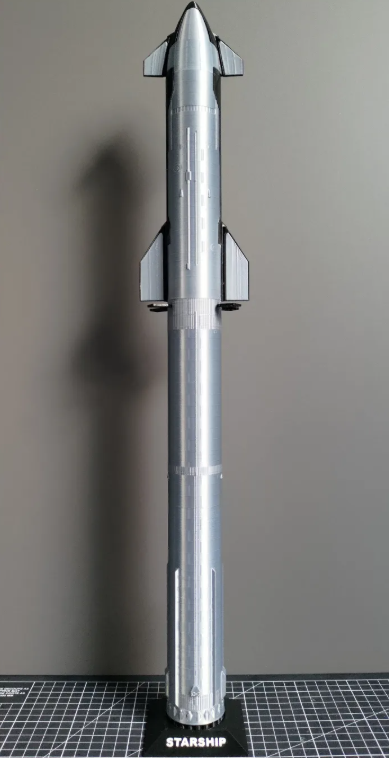
When I told my youngest son Ryan about my new 3D printer, he asked me if I could print him a 3D model of the SpaceX Starship for his work desk. After doing some web searches, I finally decided on a 3D model from Kmobrain - AstroDesign3D, which is located on the Printables website.
The SpaceX Ship “Starship S24” and Booster “SuperHeavy B7” model is a highly detailed 1:200 scale reproduction of the rocket currently under development for SpaceX's space transportation missions. The model consists of several pieces printed separately, which are easy to print and assemble. The finished model dimensions are approximately 25cm high and 9cm wide for the Starship S24, and 35cm high and 8cm wide for the Booster B7. There also is an updated version of the Starship which is based on Ship S33, and the Starship Hot-Staging Ring.
Source of Images: Printables.
I downloaded all the STL files for both the original Starship/Booster and and the updated version 2. These are very nicely done models. I had no problems using them in Creality Print and only had to make minor size adjustments to the couplers to get the all parts to fit together properly. I printed all the black parts using Creality Hyper-PLA with a 0.4mm printer nozzle. To get a nice silver metal color, I printed all the metal parts using Giantarm Silk Metallic Silver PLA 3D printer filament using the same printer nozzle.
All the parts in the image below took 30+ hours to print, ranging from under a minute for the smallest parts to just under 4 hours for the large parts like the Starship and Booster tanks. This does not include the time to set-up the models in Creality Print. I will update this section once my son completes the assembly of his SpaceX Starship model.
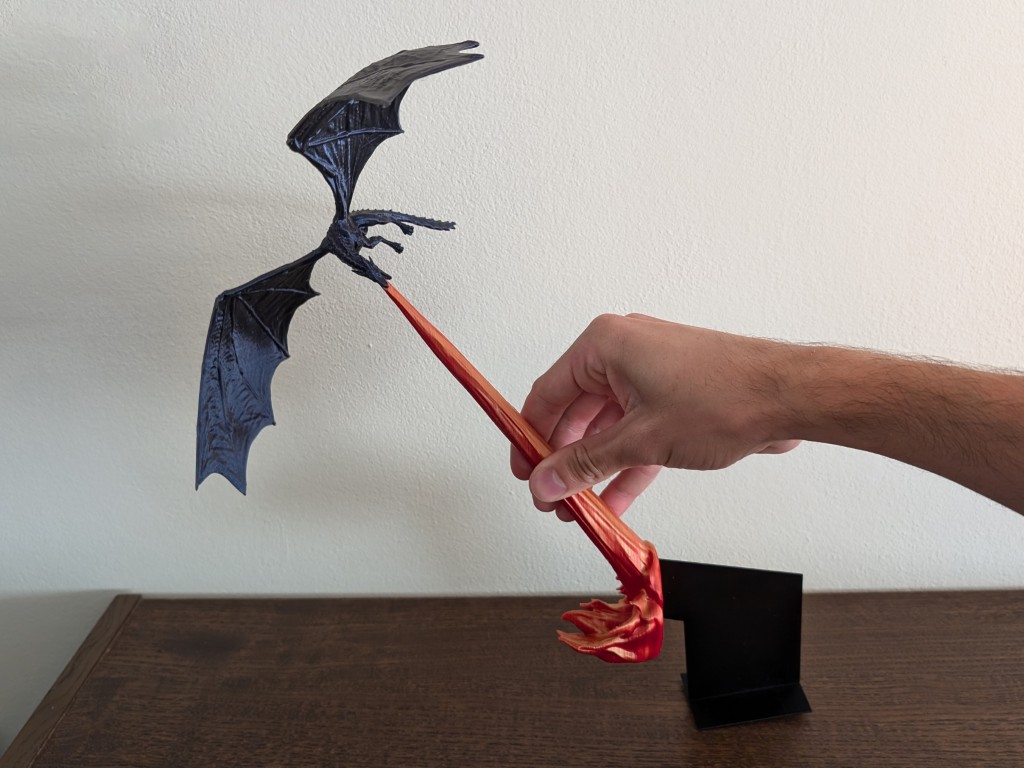
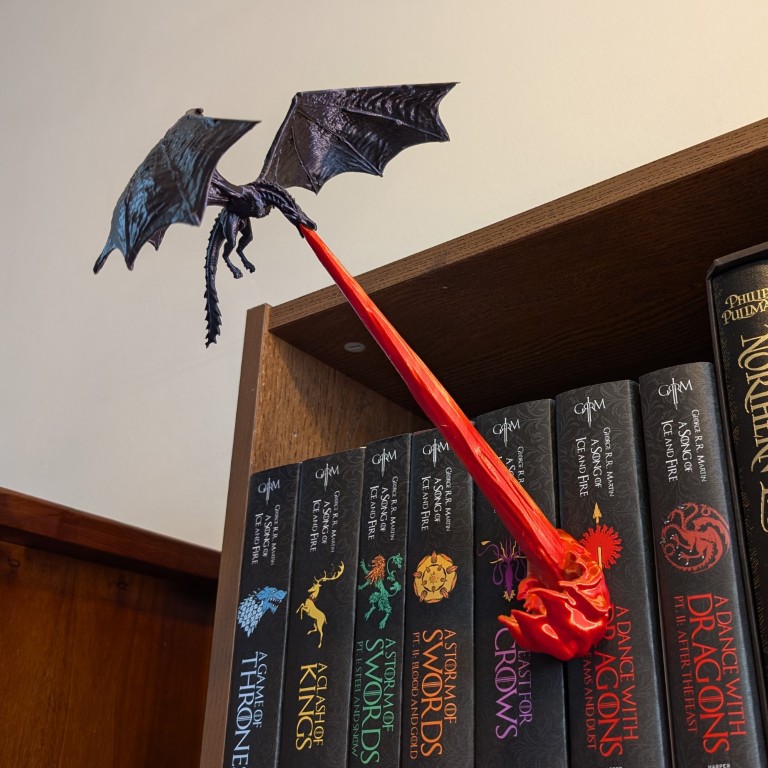
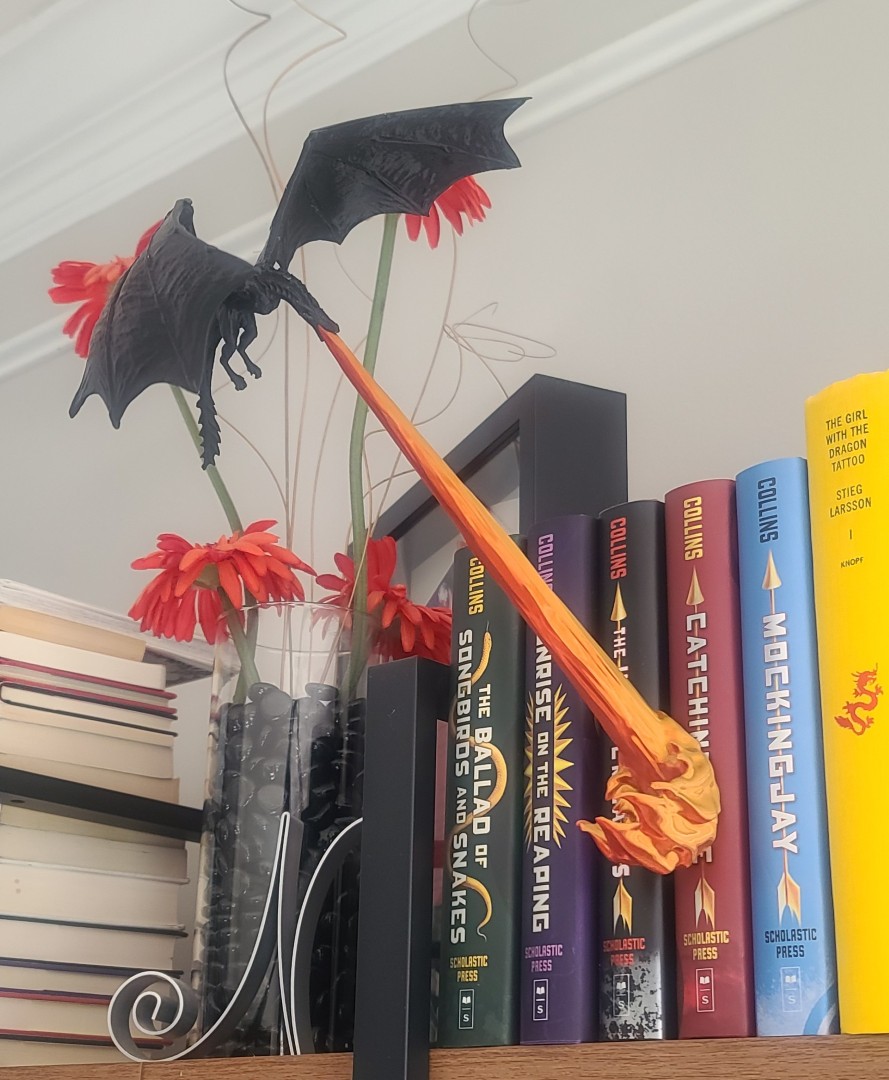
Flying Dragon Book Nook
While talking to our mail-lady I happened to mention that I had gotten a 3D printer. When delivering my order of filaments, she asked if I would be willing to print out something for her. I told her that if she could provide me with an image of what she wanted, or a link to the image, I would see if I could find an STL file to print out her 3D model. Well, when delivering our mail several days later she showed me an image of a “Flying Dragon Book Nook” that was listed for sale on Etsy. After doing some web searches for similar items, I finally found a nice 3D model on Cults3d.com.
Source of Images: Cults3d.com.
Below you can see an image of my 3D printed “Flying Dragon Book Nook” trying to burn the books on my daughters-in-law's bookcase. It turned out pretty nice I think, and she really liked it.
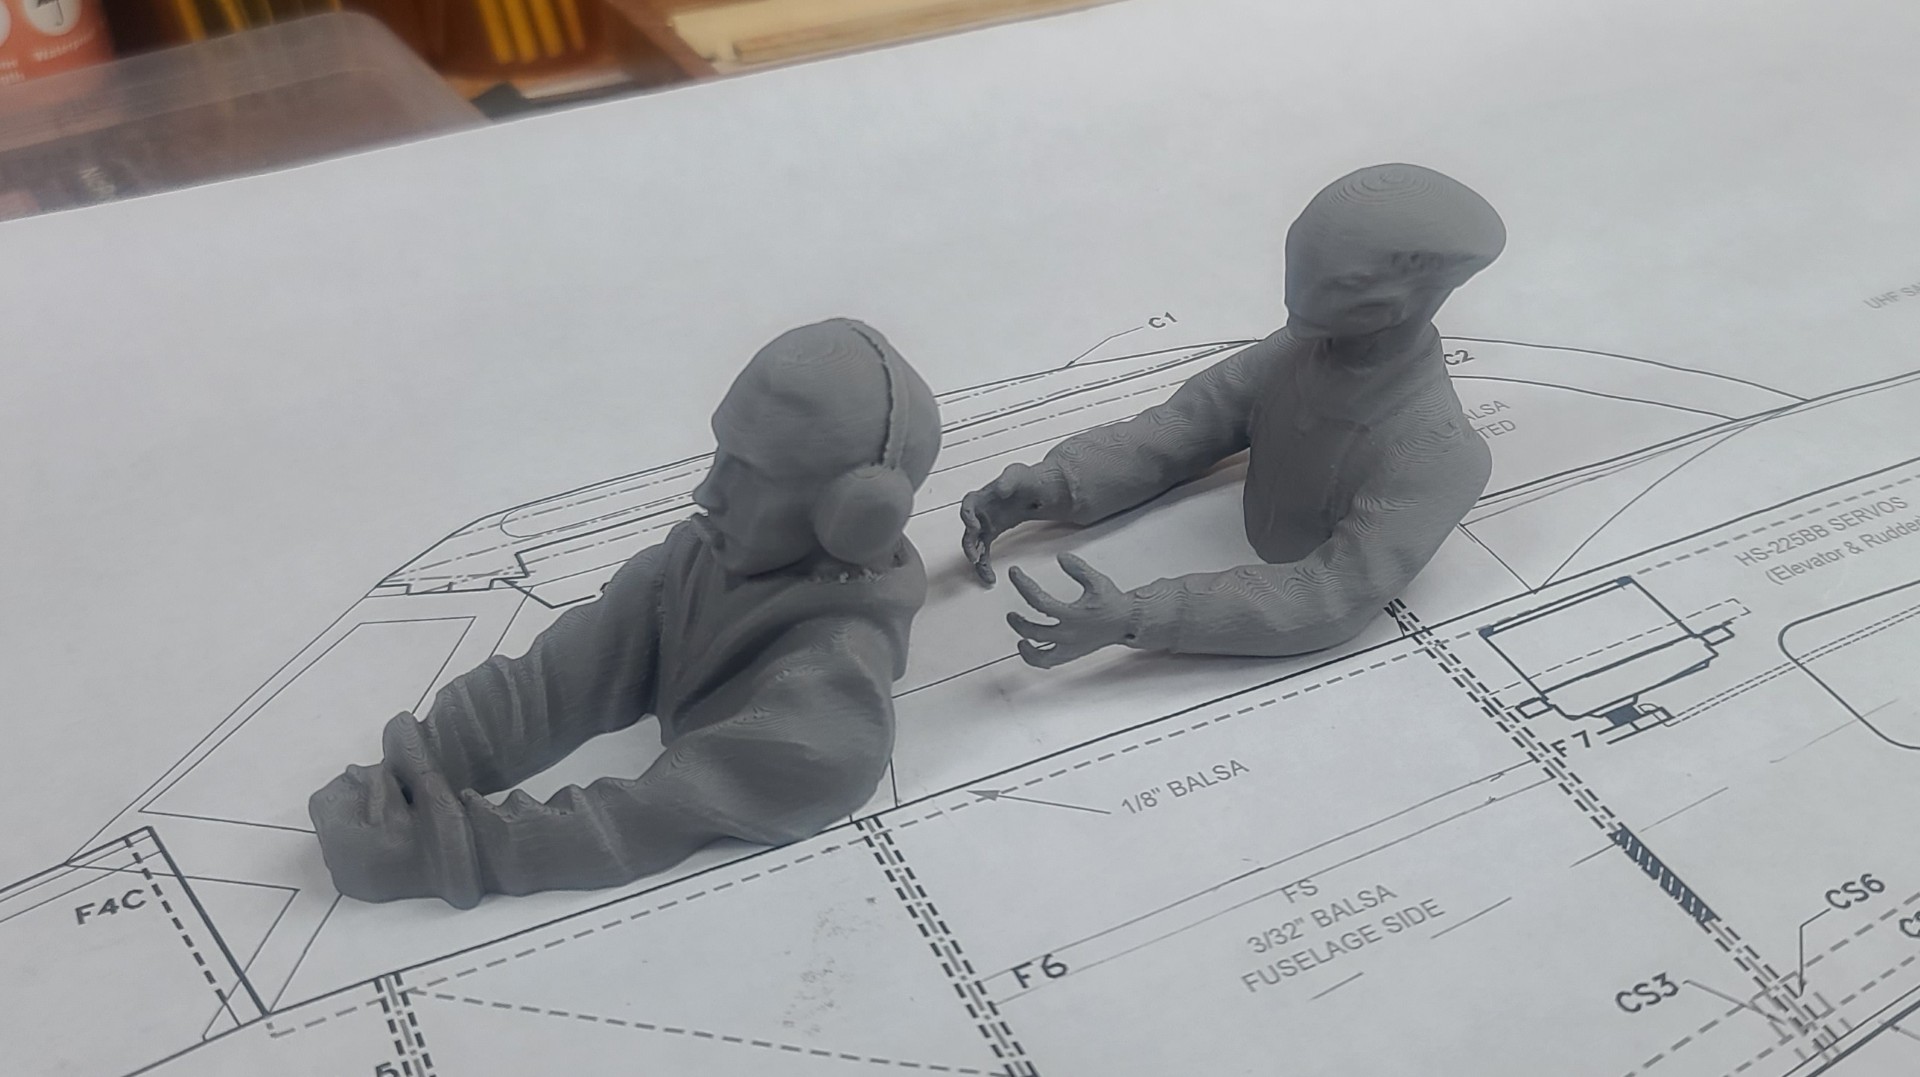
Miss Vintage WW1 Pilot Bust & Spandau Machine Guns
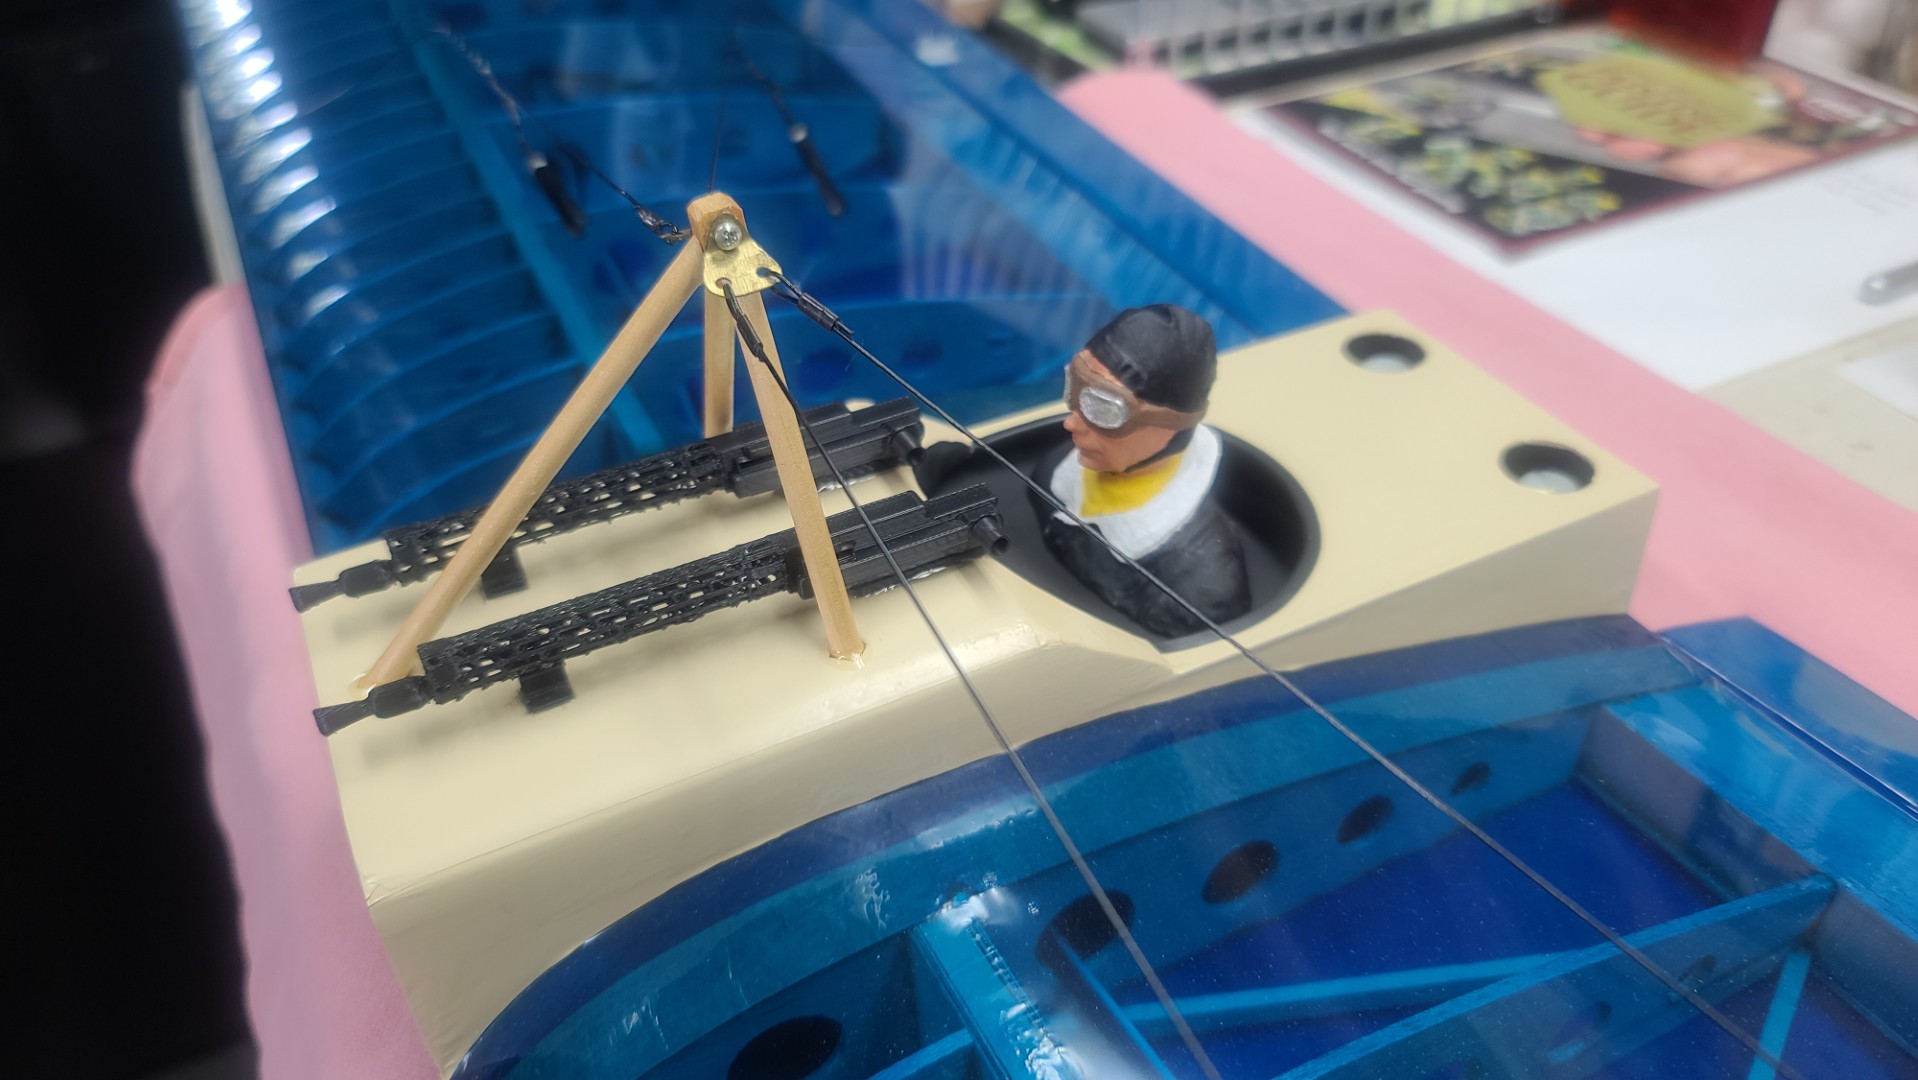
As I had indicated in My Miss Vintage Build Description, the selection of the pilots bust was still an open item for that build. I also had not planned to put any machine guns on the model due to their high prices to purchase, but now that I have my 3D printer, both of these items can be addressed.
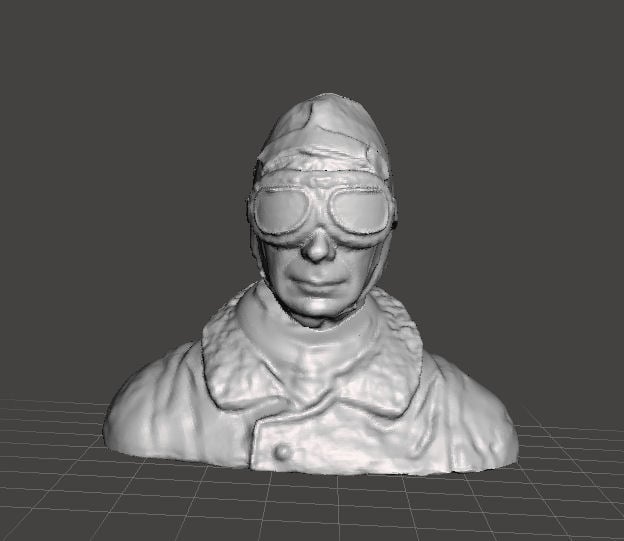
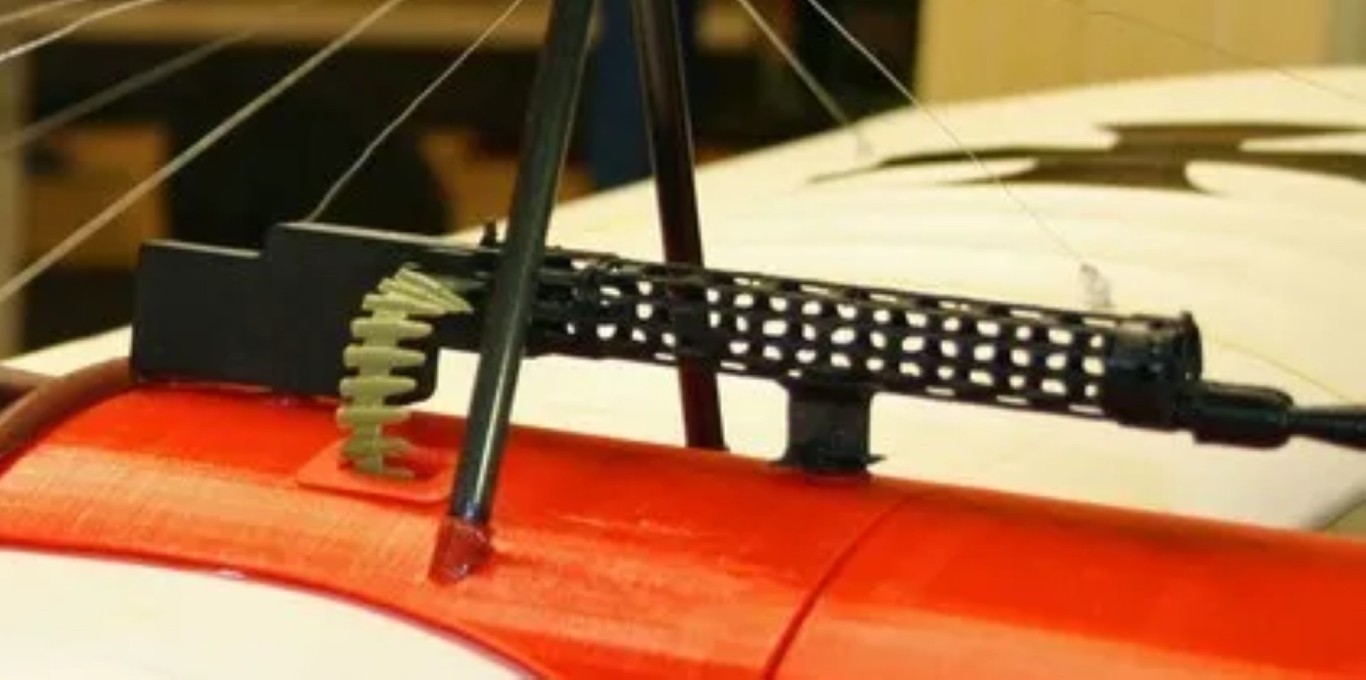
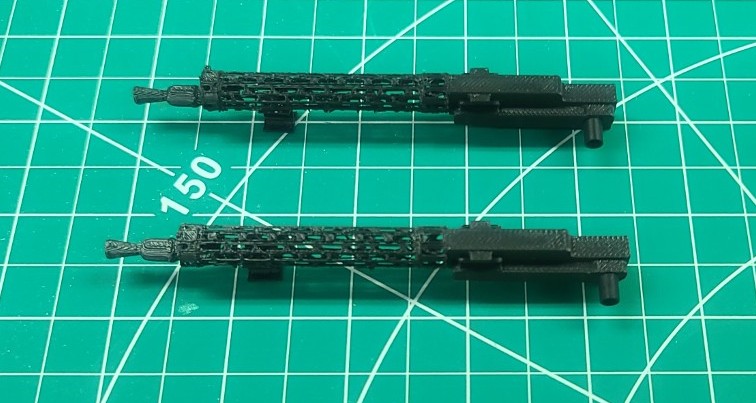
For the pilot bust in the left image below, I found a WWI style pilot made by workshopbob using the body of Manfred WW1 Model Pilot Burst. This was found on Thingivers.com, and for the Spandau MG08 machine guns in the right image I found a 3D model by Wersy on Cults3d.com.
Source of Images: Thingivers.com, and Cults3d.com.
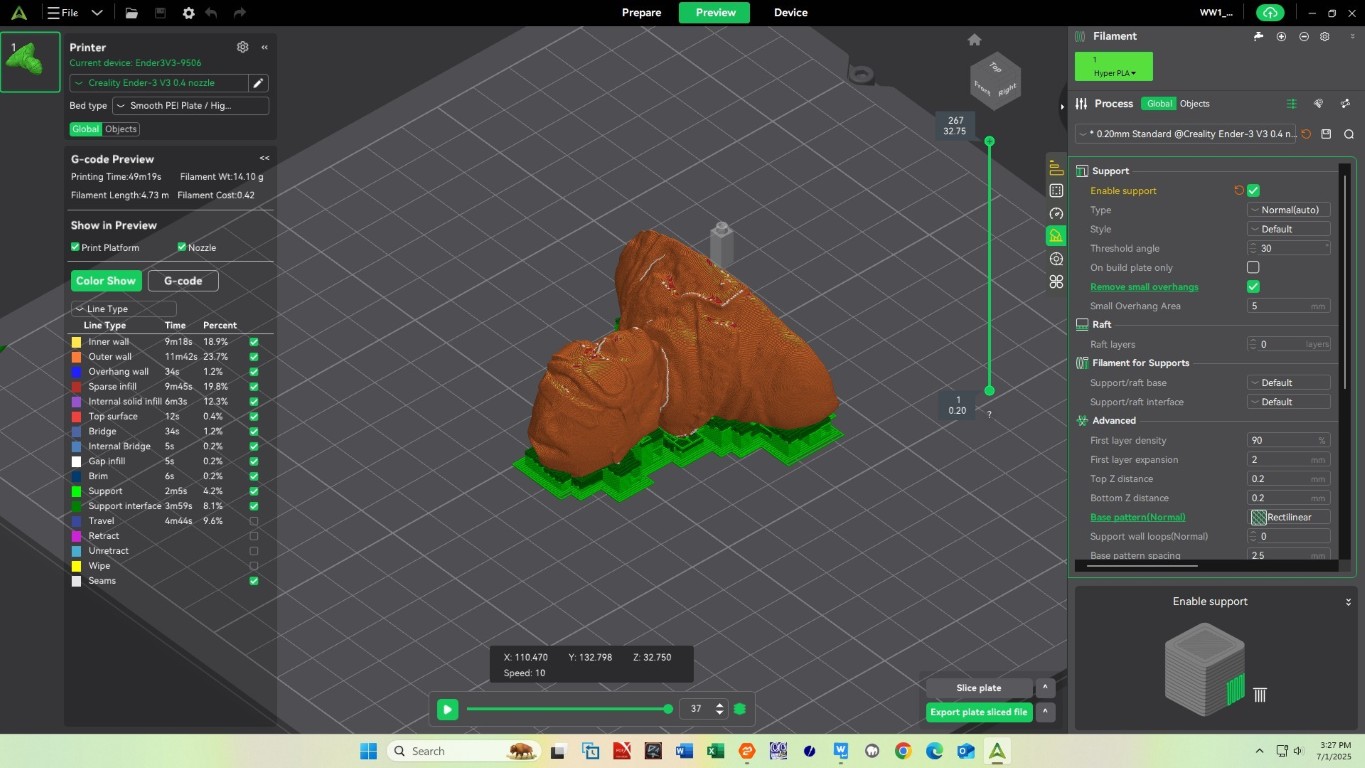
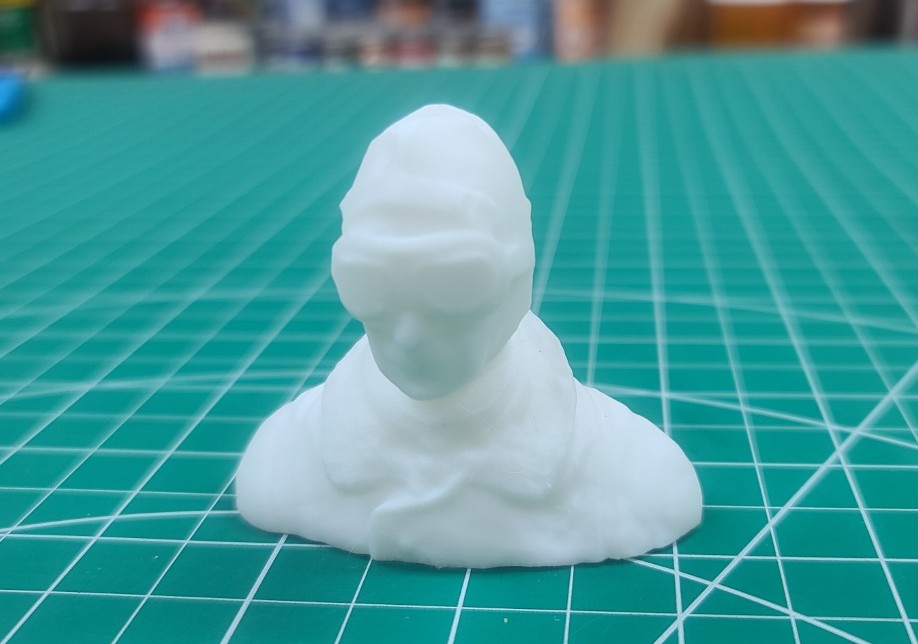
I imported the STL file I download for the pilot bust into Creality Print and adjusted the settings to scale the model for my Miss Vintage cockpit. The image below on the left is the print preview for the pilot bust. Note the print time of just over 49 minutes. The results of the printing using White Creality Hyper-PLA is shown in the image on the right. Now all I need to do is get my paints and fine brushes out to finish the bust.
Next I imported the STL file for the Spandau Machine Gun into Creality Print and for a properly fit on my Miss Vintage I adjusted the settings to scale the model down to 60 percent. The image below on the left is the print set-up for a single gun. Note the print time of approximately 23 minutes. The results of the printing using Black Creality Hyper-PLA is shown in the image on the right.
The final image below shows the painted pilot bust and two Spandau machine guns mounted on my Miss Vintage. Not bad for an old man.
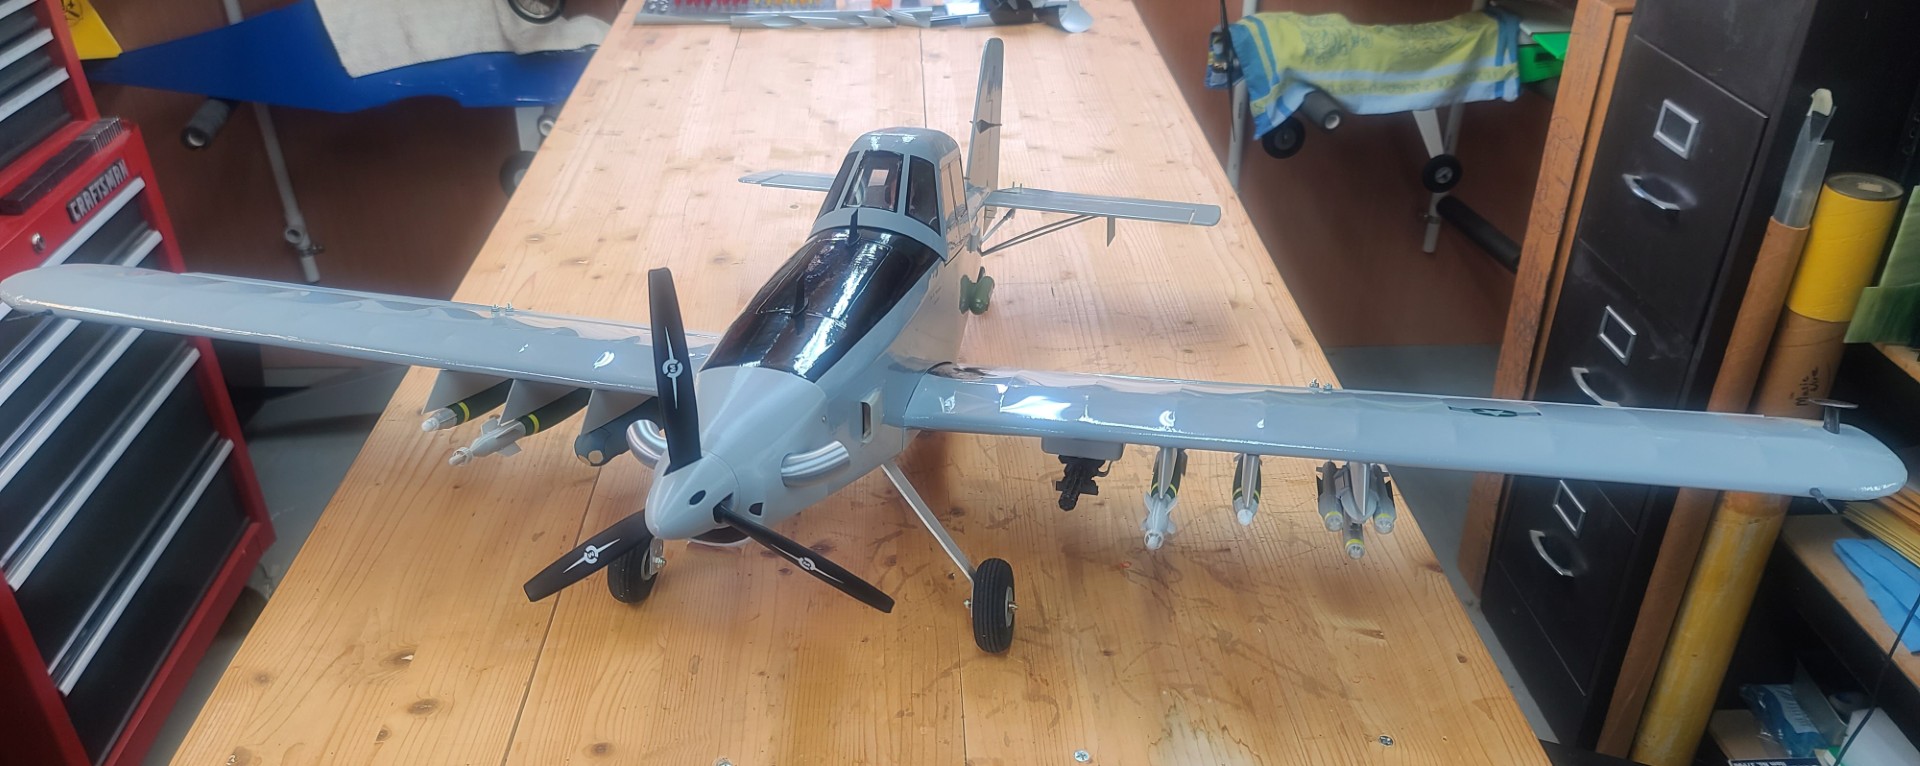
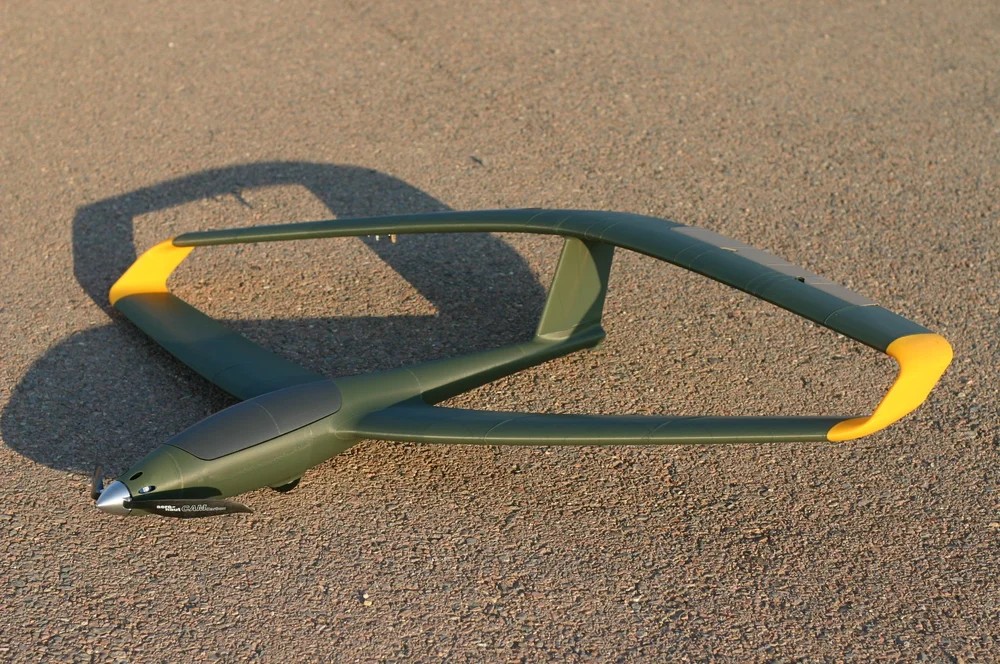
3DAeroventures X-100 Infinity Wing V2
Well, it finally happened. Given that I had my new 3D printer up and running, it was only a matter of time before I would venture into an attempt at building a 3D printed RC airplane model. And to beat all, it was yet another electric powered RC model, which as you know from my other builds is out of the normal for me.
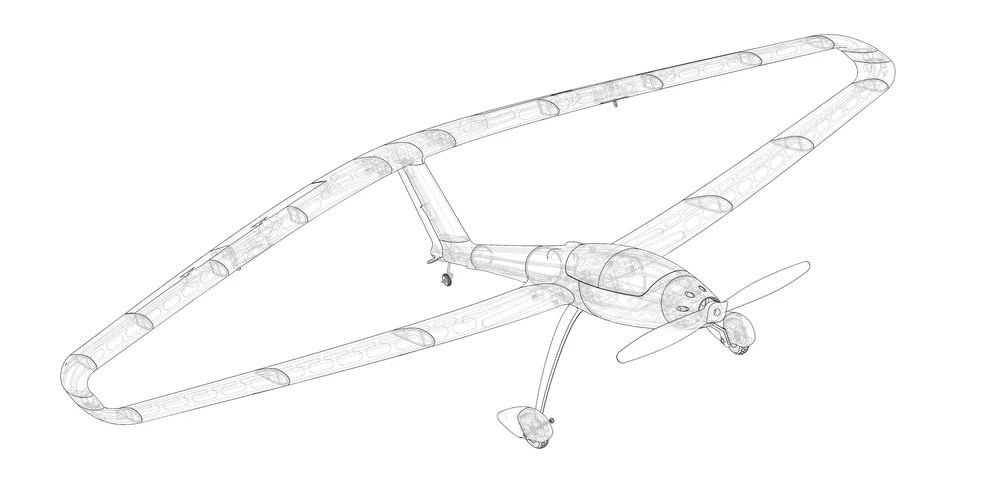
I started my web search for something that was an unusual design, not a large RC airplane model (15 - 40 size), something I would not attempt using balsa and plywood, and was not something with a hundred pieces to print out. Using these requirements I found a very nice website that had just what I was looking for, and that being the X-100 INFINITY WING V2, a 3D printable model designed by Eric Haddad which you can find on 3DAeroventures.

Images Source: X-100 INFINITY WING V2 Webpage.
Below you can see my completed X-100 Infinity Wing ready for first flight.
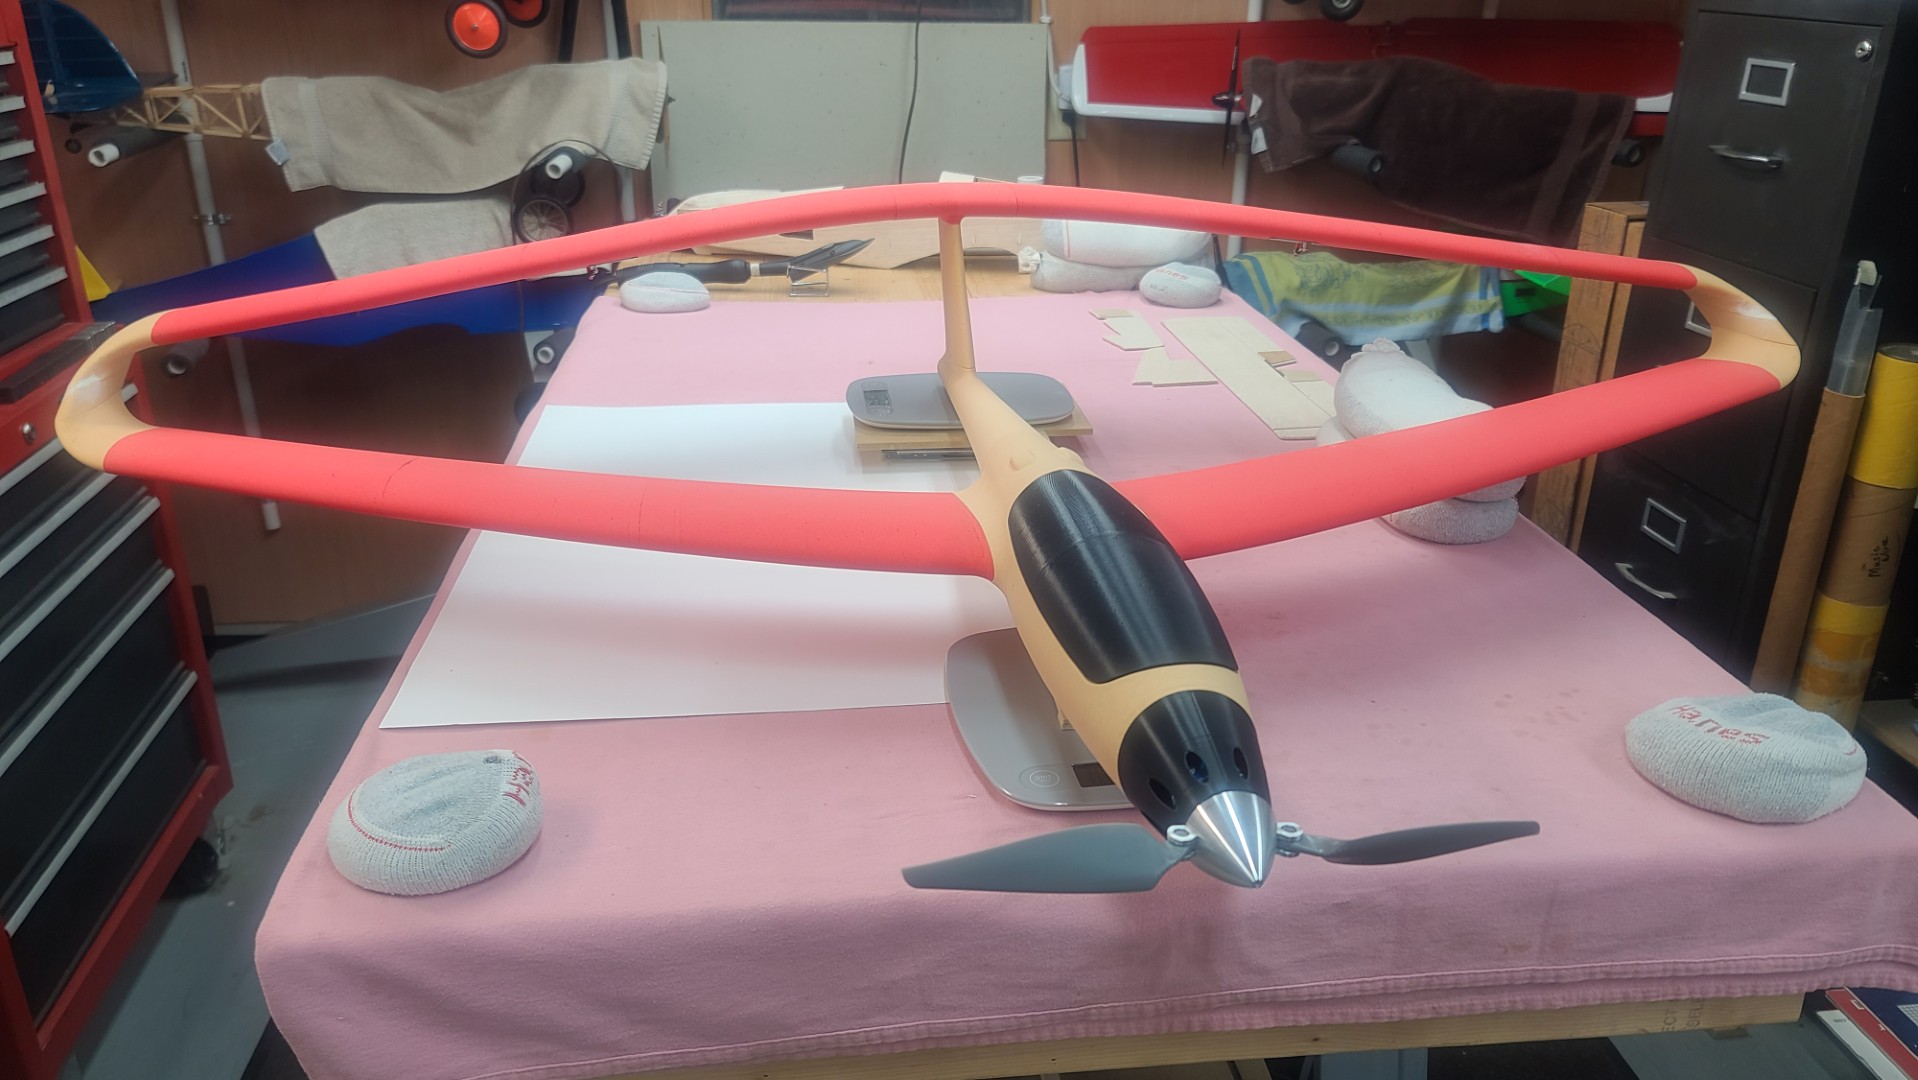
This updated posting is as of 20 March 2026, and for those who have not been following my regular webpage updates, you can read my Latest Version of my X-100 Infinity Wing Print & Builds Description to see everything I have been through up to this point.
3D Printing the X-100 Infinity Wing Upgrade Version
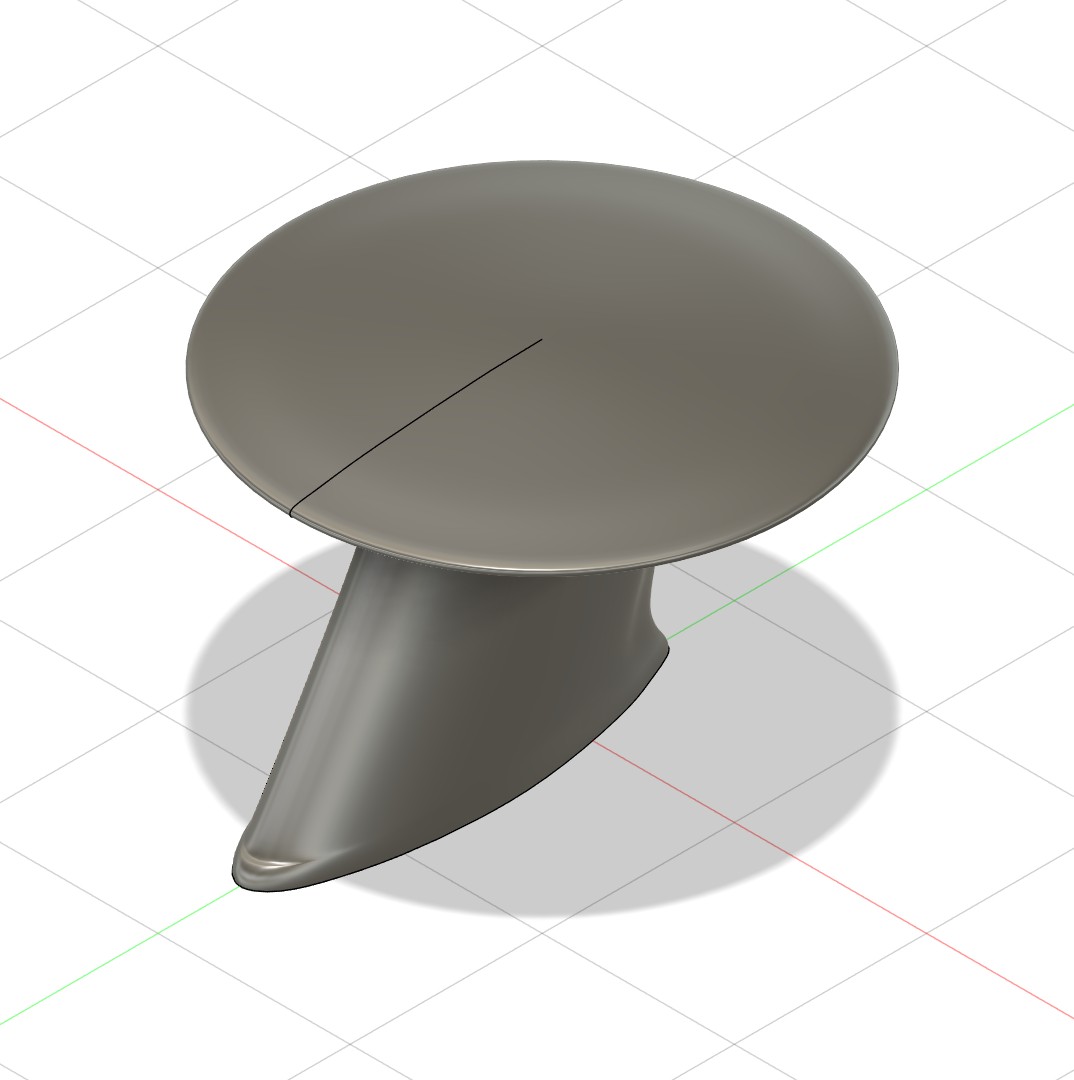
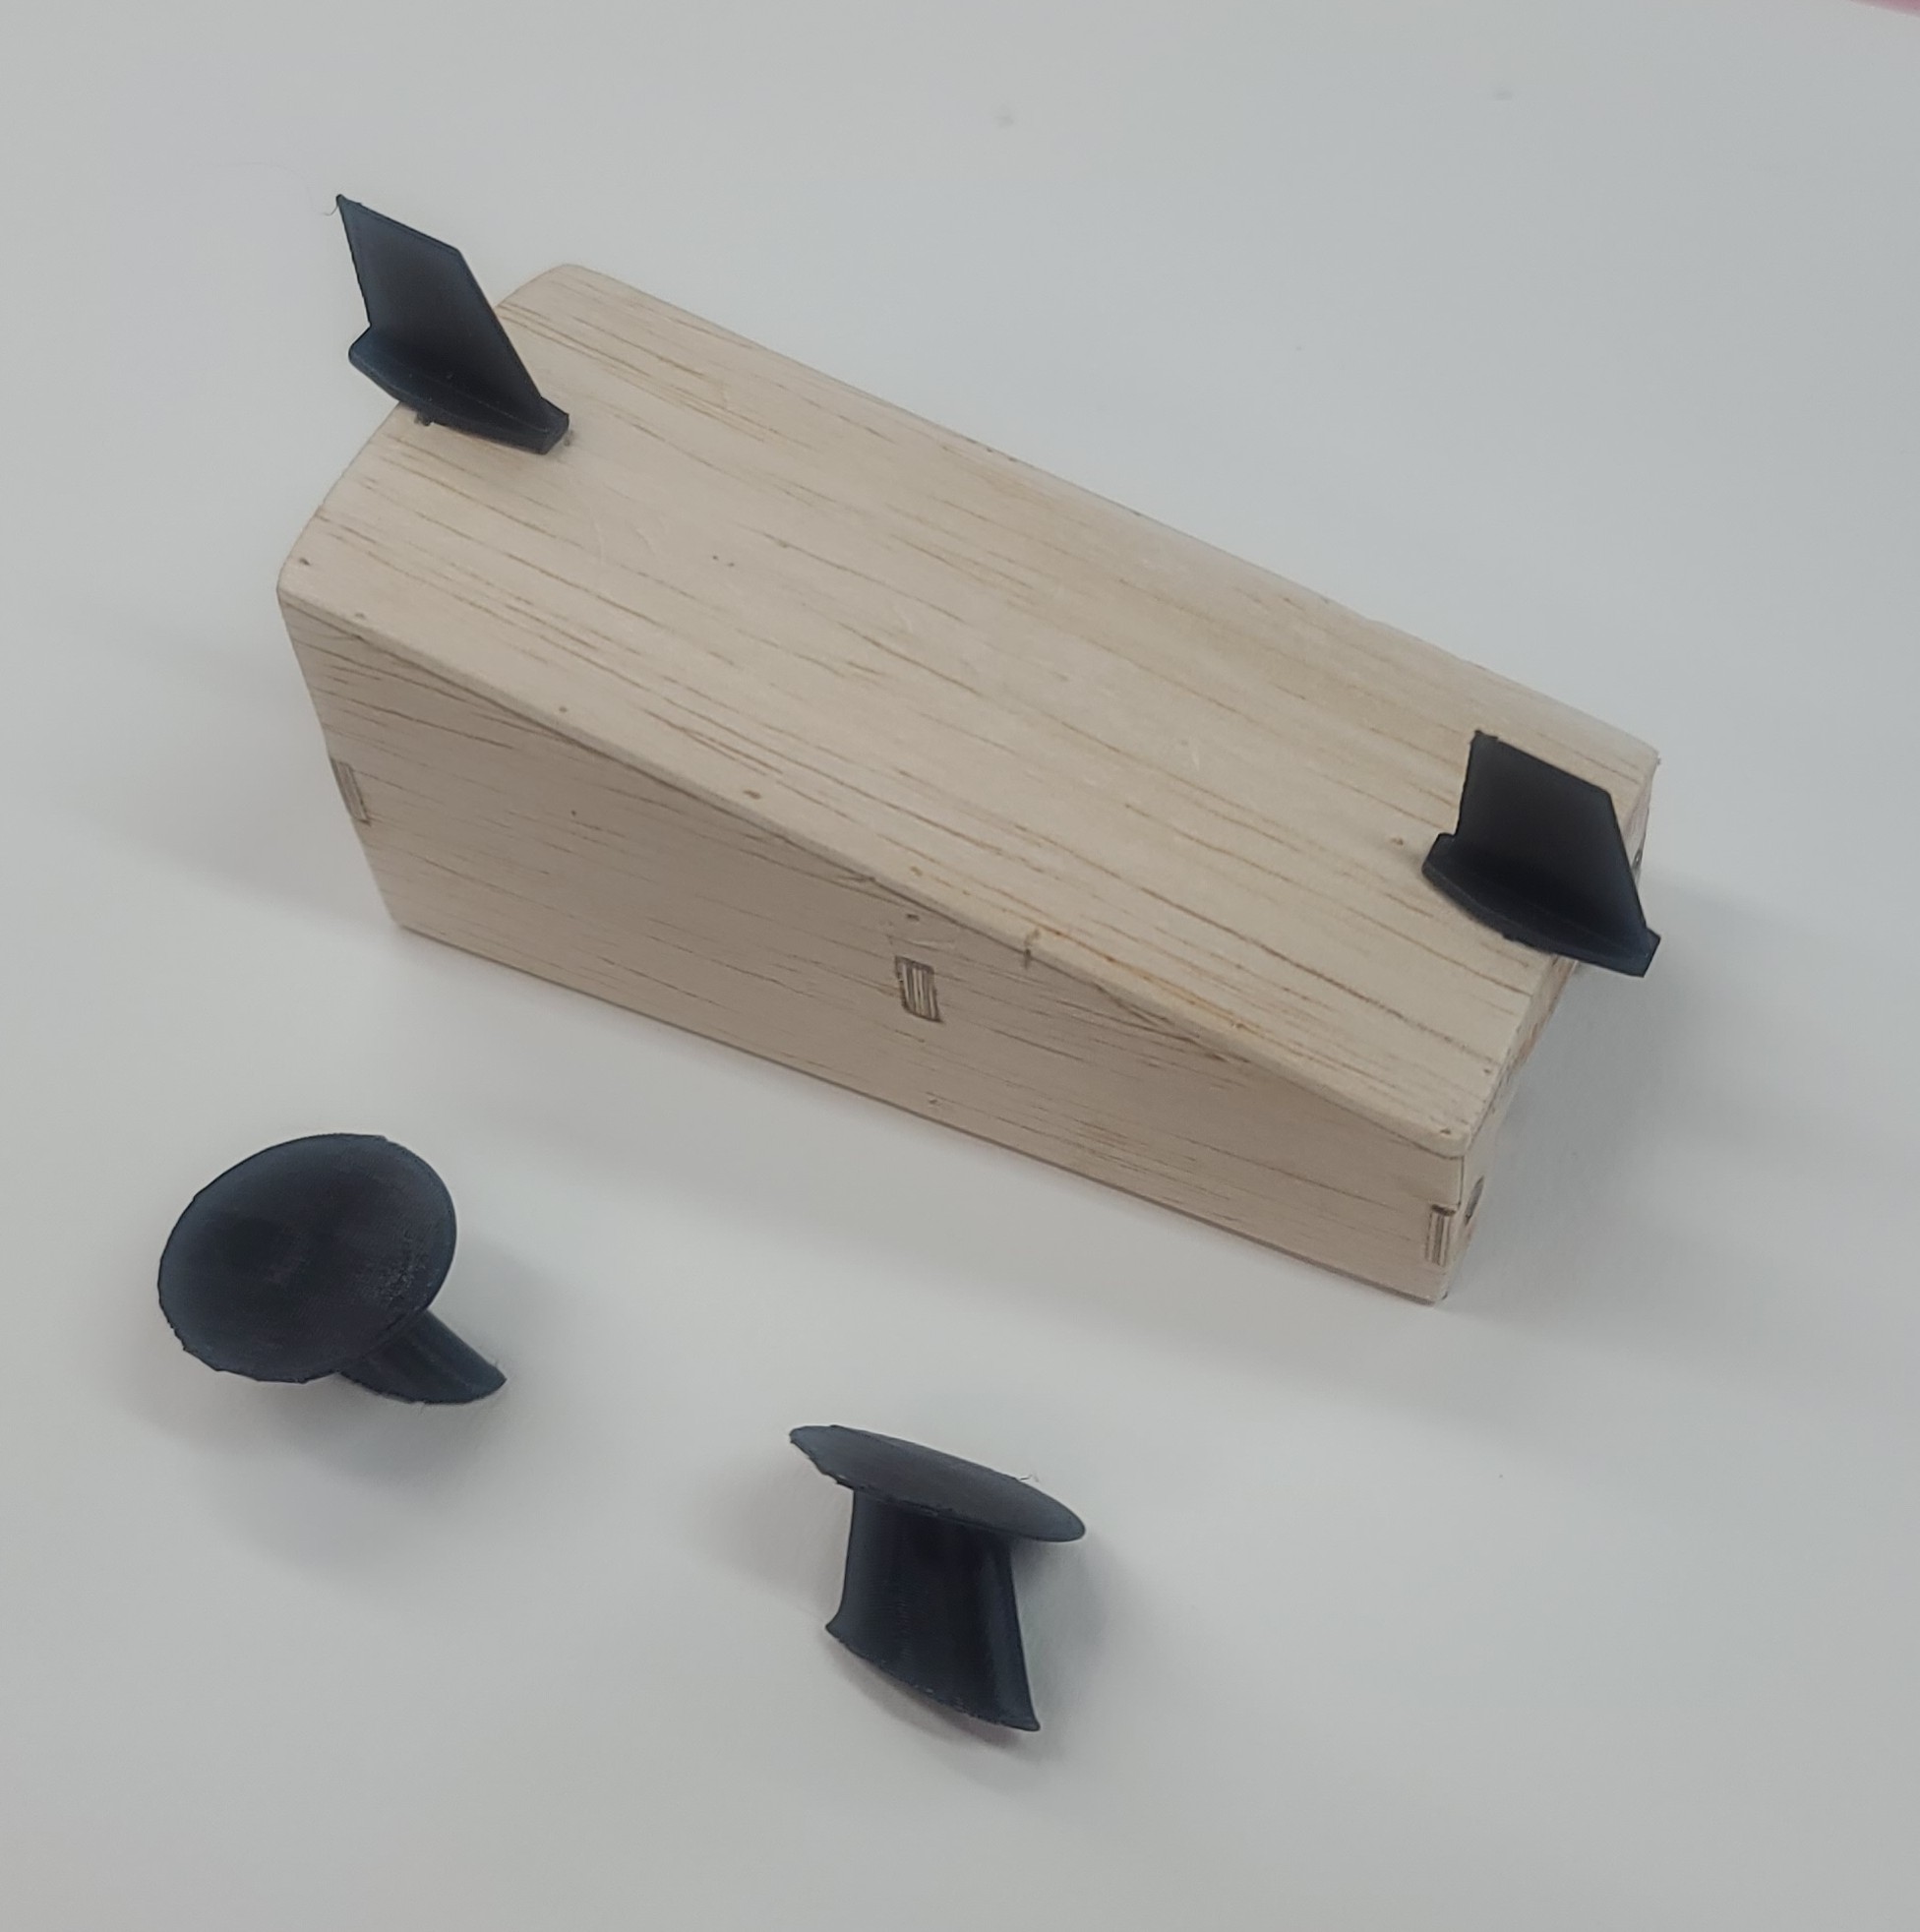
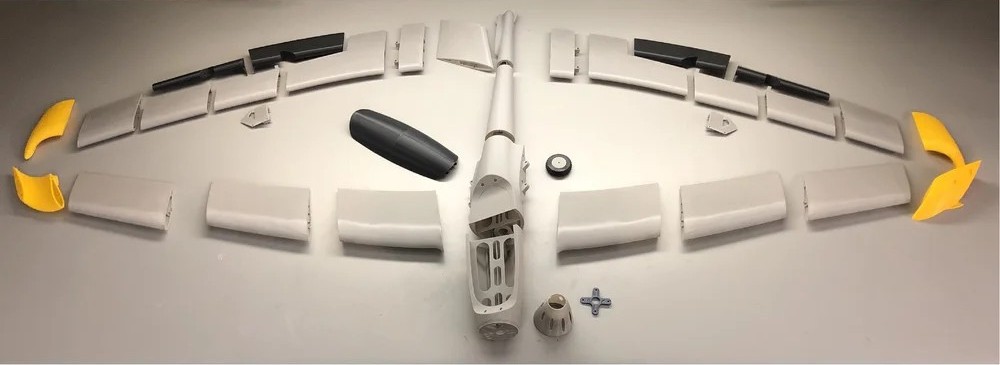
First thing I did was to download the the X-100 INFINITY WING landing gear and rudder upgrade STL files. This free upgrade kit is compatible with the X-100 Infinity Wing V2 STL files set. It carries the Infinity Wing design to a whole new level with a new fuselage design complete with landing gear and rudder capability.
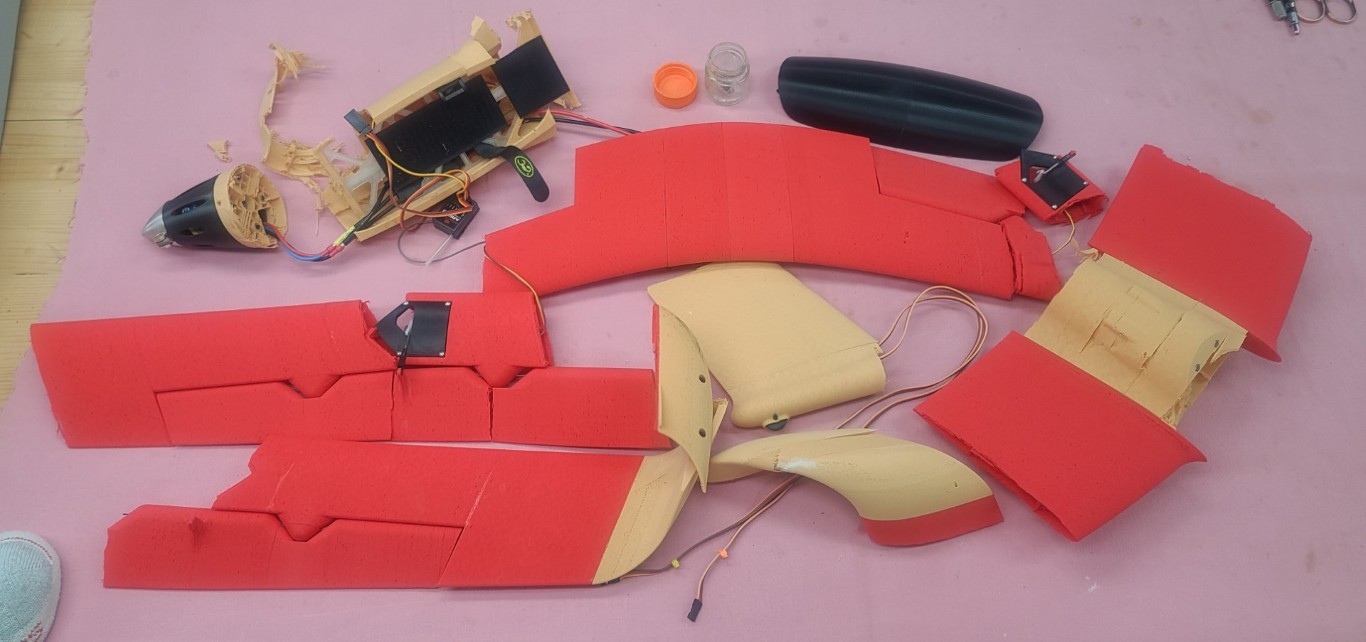
Next, I took the “first flight crash pile” of my first X-100 you see in the left image below and salvaged everything that could be used in the rebuild of my second X-100, which are shown in the right image.
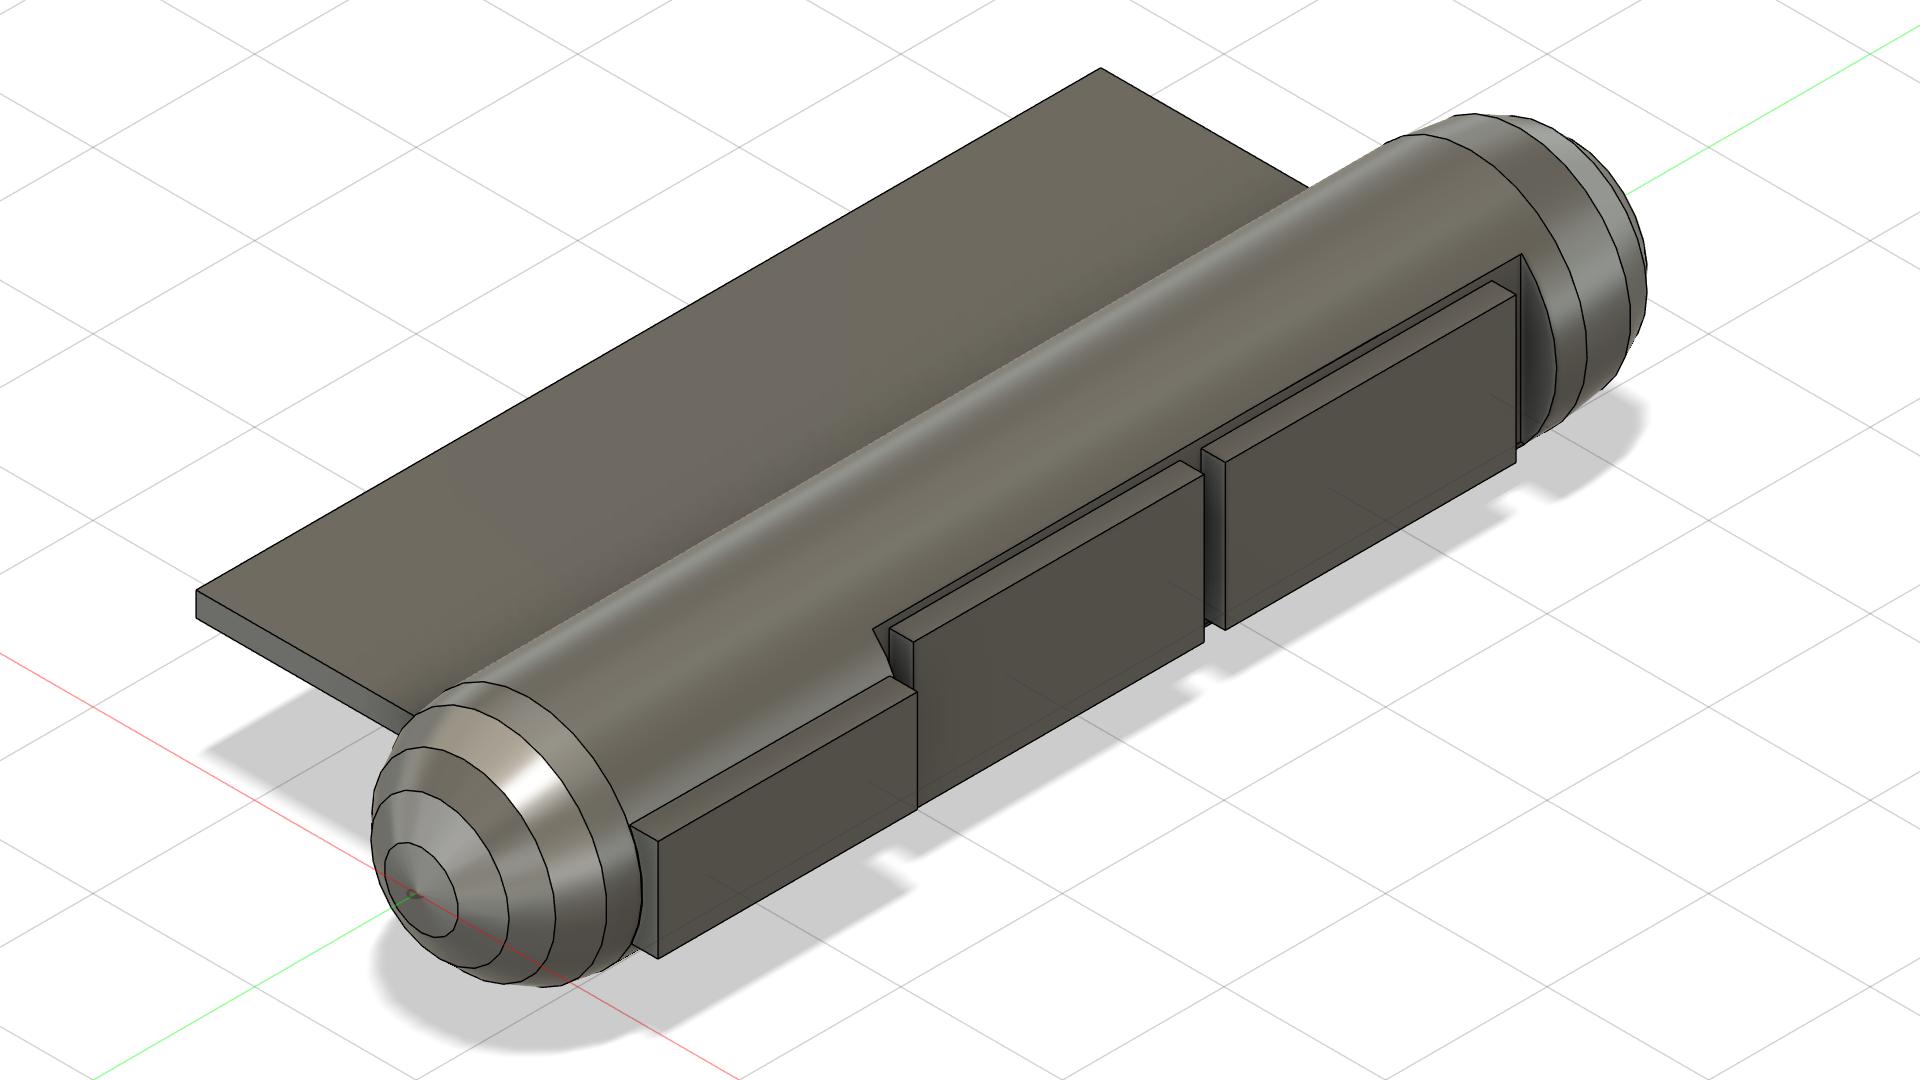
Then I set out to 3D print the upgrade fuselage by setting up each of the various STL files in Creality Print. Using Black Creality Hype-PETG filament, I printed all the parts listed using the Black filament in Table 2 contained in my "X-100 Infinity Wing Print & Builds Description." Resulting print times and part weights are also listed in Table 2.
With that complete, I next 3D printed the rest of the upgrade fuselage parts using White Creality Hype-PETG filament as listed in Table 2. Again, all print times and part weights are listed in Table 2.
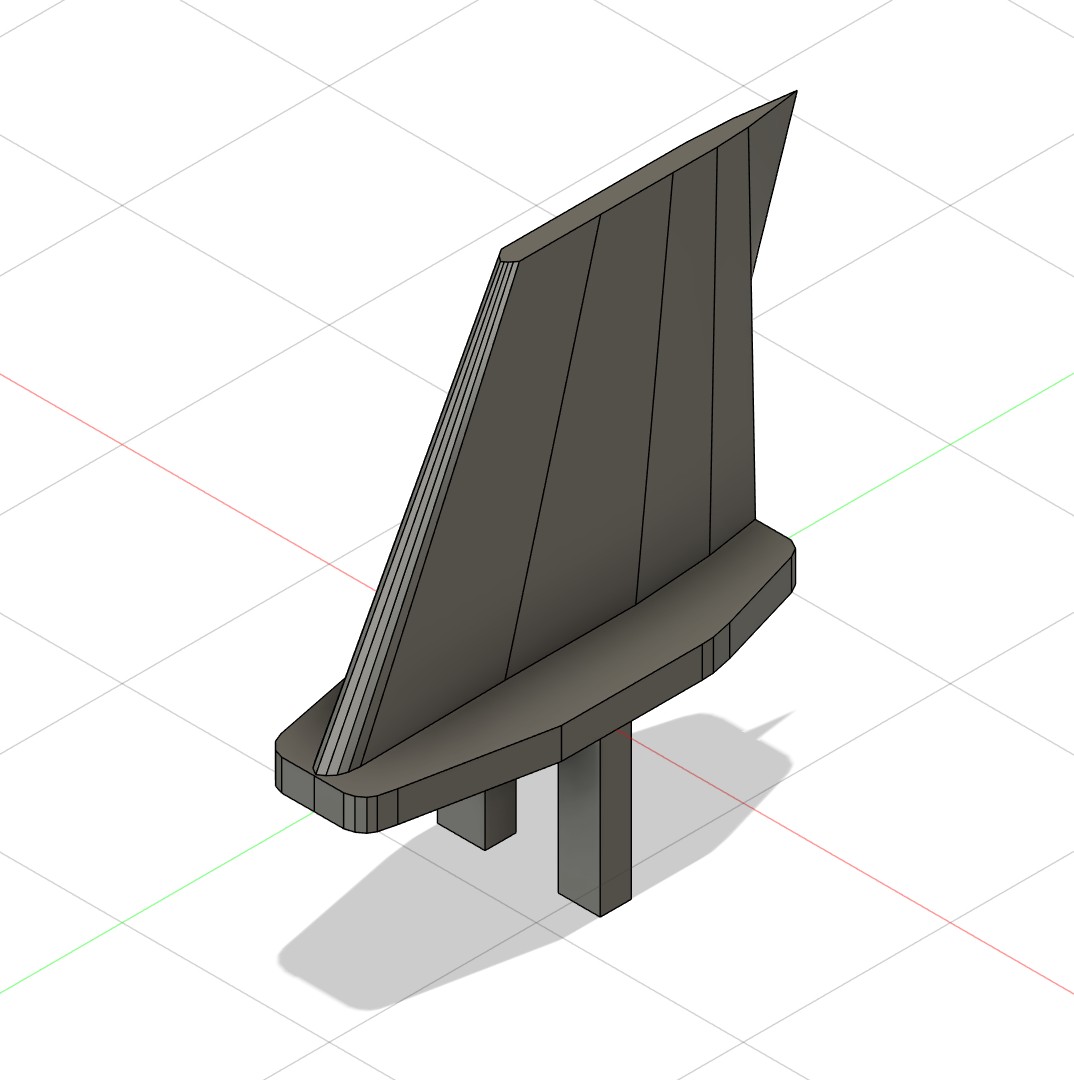
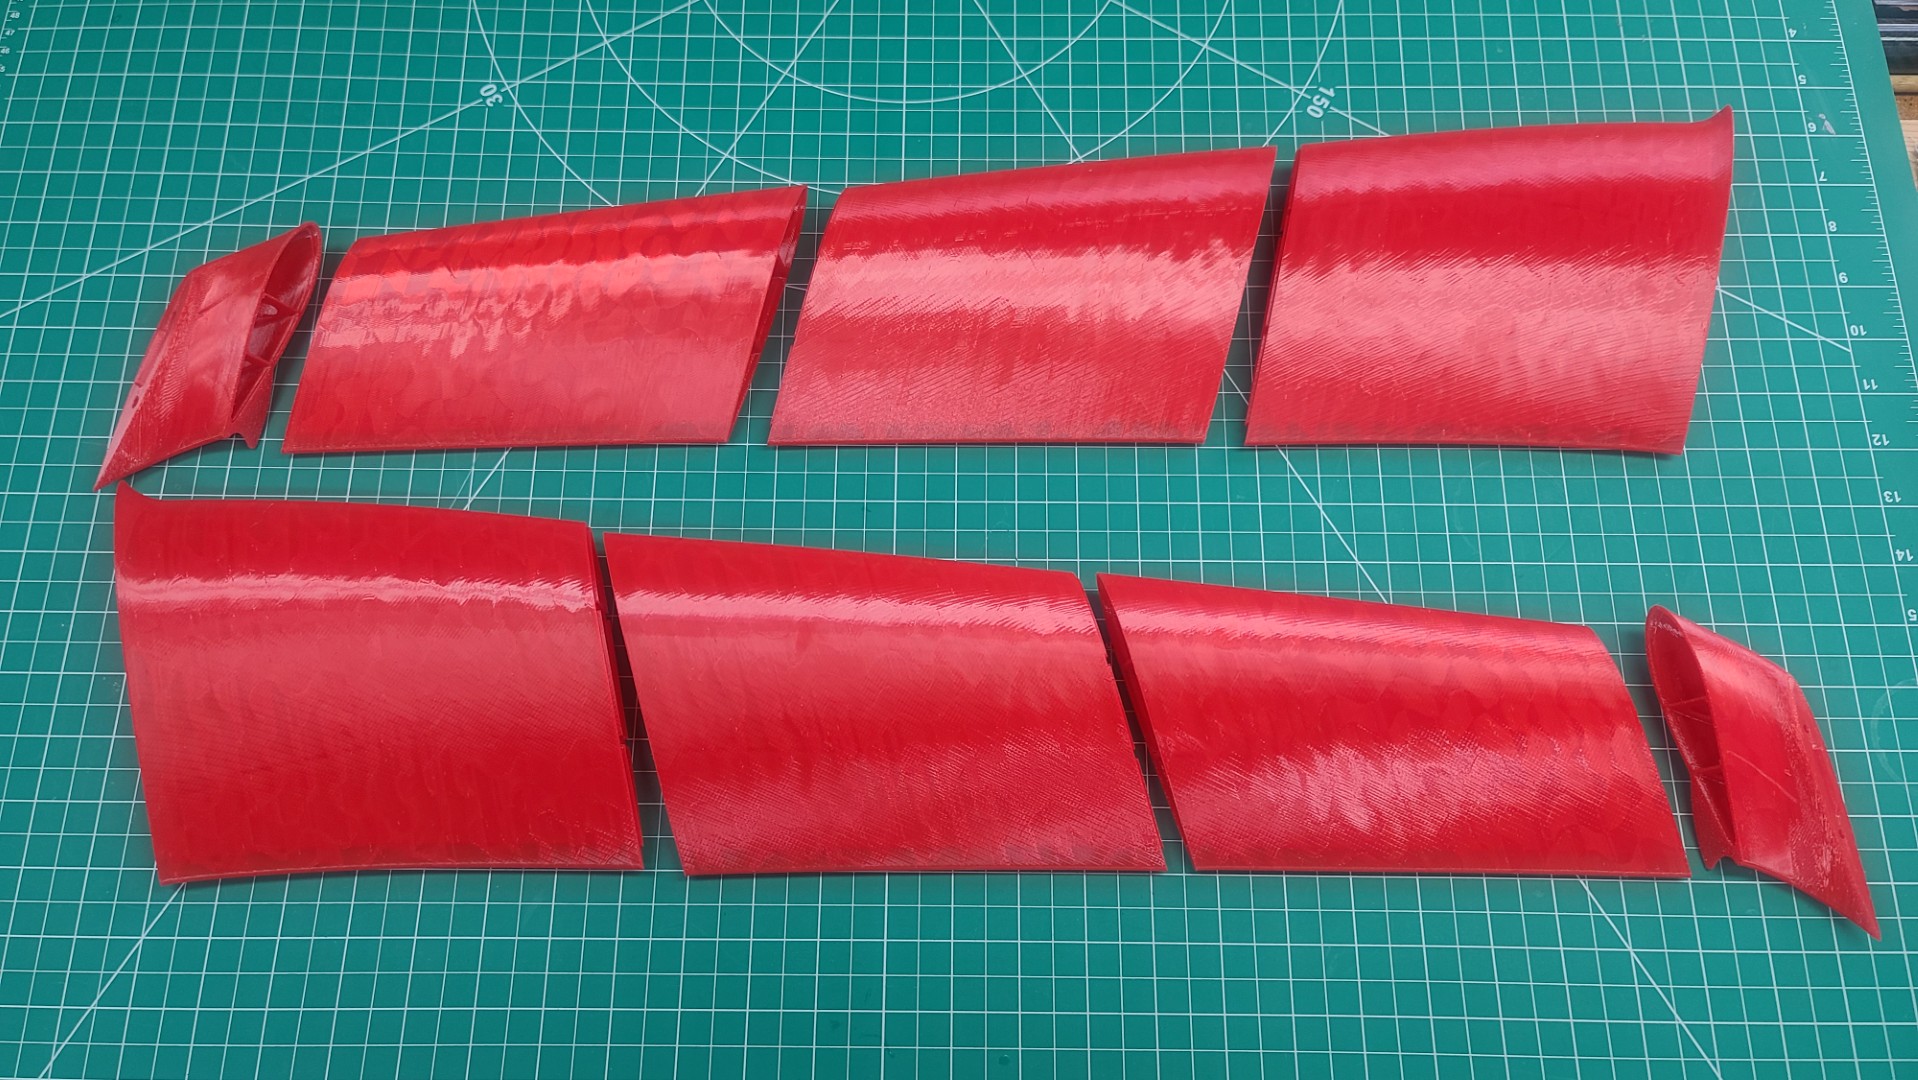
With the Upgraded fuselage parts printing complete, my next step was the Front Wing. After swapping out the filament on my Ender-3 V3 printer, I then 3D printed all of the Front Wing parts in Red Creality CR-PETG filament at a 60 mm/s print speed, 0.2mm layer height, with single walls and a 5% Gyroid sparse infill pattern, using a 0.4mm nozzle. Again, all print times and part weights are listed in Table 2. Results of my efforts are shown shown in the next image below.
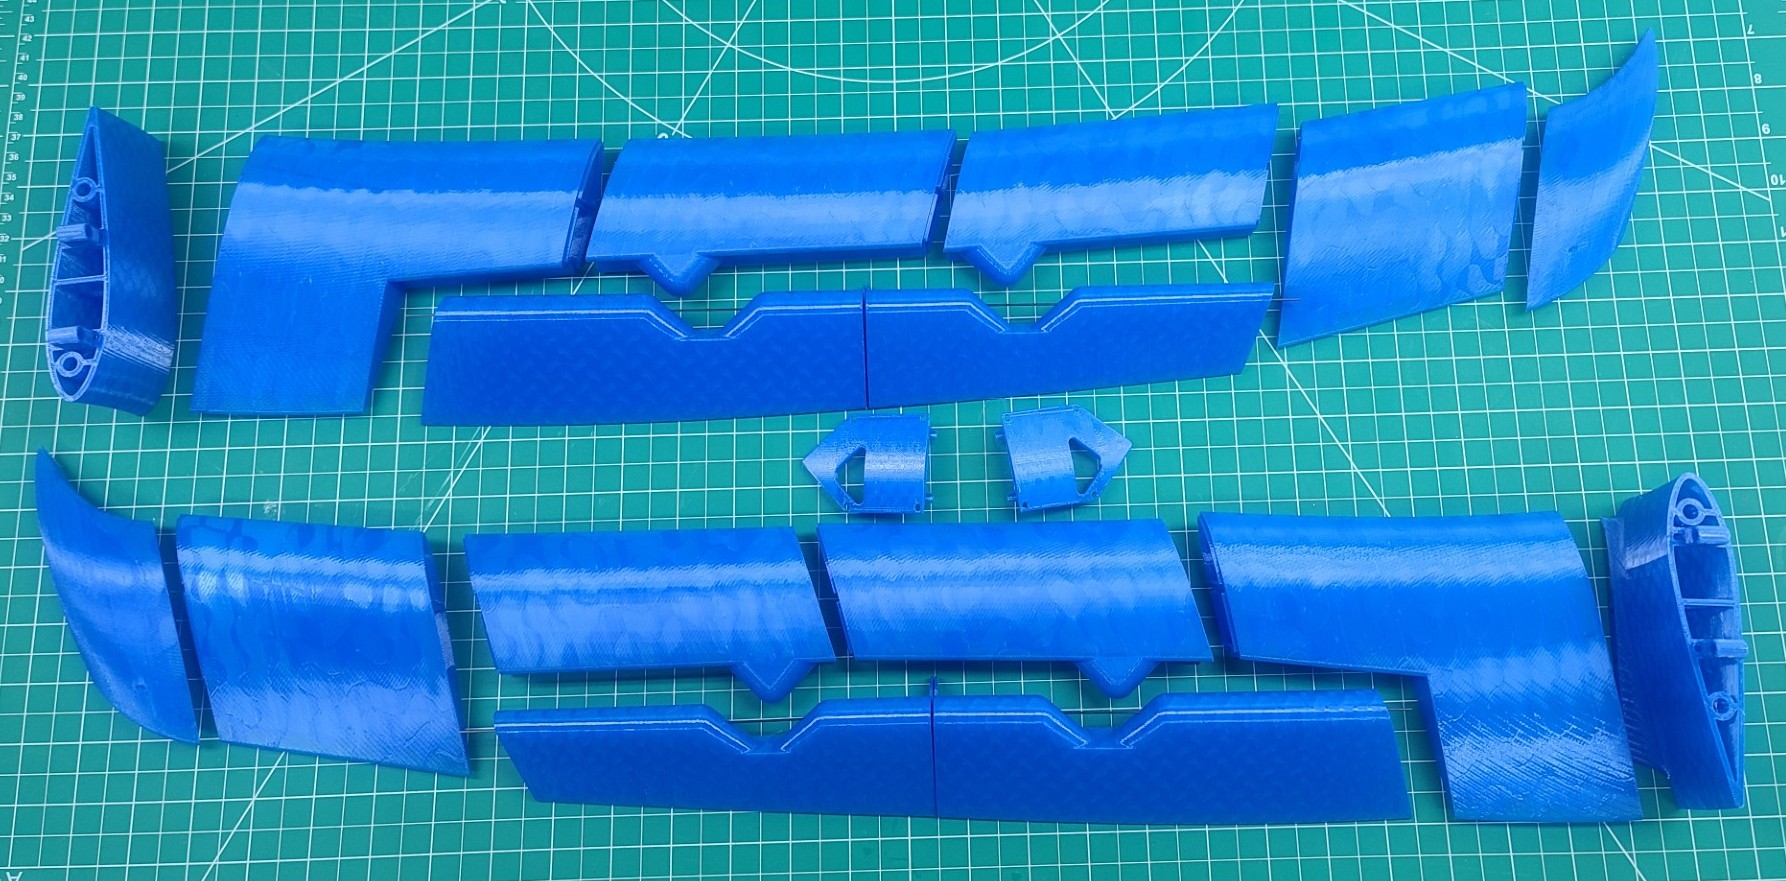
With the Front Wing parts printing complete, my next step was the Back Wing. After swapping out the filament on my Ender-3 V3 printer, I then 3D printed all of the Elevon and Back Wing parts in Blue Creality CR-PETG filament at a 60 mm/s print speed, 0.2mm layer height, with single walls, and a 5% & 10% Gyroid sparse infill pattern, using a 0.4mm nozzle. Again, all print times and part weights are listed in Table 2. Results of my efforts are shown shown in the next image below.
Stay Tuned for more to come!
X-100 Infinity Wing Print & Builds Description.
See All Images Taken During the X-100 Infinity Wing Print/Builds.
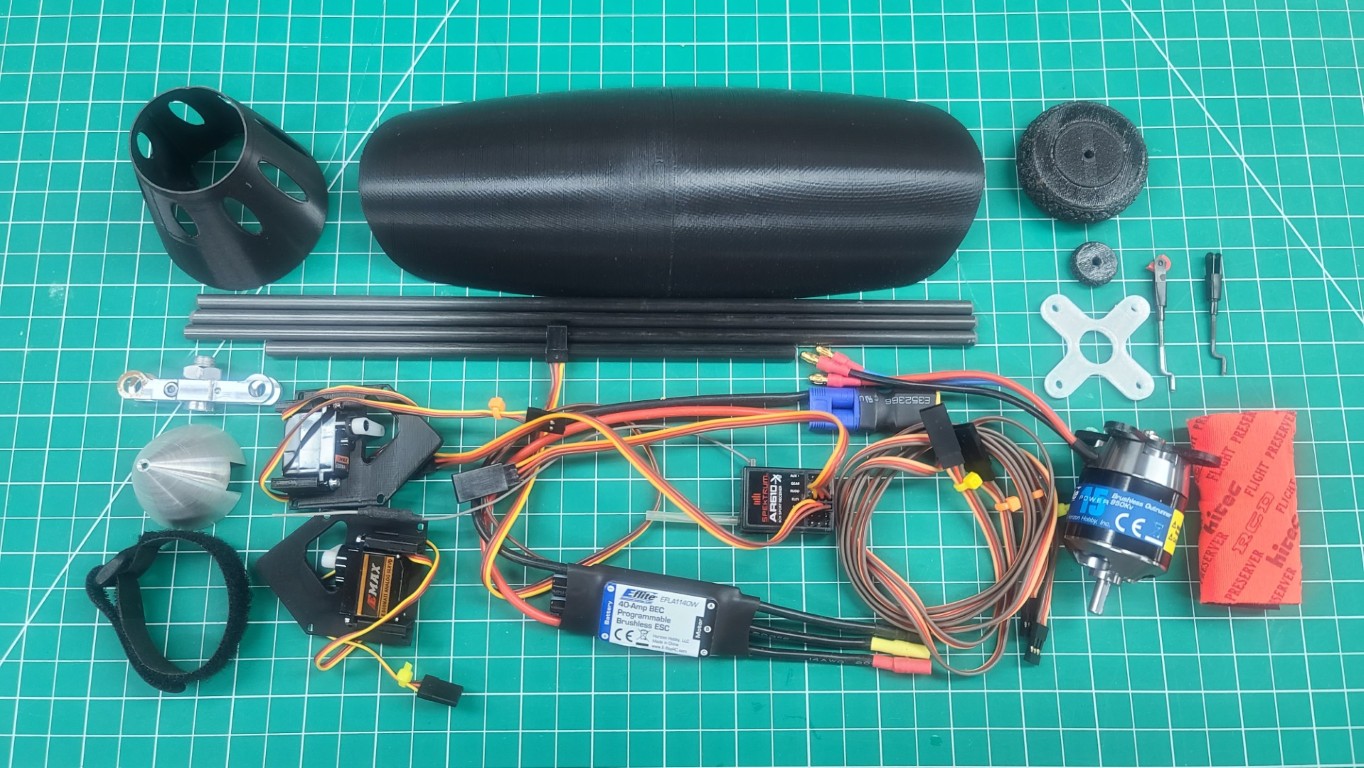
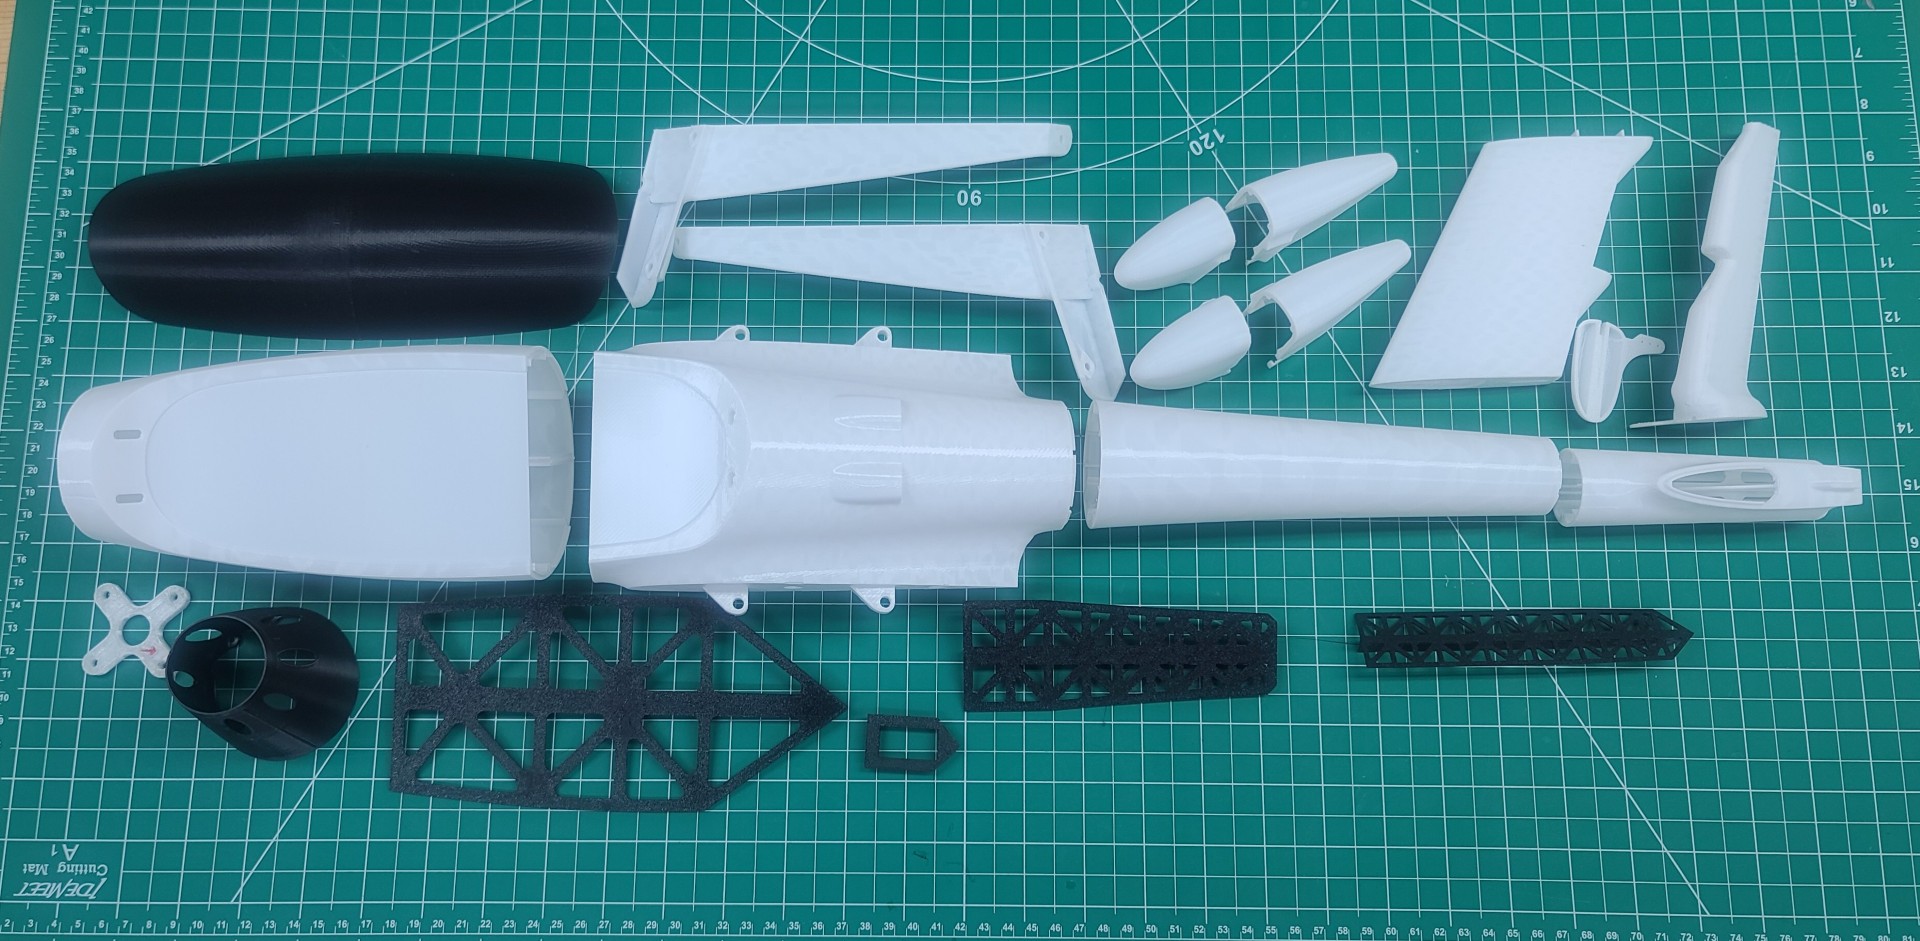
Kyles Designs RC RQ-4 Global Hawk
The RQ-4 Global Hawk is a high-altitude, long-endurance, remotely piloted aircraft with an integrated sensor suite that provides global all-weather, day or night intelligence, surveillance and reconnaissance (ISR) capability. Global Hawk's mission is to provide a broad spectrum of ISR collection capability to support joint combatant forces in worldwide peacetime, contingency and wartime operations. The Global Hawk provides persistent near-real-time coverage using imagery intelligence (IMINT), signals intelligence (SIGINT) and moving target indicator (MTI) sensors.
This RQ-4 Global Hawk 3D printed RC model was designed by Kyle Germanton with help from his co-designers Thomas Heuer and Chris Parent. You can see more of their 3D models on Kyles Designs RC, SODYs3D, and on Cults 3D. This model was also featured in my September 2025 BOTM Edition.
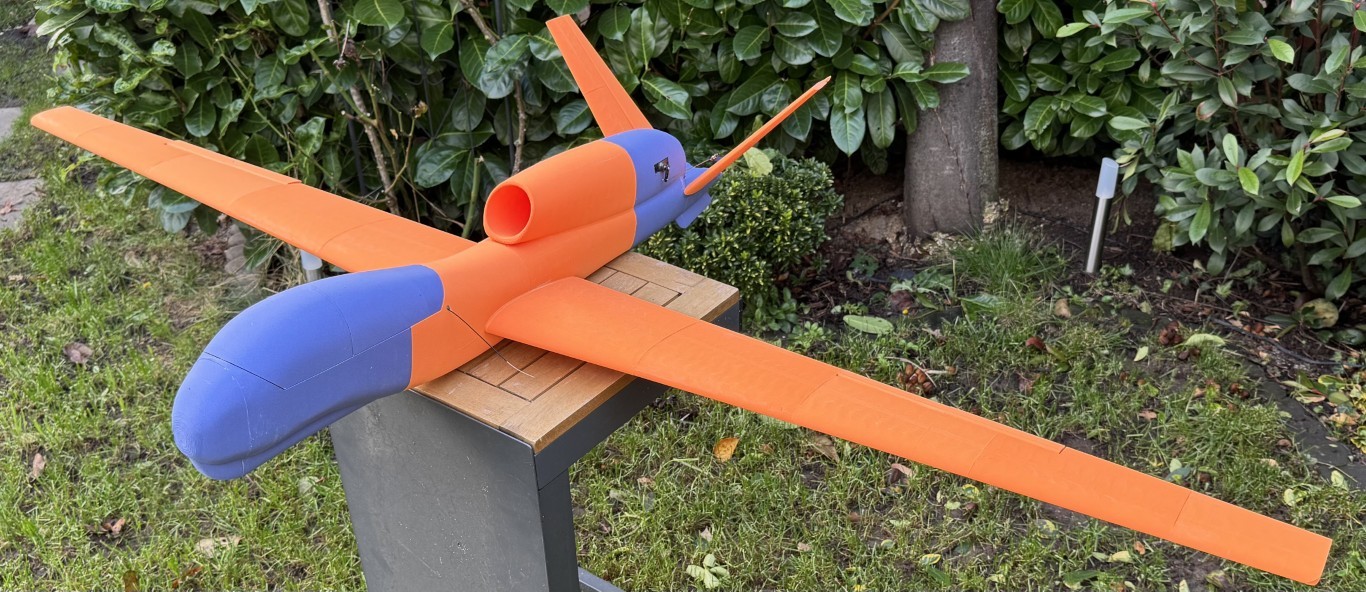
Images Source: Cults3d.com.
I picked the RQ-4 3D model for a couple reasons. First, I wanted a 3D printed model that would be simple to build and easy to fly. Second, I worked on the USAF Global Hawk program for six years as a flight test manager and the Air Vehicle IPT program manager.
This updated posting is as of 21 January 2026, and for those who have not been following my regular webpage updates, you can read my RQ-4 Global Hawk Print/Build Description to see everything I have been through up to this point. A complete listing of all the materials, tools, and hardware needed to 3D print and build the RQ-4 are also listed in my build description.
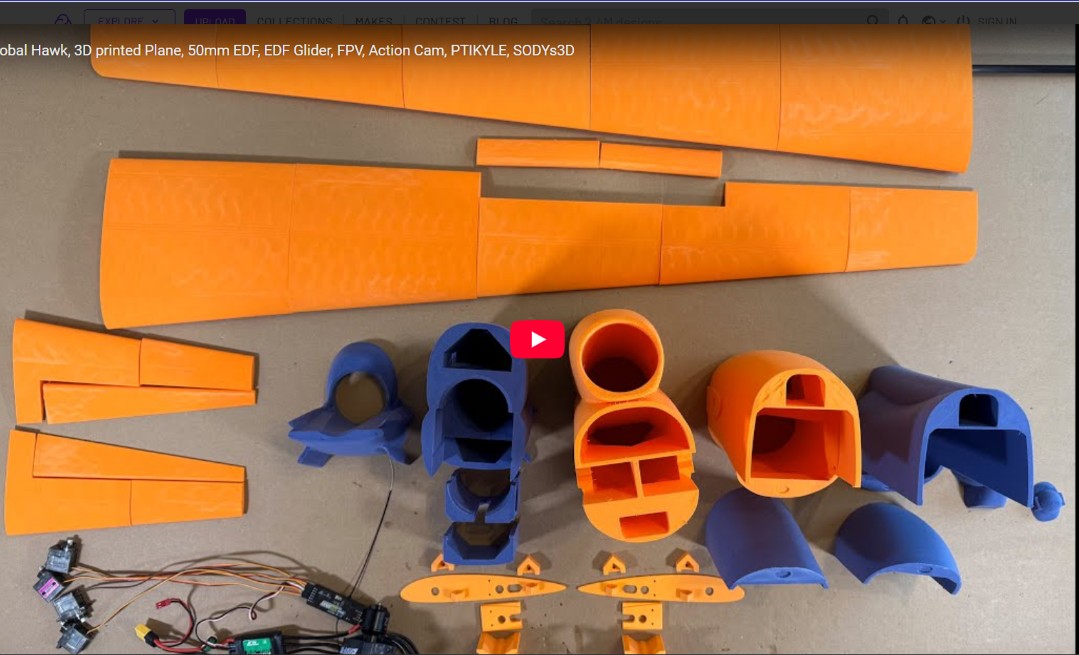
Next, I started the assembly of the RQ-4 fuselage. I first completed an electrical checkout of the two ruddervator servos, and then using a hot glue gun I installed them into each side of Fus5. I mounted the 50mm Ducted Fan in the front of Fus5 using a bead of hot glue around the backside of the fan shroud. The assembly video doesn't actually show where to place/attach the Electric Speed Controller (ESC), so I decided to mount it as close to the CG as I could using Velcro strips on the middle shelf in Fus3. To do this I had to add 20cm 14AWG ESC to Motor Extension Cables w/3.5mm bullet connectors to the ESC motor leads. Servo extension cables were also needed in order to reach the AR620 receiver, which is mounted near the top front edge of Fus3.
Builders Note — To identify what extension cable is attached to a particular control surface servo, I place different color small cable ties around the ends of the extension cables that plug into the AR620 receiver (i.e. Channel 1 Throttle – Black; Channel 2 Right flaperon – Orange; Channel 3 Right ruddervator – Blue; Channel 4 Left ruddervator – Purple; and Channel 6 Left flaperon – Yellow).
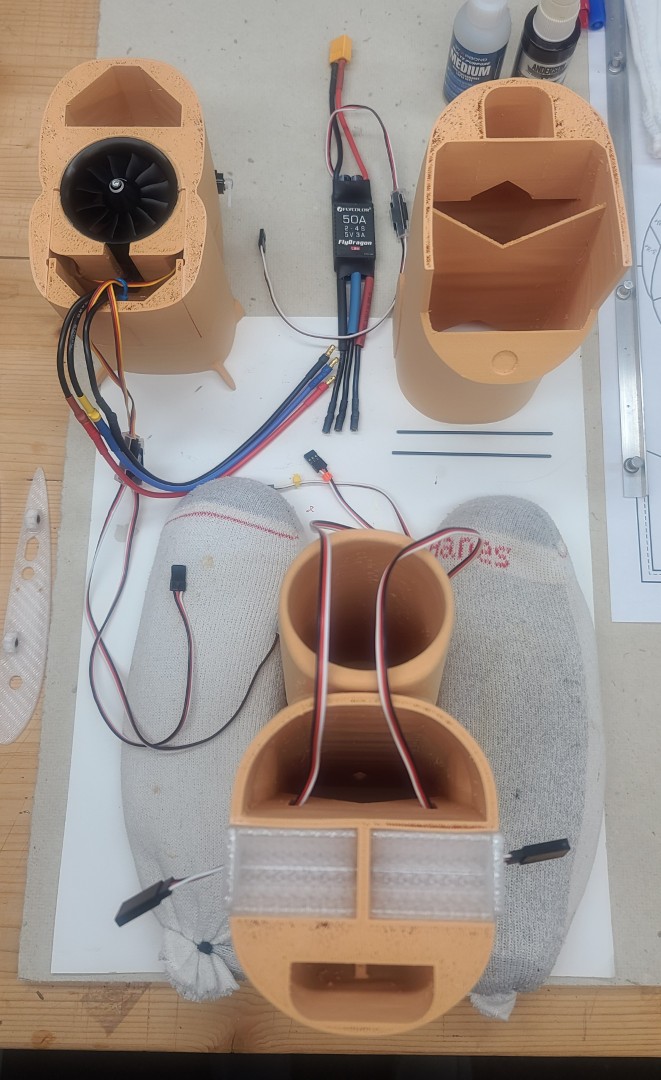
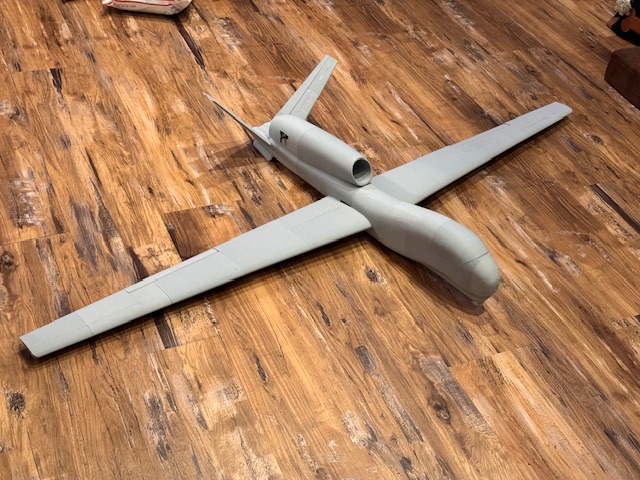
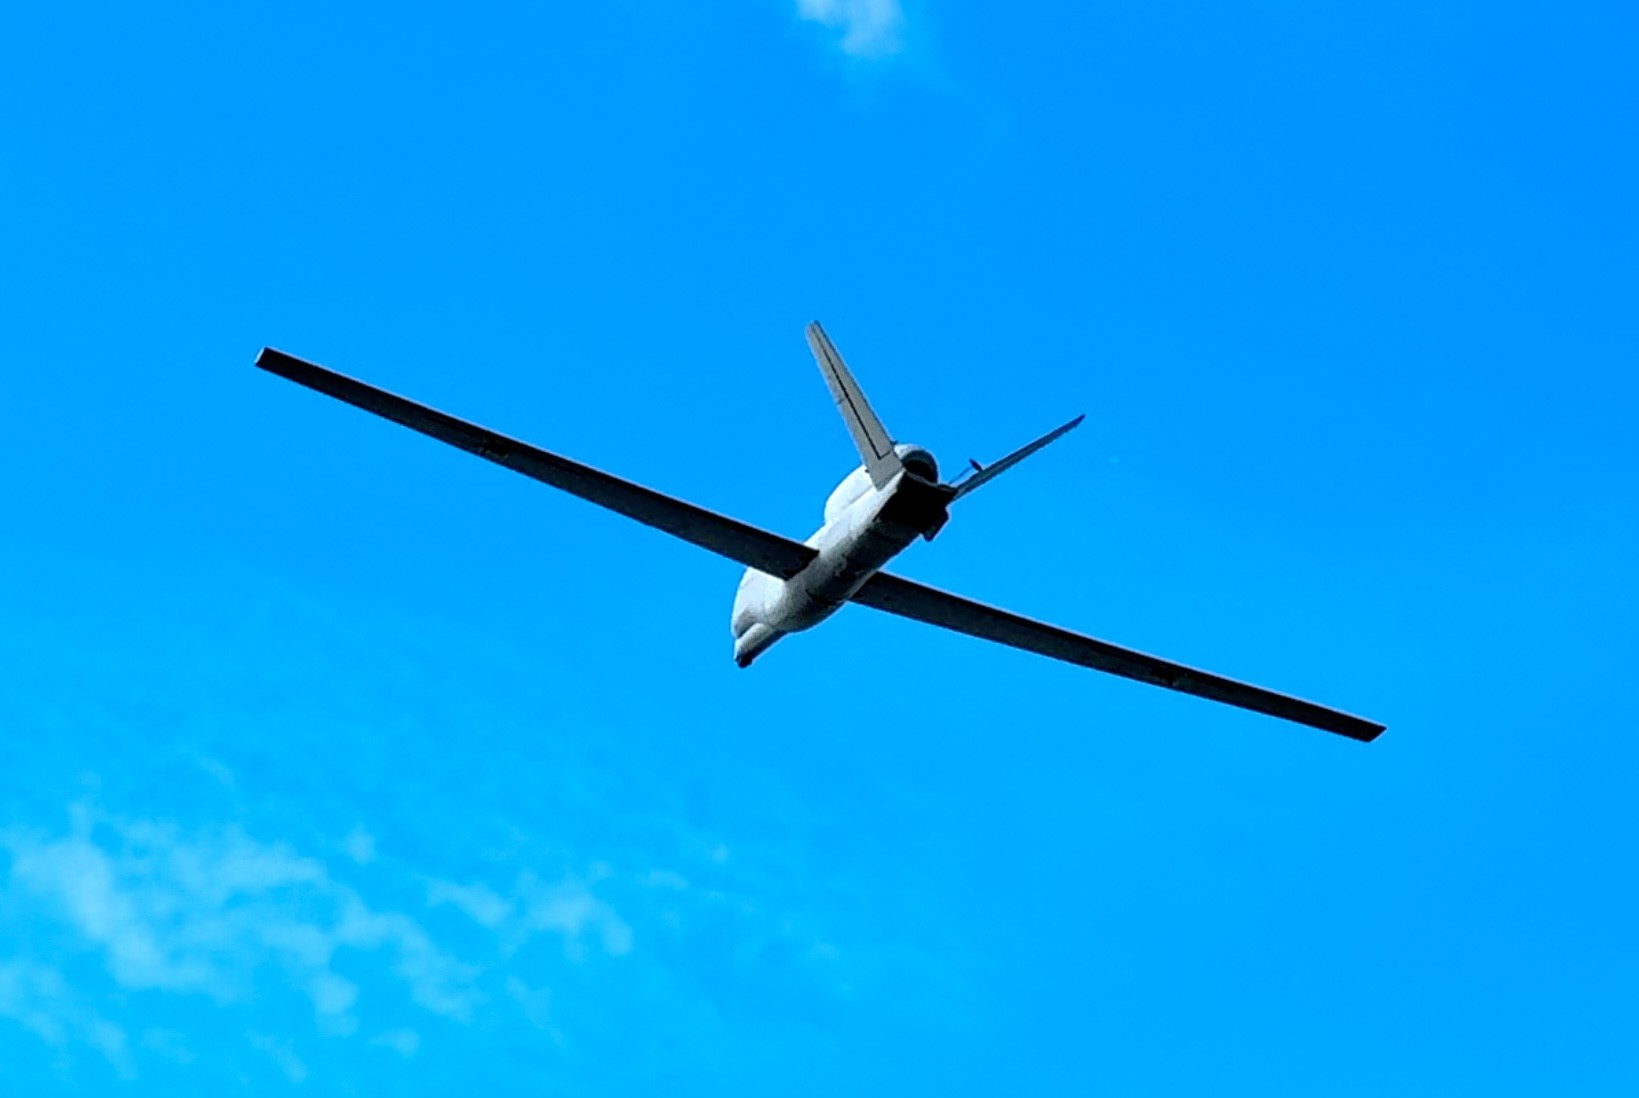
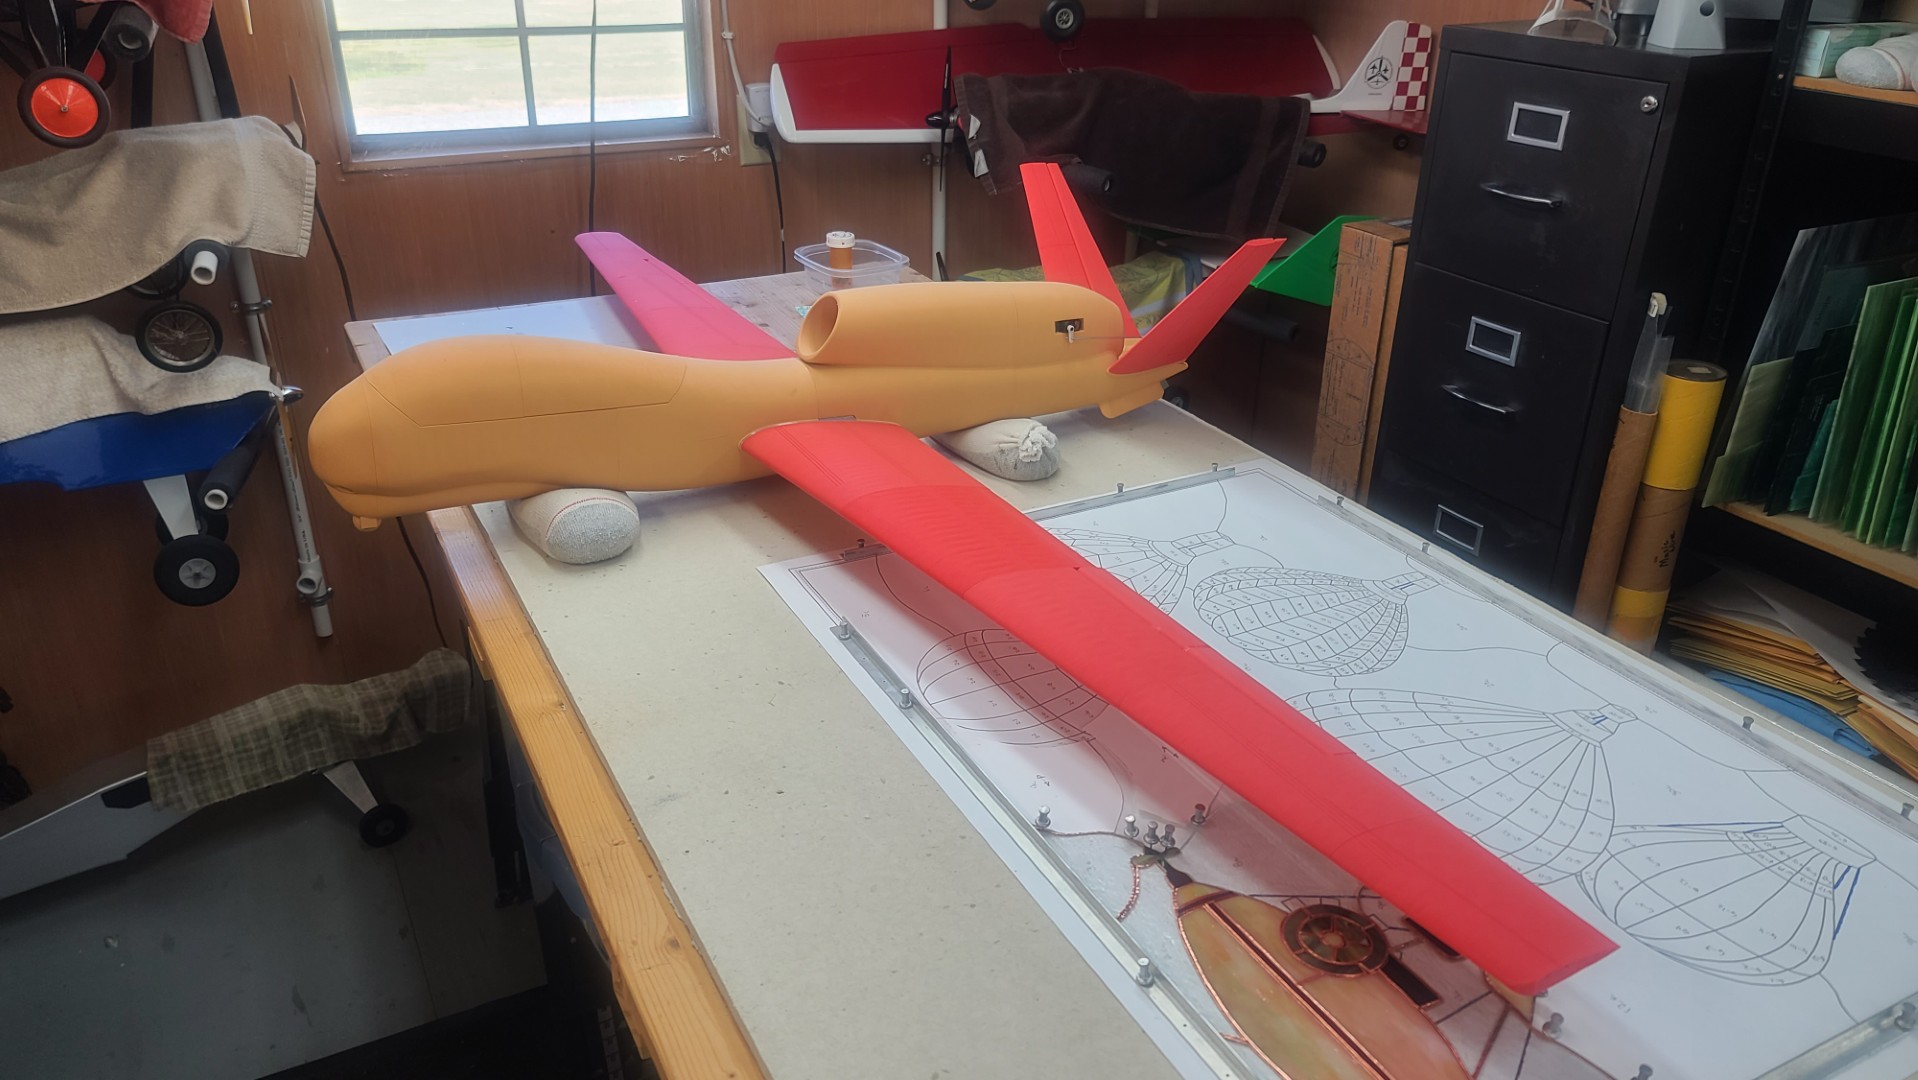
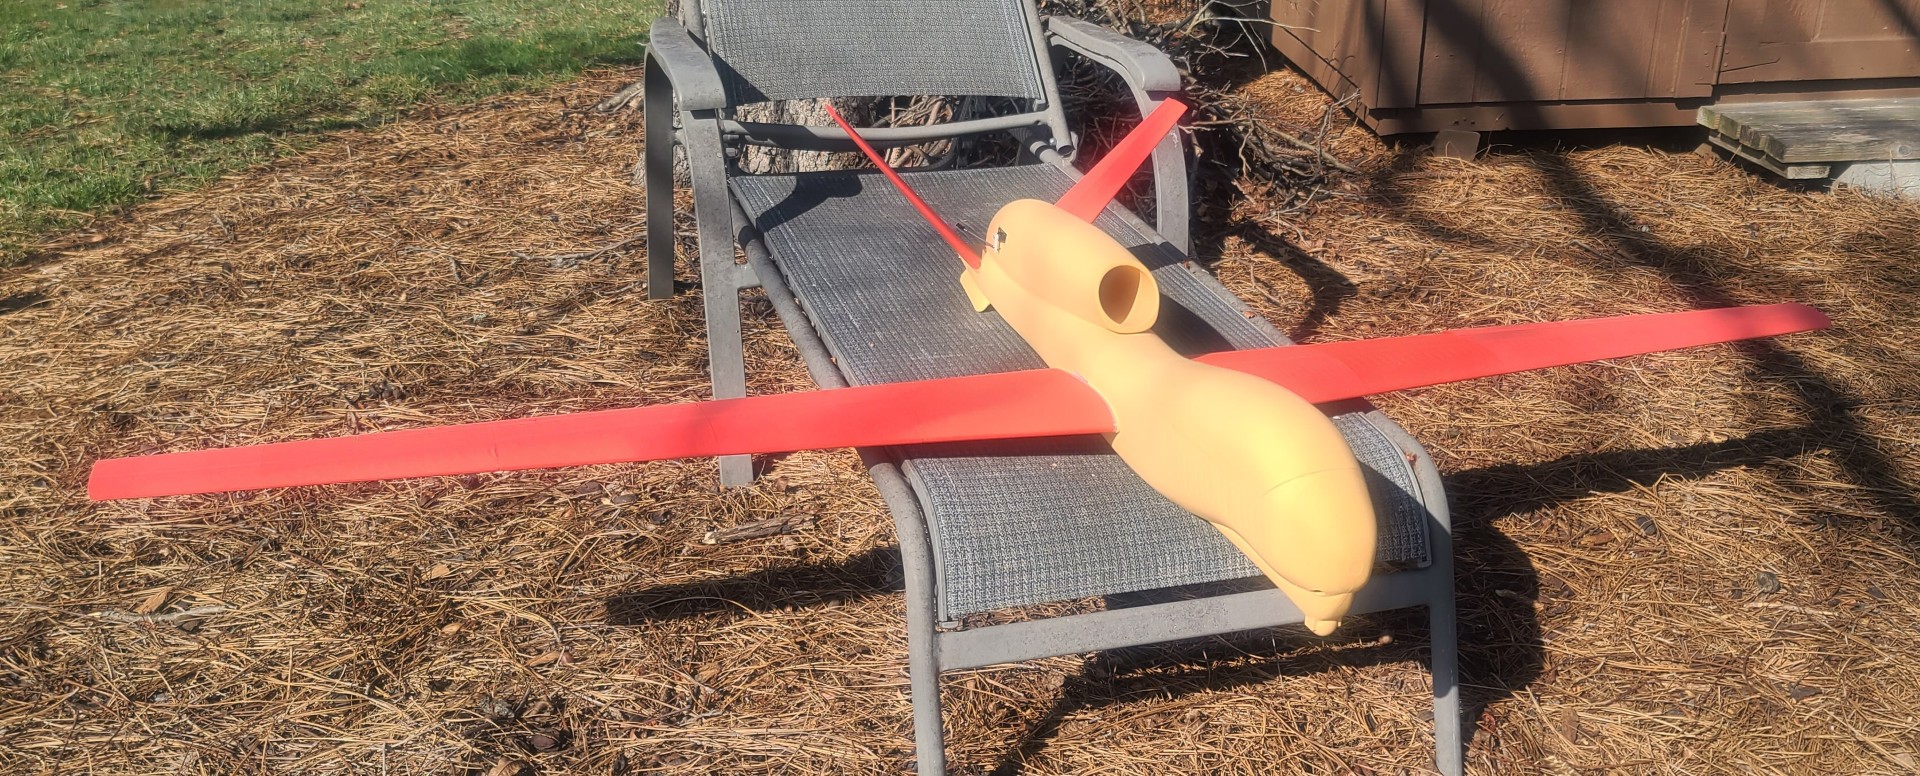
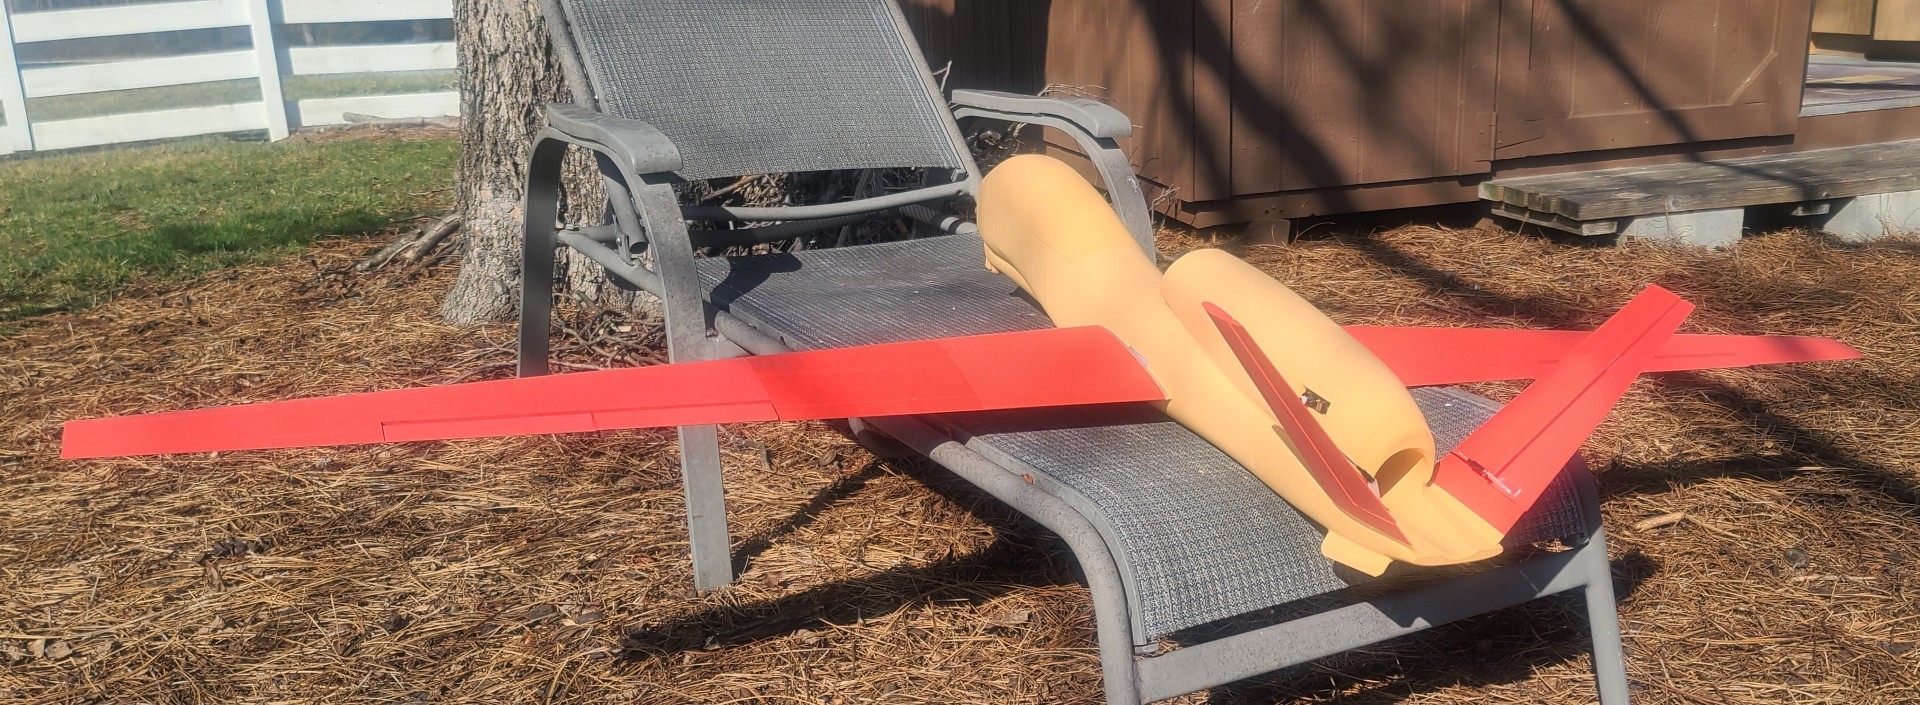
I completed the assembly of the fuselage per the build video, installed the ruddervator control linkages, put a Velcro strip in the bottom of the LiPo bay, established the required location of the LiPo for a correct CG, and set up my NX8 transmitter for proper control surface deflections and throw directions. Total full-up “ready to fly” weight with a 2,600mah 4S LiPo battery installed comes in at 1,247g. The final three images below show you my finished RQ-4 Global Hawk. Now all I need to do is execute a first flight that does not end up similar to my X-100 Infinity Wing first flight.
RQ-4 Global Hawk Print/Build Description
See All Images Taken During my RQ-4 Global Hawk Print/Build.
Steam Turbine Puzzle Box
I wanted to make a Christmas present for my oldest son Kent using my new 3D printer. I found a very interesting, nicely designed, great looking, and very complex to solve Steam Turbine Puzzle Box, designed by Ralph Hanson of flarPuzzles, which you can build using the STL files that are for sale on the Etsy flarPuzzles webpage. With the purchase you can download the 44 STL files and a detailed instruction manual.
Overall, 3D printing was straight forward as long as you follow all the print setup recommendations in the instruction manual. All required hardware items were available on Amazon, as were the various PLA filaments I used. The puzzle box design engineering and 3D modeling is excellent, and everything fits together and functions like a champ! I highly recommend this puzzle. I guess I need to provide a couple images of my final product. Below you can see all of the sides of my 3D printed Steam Turbine Puzzle Box. Have fun making one yourself.
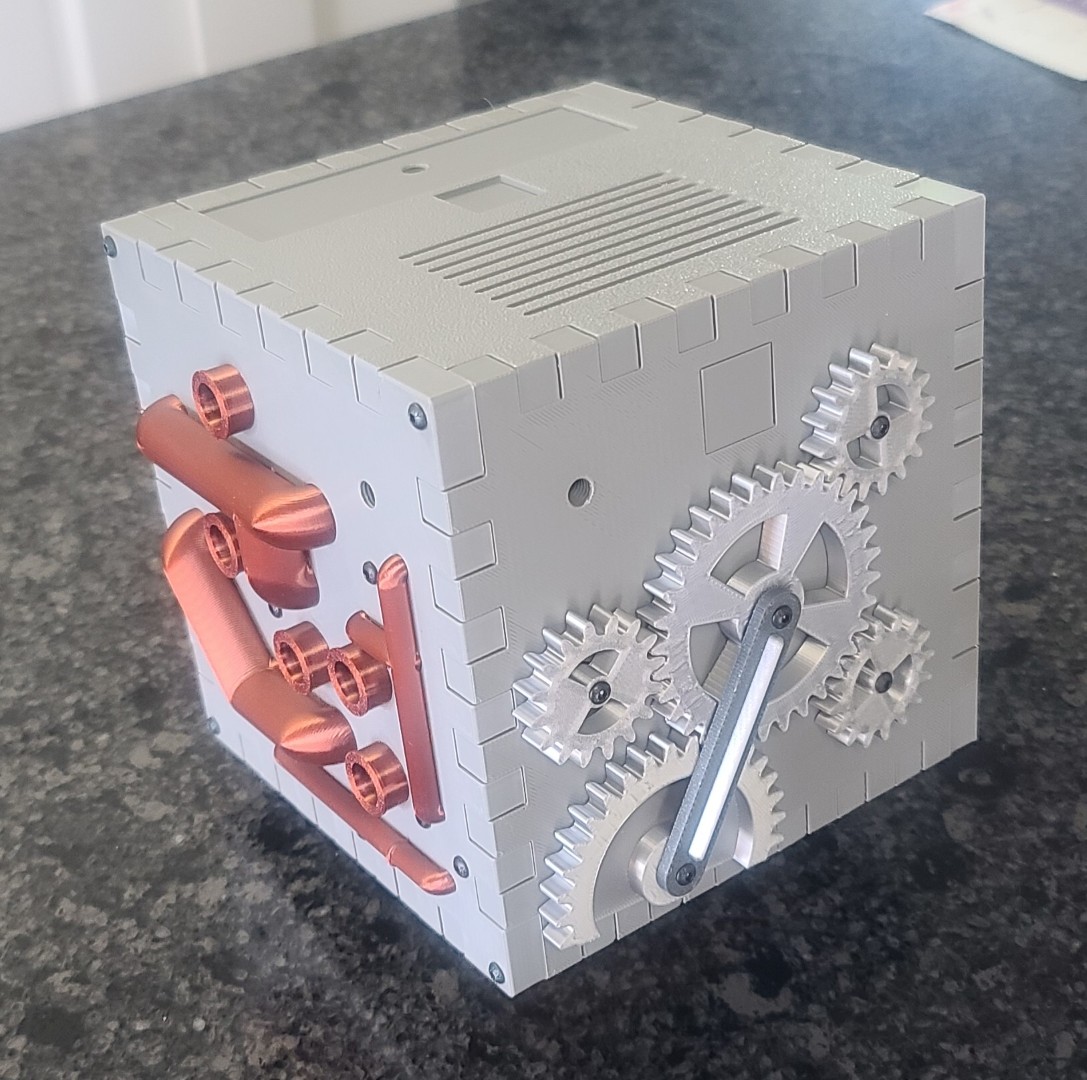
Steam Machine Puzzle Box
Having finished the Steam Turbine Puzzle Box for my oldest son Kent, I decided to make the Steam Machine Puzzle Box as a Christmas gift for my youngest son Ryan. This puzzle box is a follow-on design from the Steam Turbine Puzzle, and again it is very interesting, nicely designed, great looking, and very complex to solve. Designed by Ralph Hanson of flarPuzzles, all the required STL files and a detailed instruction manual are for sale on the Etsy flarPuzzles webpage.
Overall, as with the Steam Turbine Puzzle Box, 3D printing was straight forward as long as you follow all the print setup recommendations in the instruction manual. Again, all required hardware items were available on Amazon, as were the various PLA filaments I used. The puzzle box design engineering and 3D modeling is excellent, and everything fits together and functions like a champ! I highly recommend this puzzle. Note — The Mr. Puzzle video is nice, but toward the end of his solution he used an incorrect method of getting the Credit Card, and jumped over several steps the model designer intended to be used. I put a “Correct” detailed “Steam Machine Puzzle Box Solution Guide” at the end of my Steam Machine Puzzle Box 3D Print/Assembly Description. Below you can see all of the sides of my 3D printed Steam Machine Puzzle Box. Have fun making one yourself.
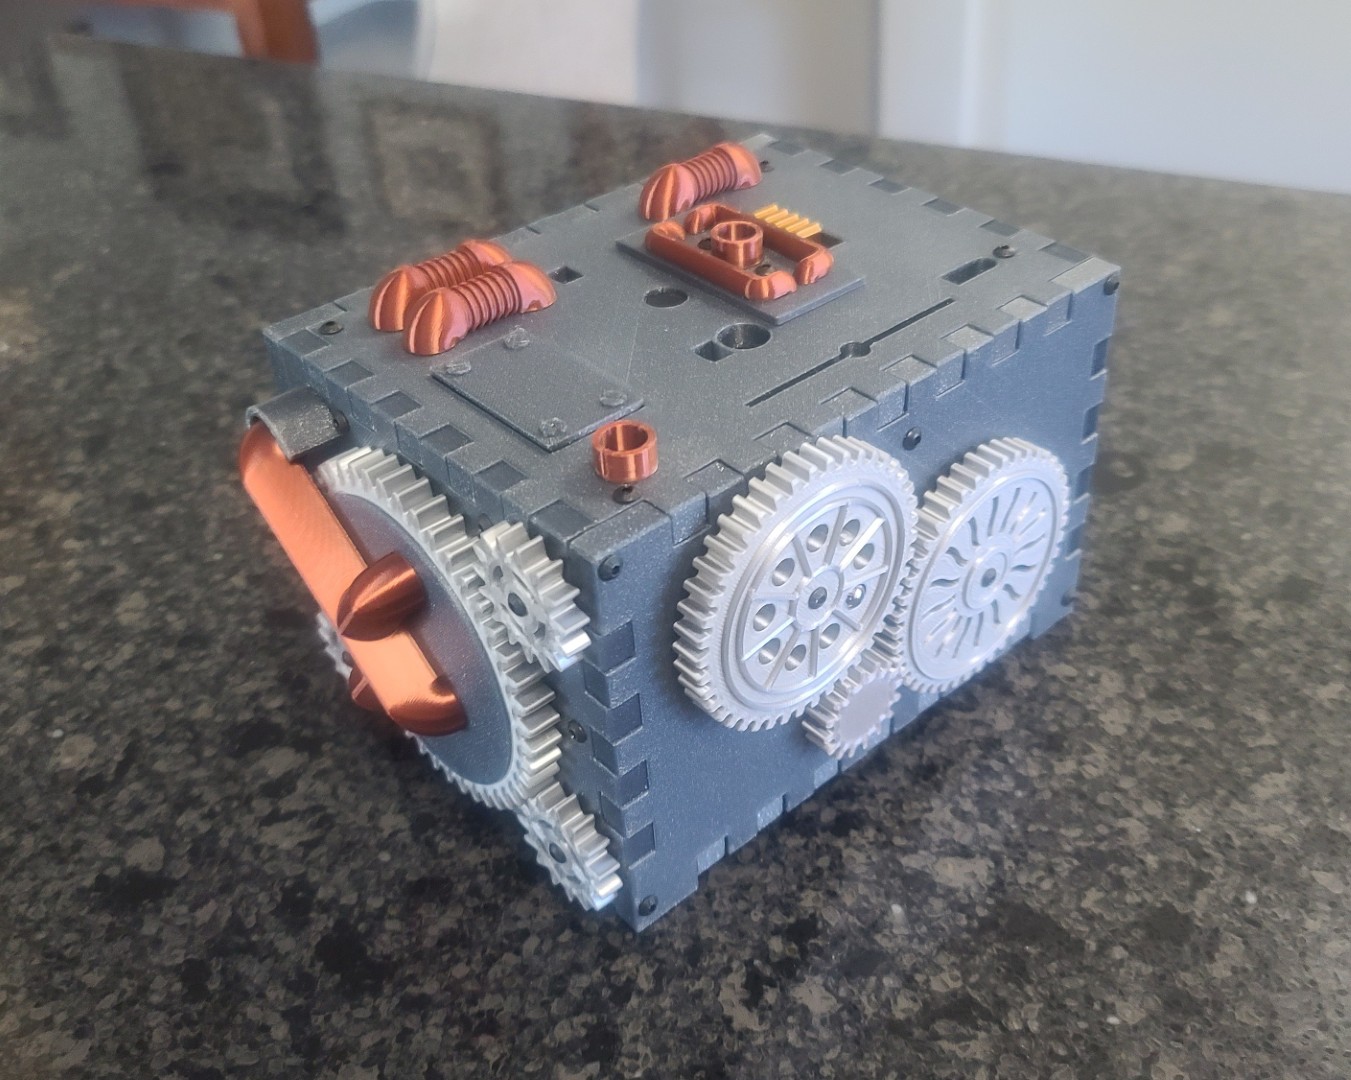
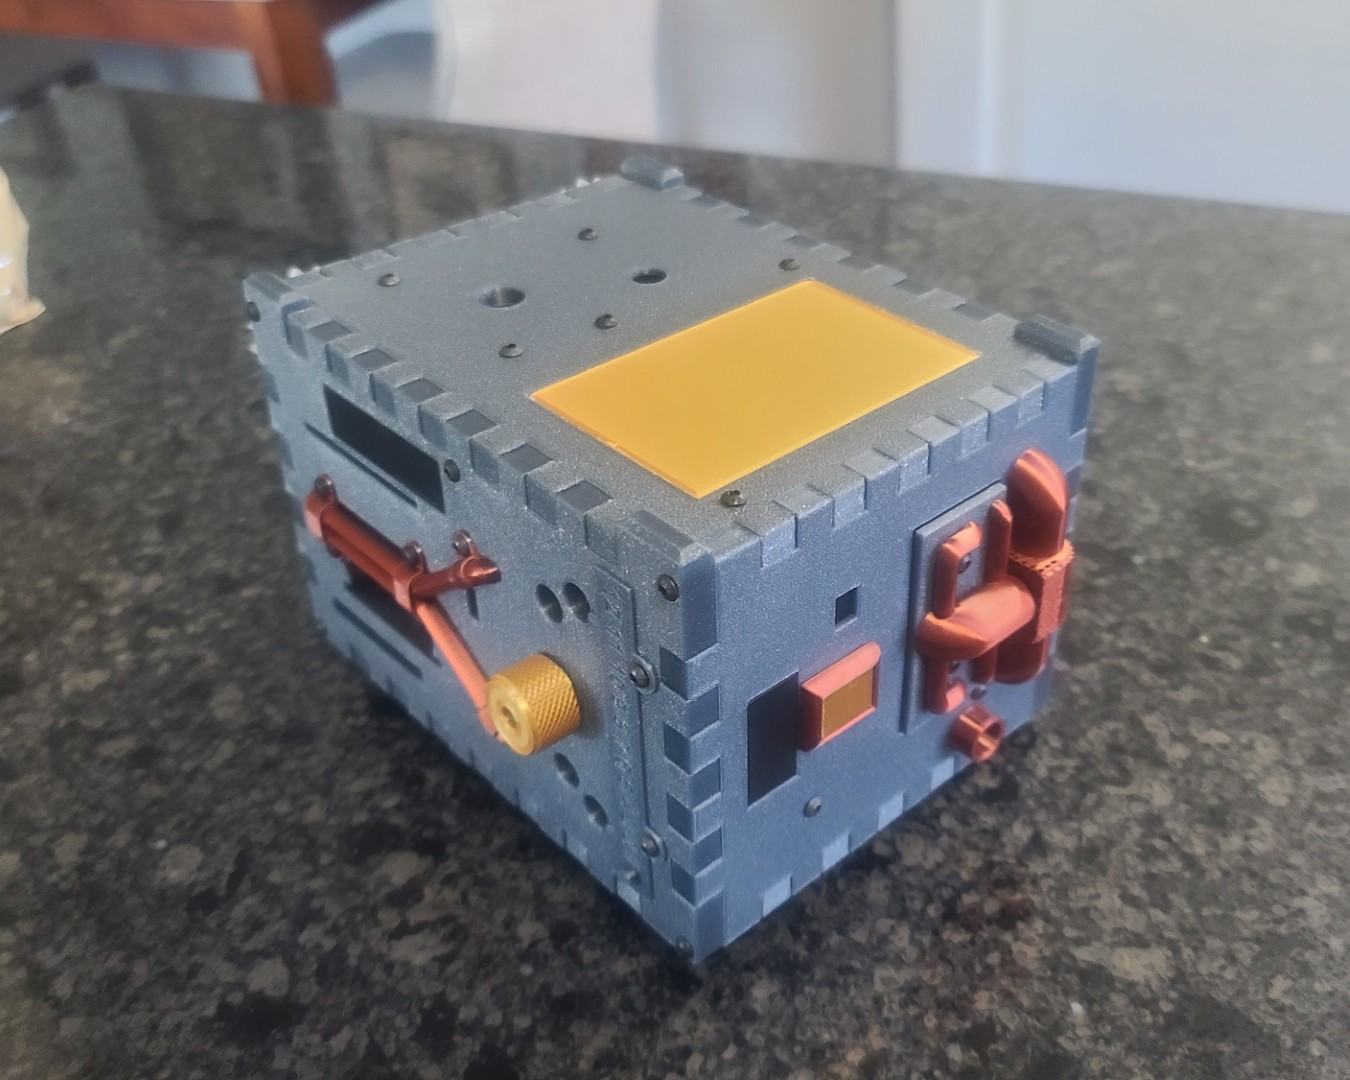
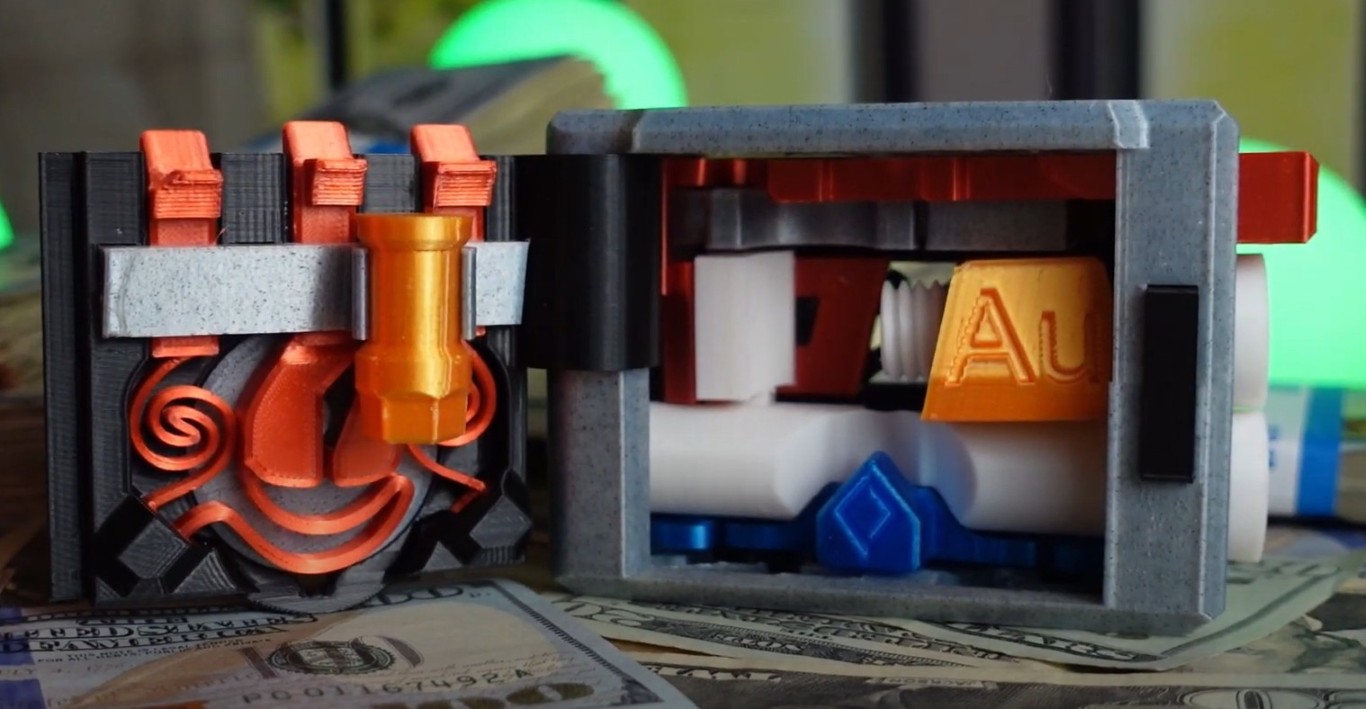
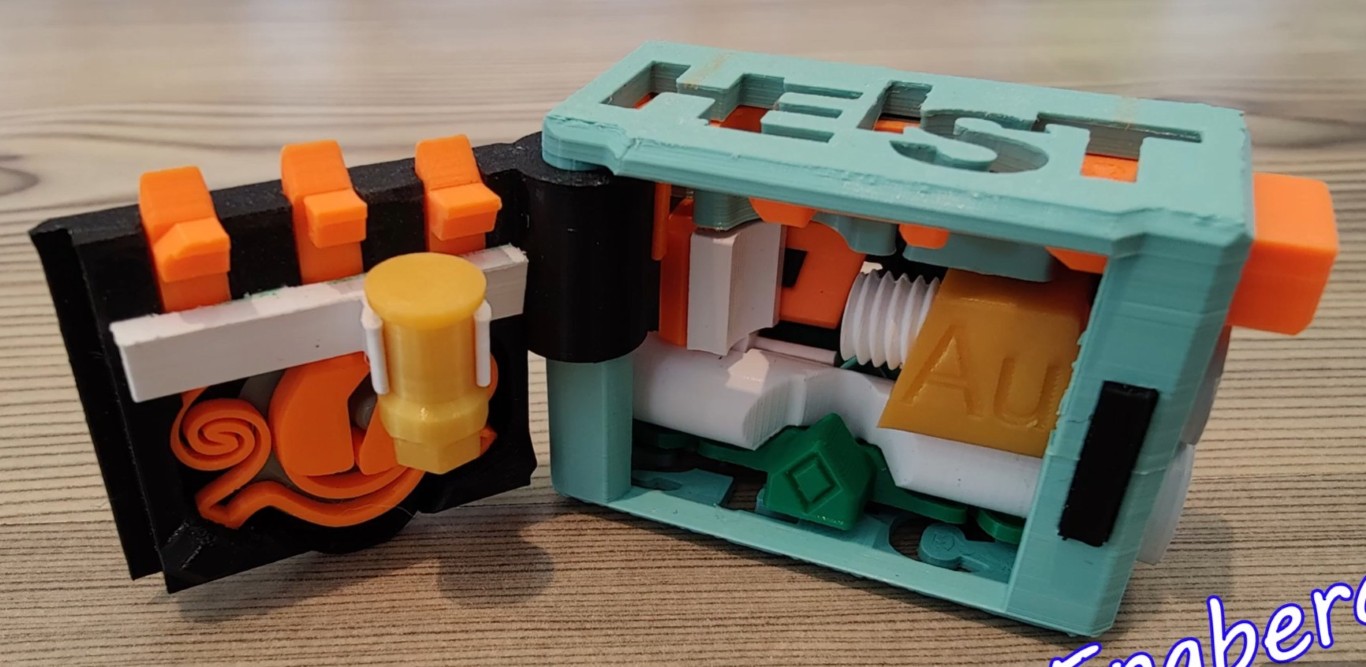
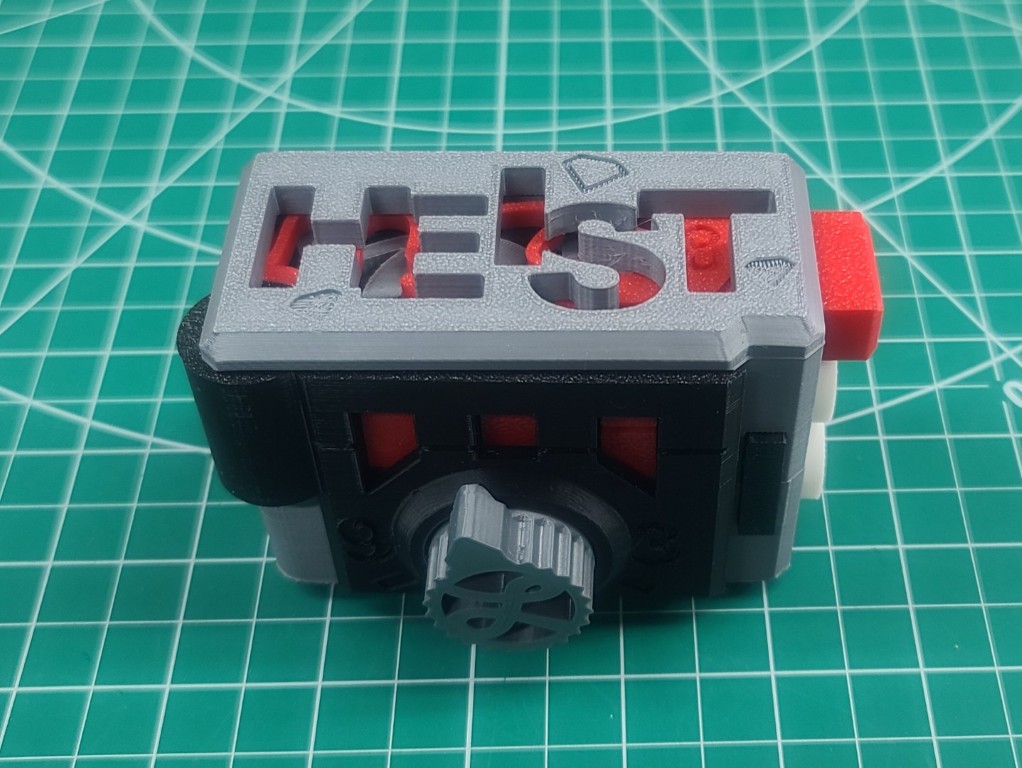
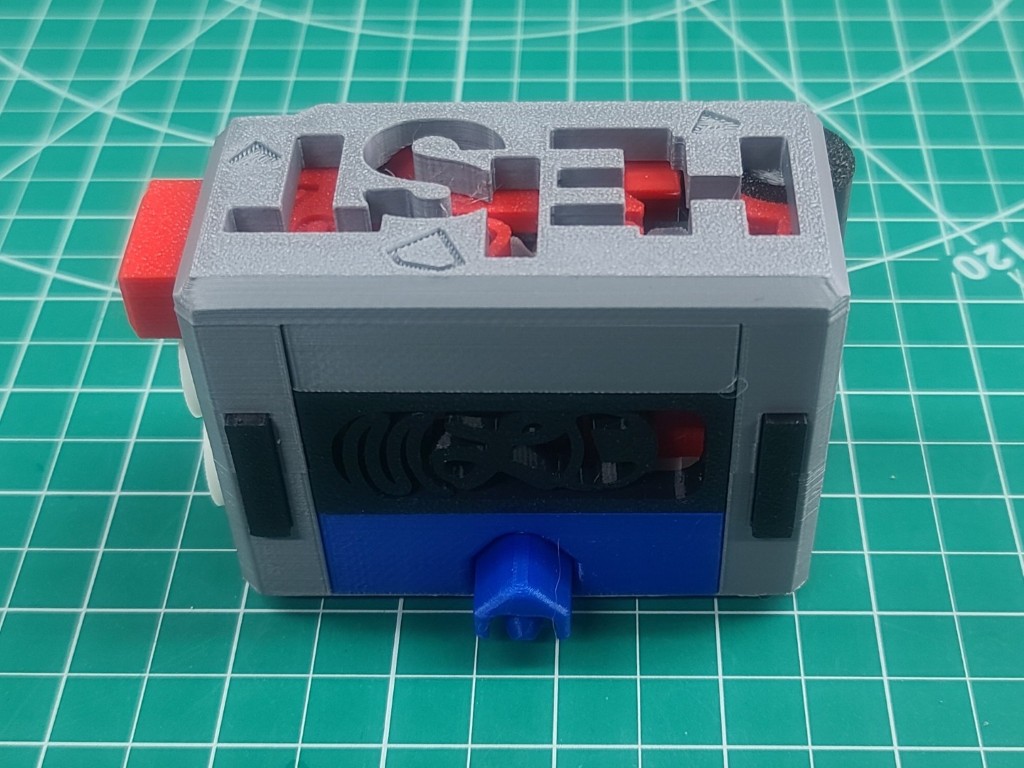
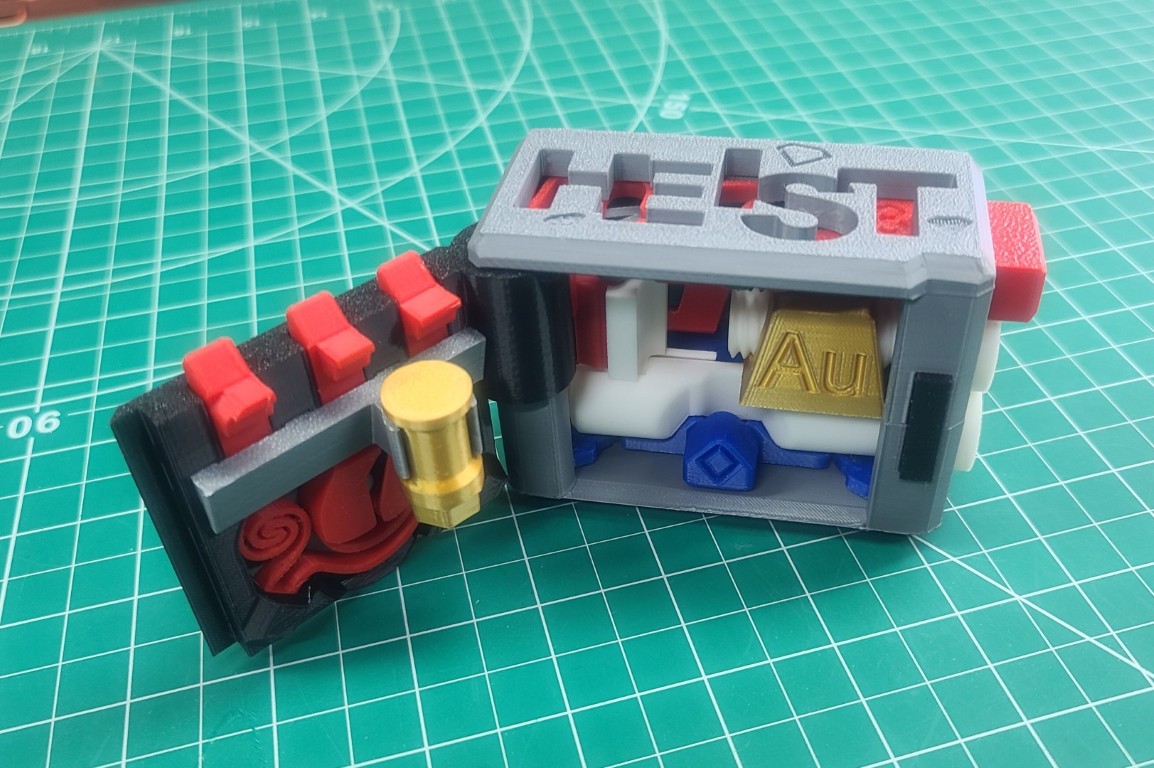
"The Heist" Puzzle Box
When I gave my youngest son Ryan his “Steam Machine” Puzzle Box as a Christmas gift, my Grandson August (Gus) went crazy solving the puzzle and really enjoys using it to store his treasures. So, I decided to see what I could find in the way of a puzzle box for him to call his very own. What I found was “THE HEIST.” A perfect project to show off your 3d printer and fire up your puzzle solving skills! Breaking into THE HEIST is not easy, and releasing the center diamond will take some SERIOUS SKILLS!!!! The Heist Puzzle Box is an original design by Leisure Luke. It's a 23 piece puzzle box that is SUPER EASY TO PRINT and requires no supports. Print it in PLA, and the parts without squiggly springs can be PETG or PLA. Very little plastic filament is needed for this project. All the required STL files can be downloaded for free from the Cults3D website or the Thingiverse Website.
Source of Images: Screen captures from the YouTube Videos listed below.
Also available to aid you in the printing and assembly are the following videos: The Leisure Luke YouTube Video Channel, a Original Hilarious YouTube Homemade Commercial, an Assembly Instructional Video, and THE HEIST SOLVED Video.
Below you see my 3D printed — “The Heist” Puzzle Box. I know my Grandson August is going to love it, and I hope you have fun making one for yourself.
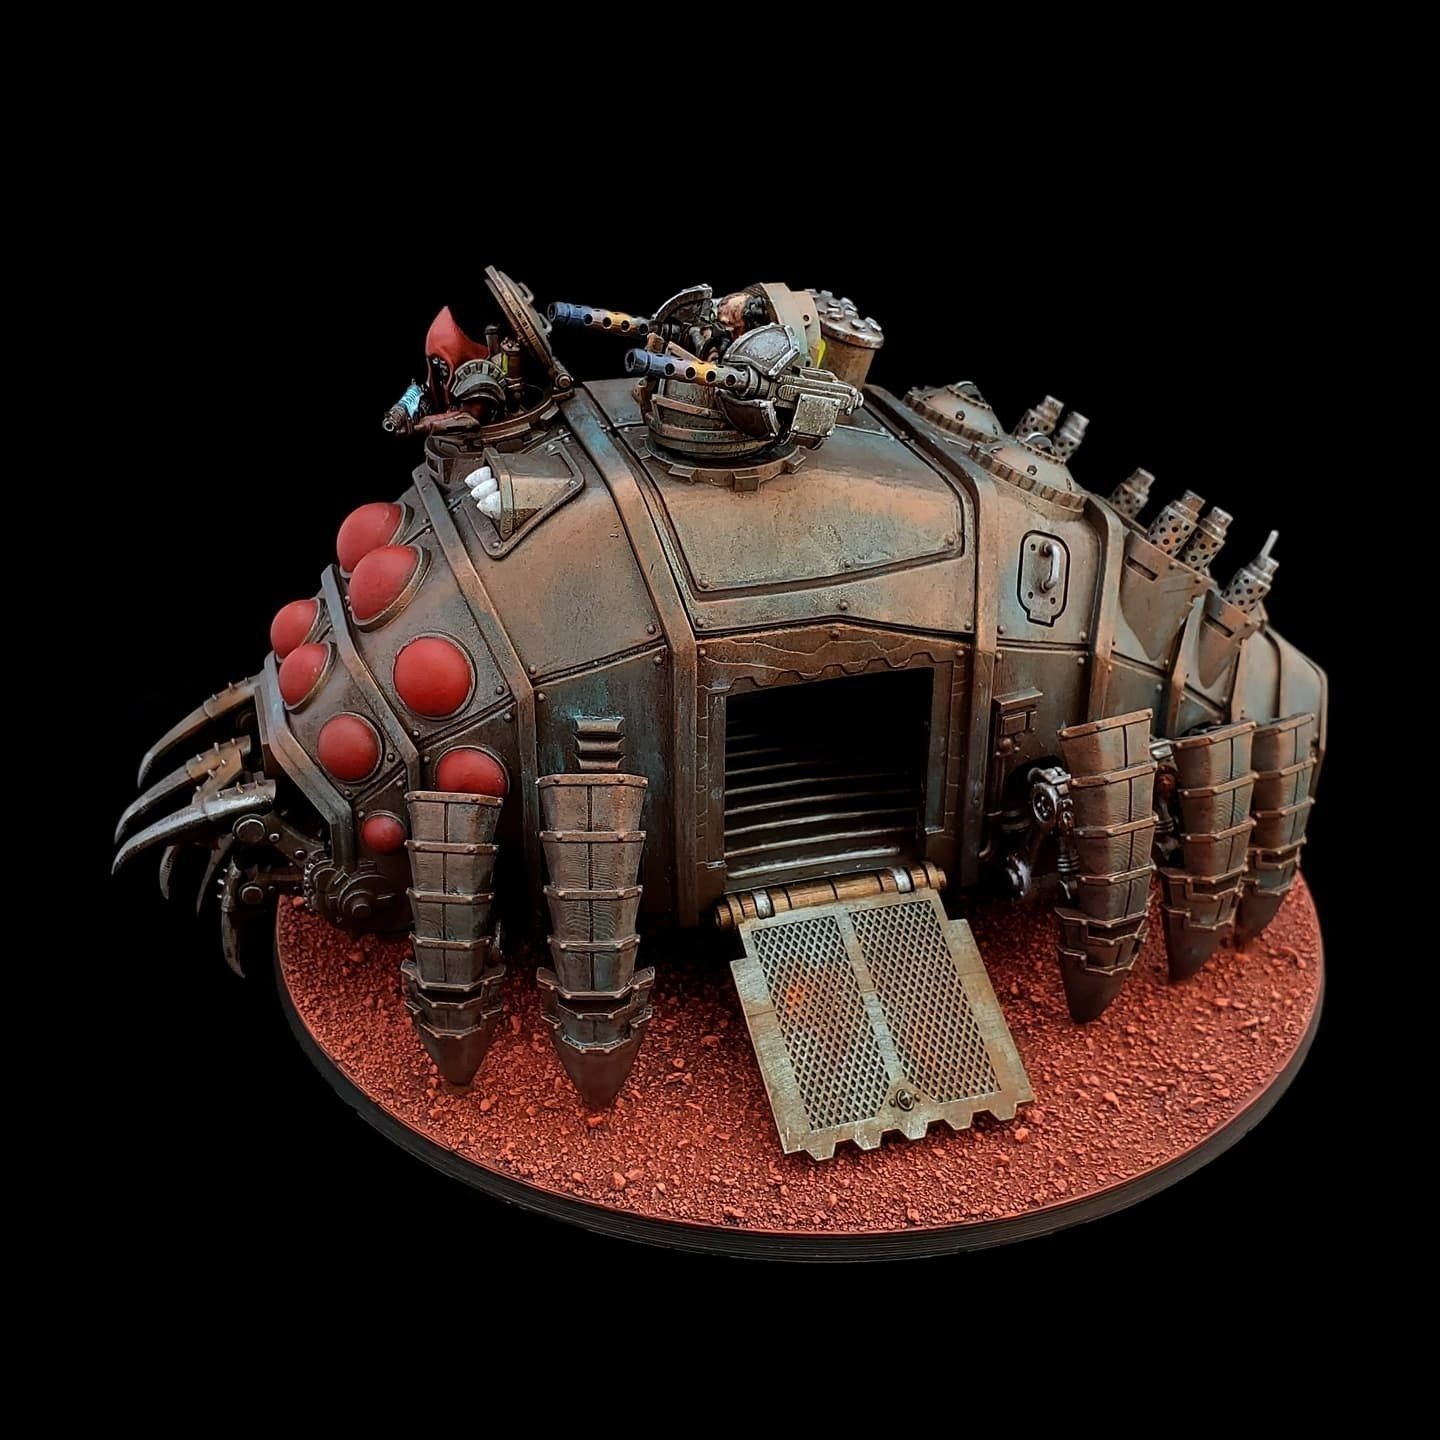
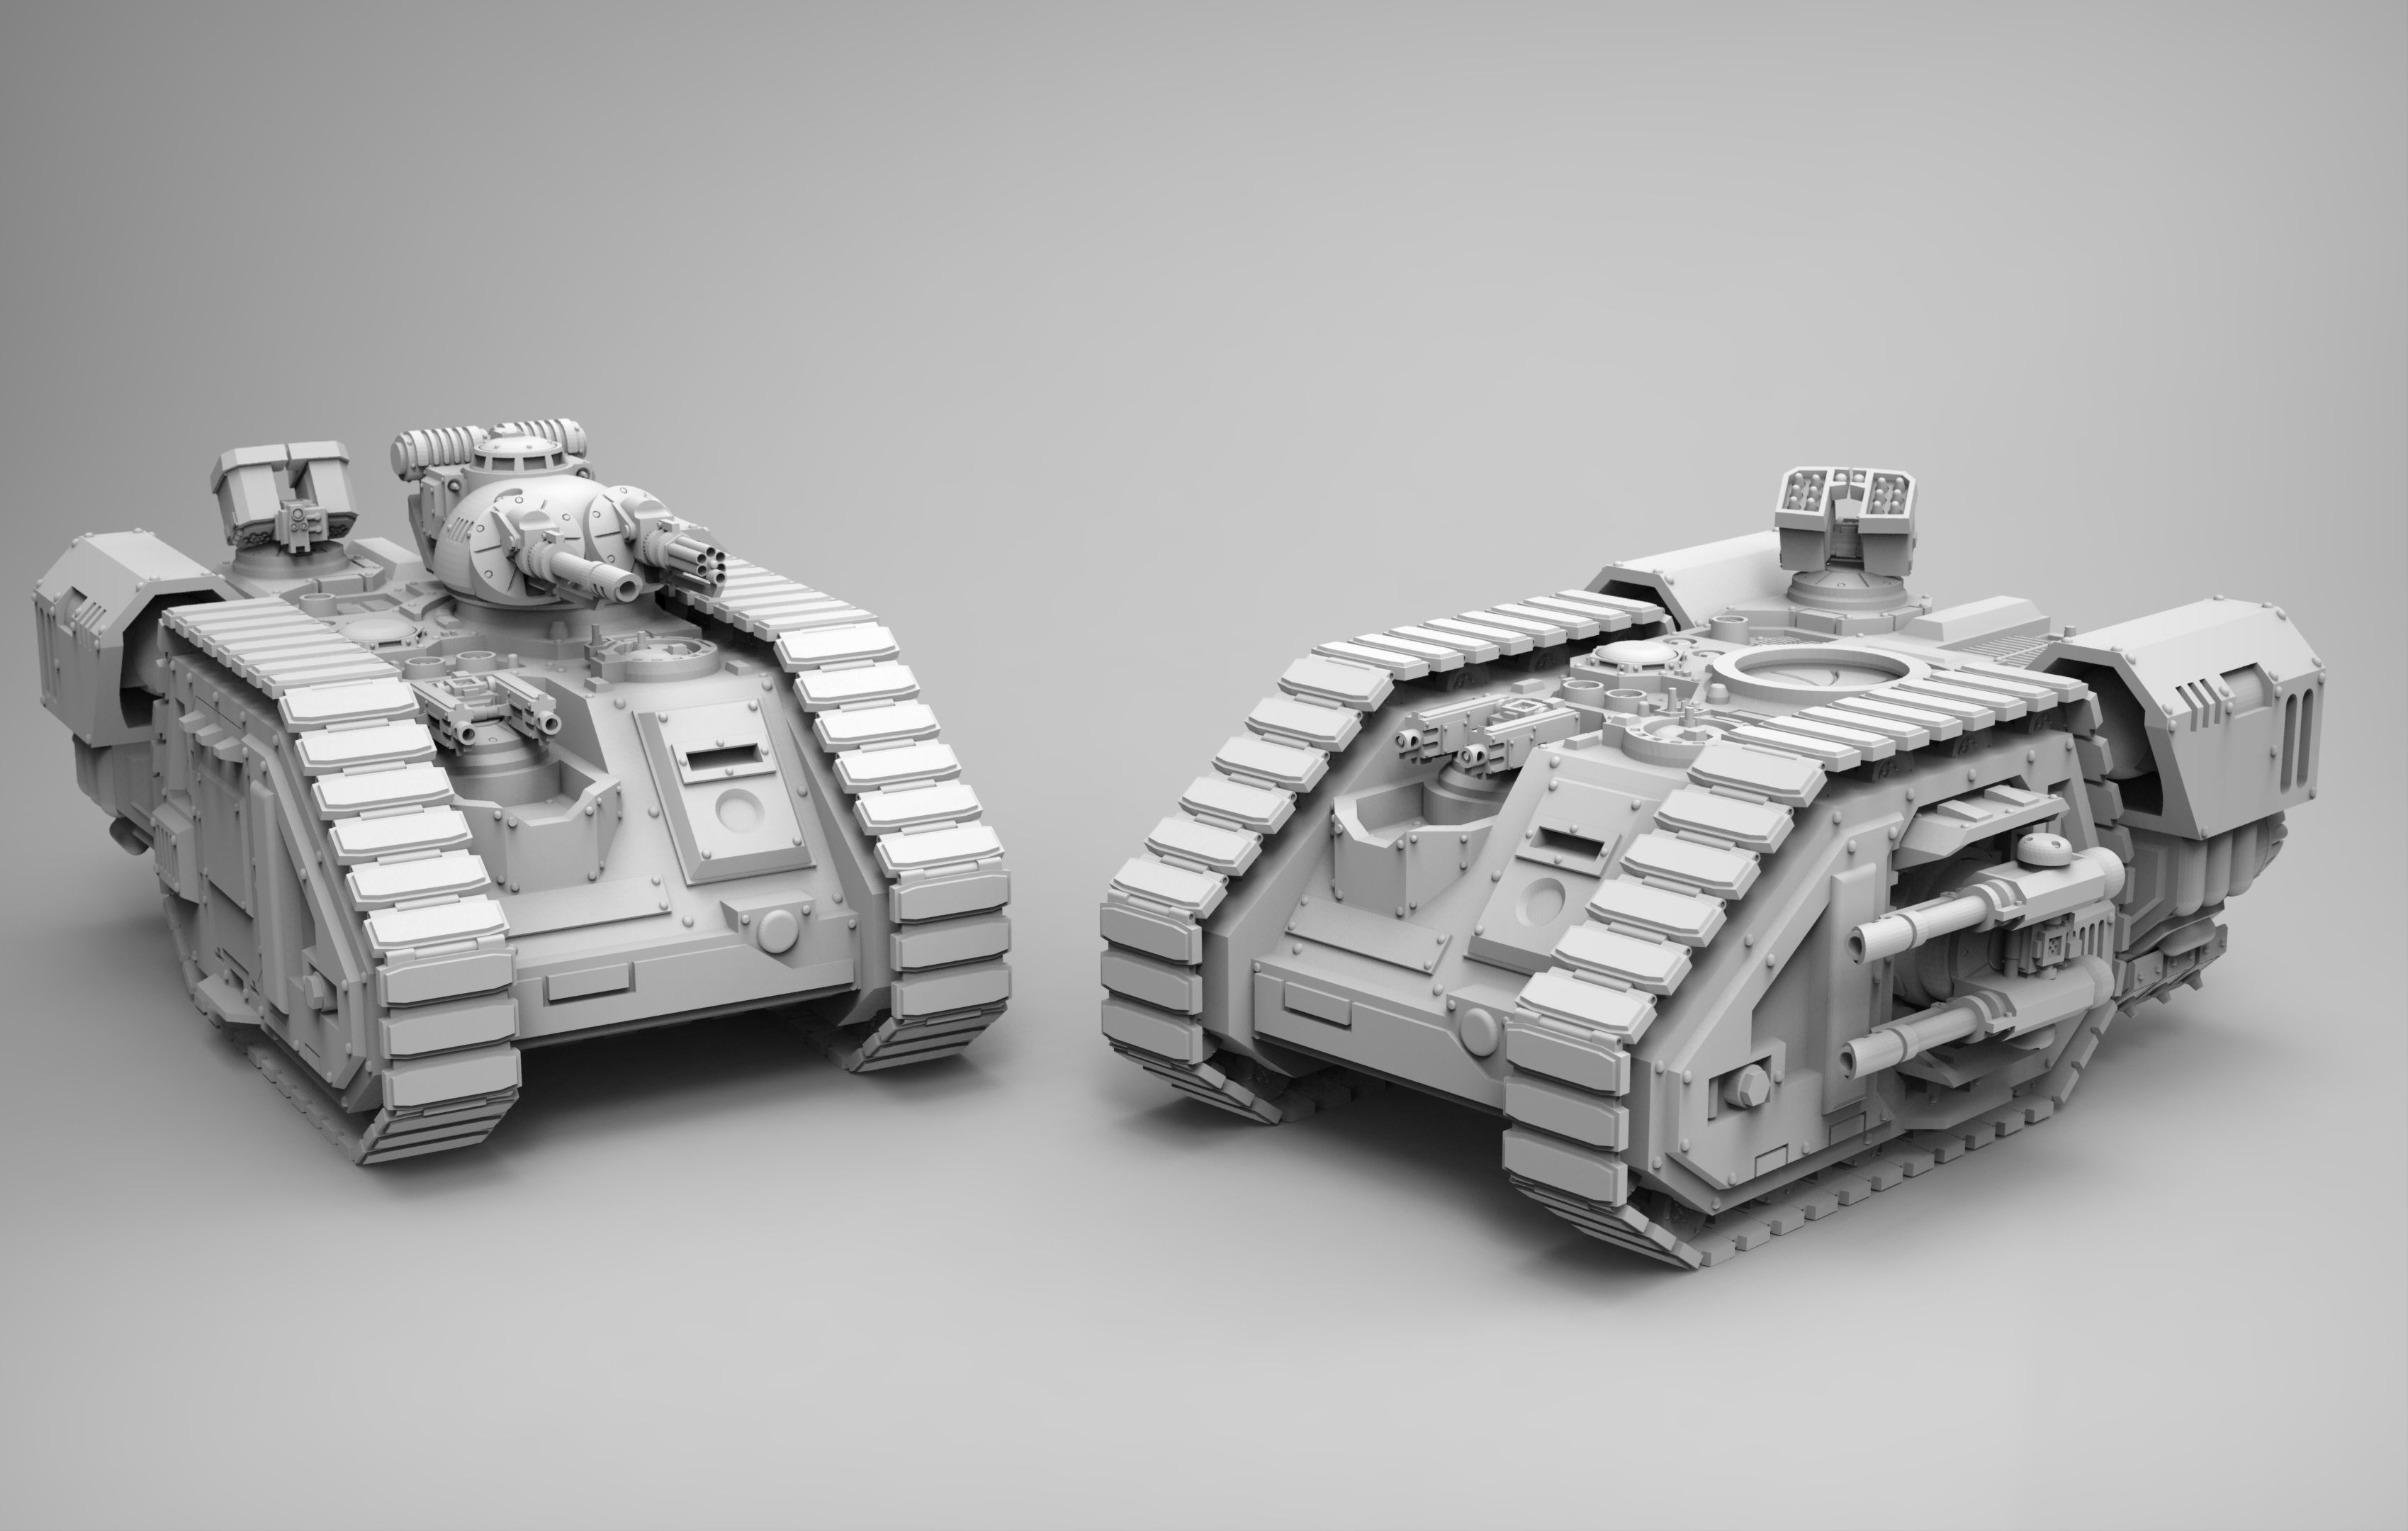
Dark Techno Isopodius Transport/Tank
As was stated in the 3D Modeling & Printing Webpage Introduction, one of the drivers behind my getting a 3D printer was to “make toys for our grandchildren.” My wife Carolyn set off to find some 3D models that we could work on together to build some gifts for the 2025 Christmas. The plan was that she finds the 3D models, I print them out, she does the detailed painting, and then I assembly the finished models. Simple right? Well, we will see.
Using this strategy, Carolyn first found an interesting 3D model for our Grandson August (Gus). As shown in the images below, for our first project we would work together to build the Dark Techno Isopodius Transport/Tank. This was found on cgtrader.com.
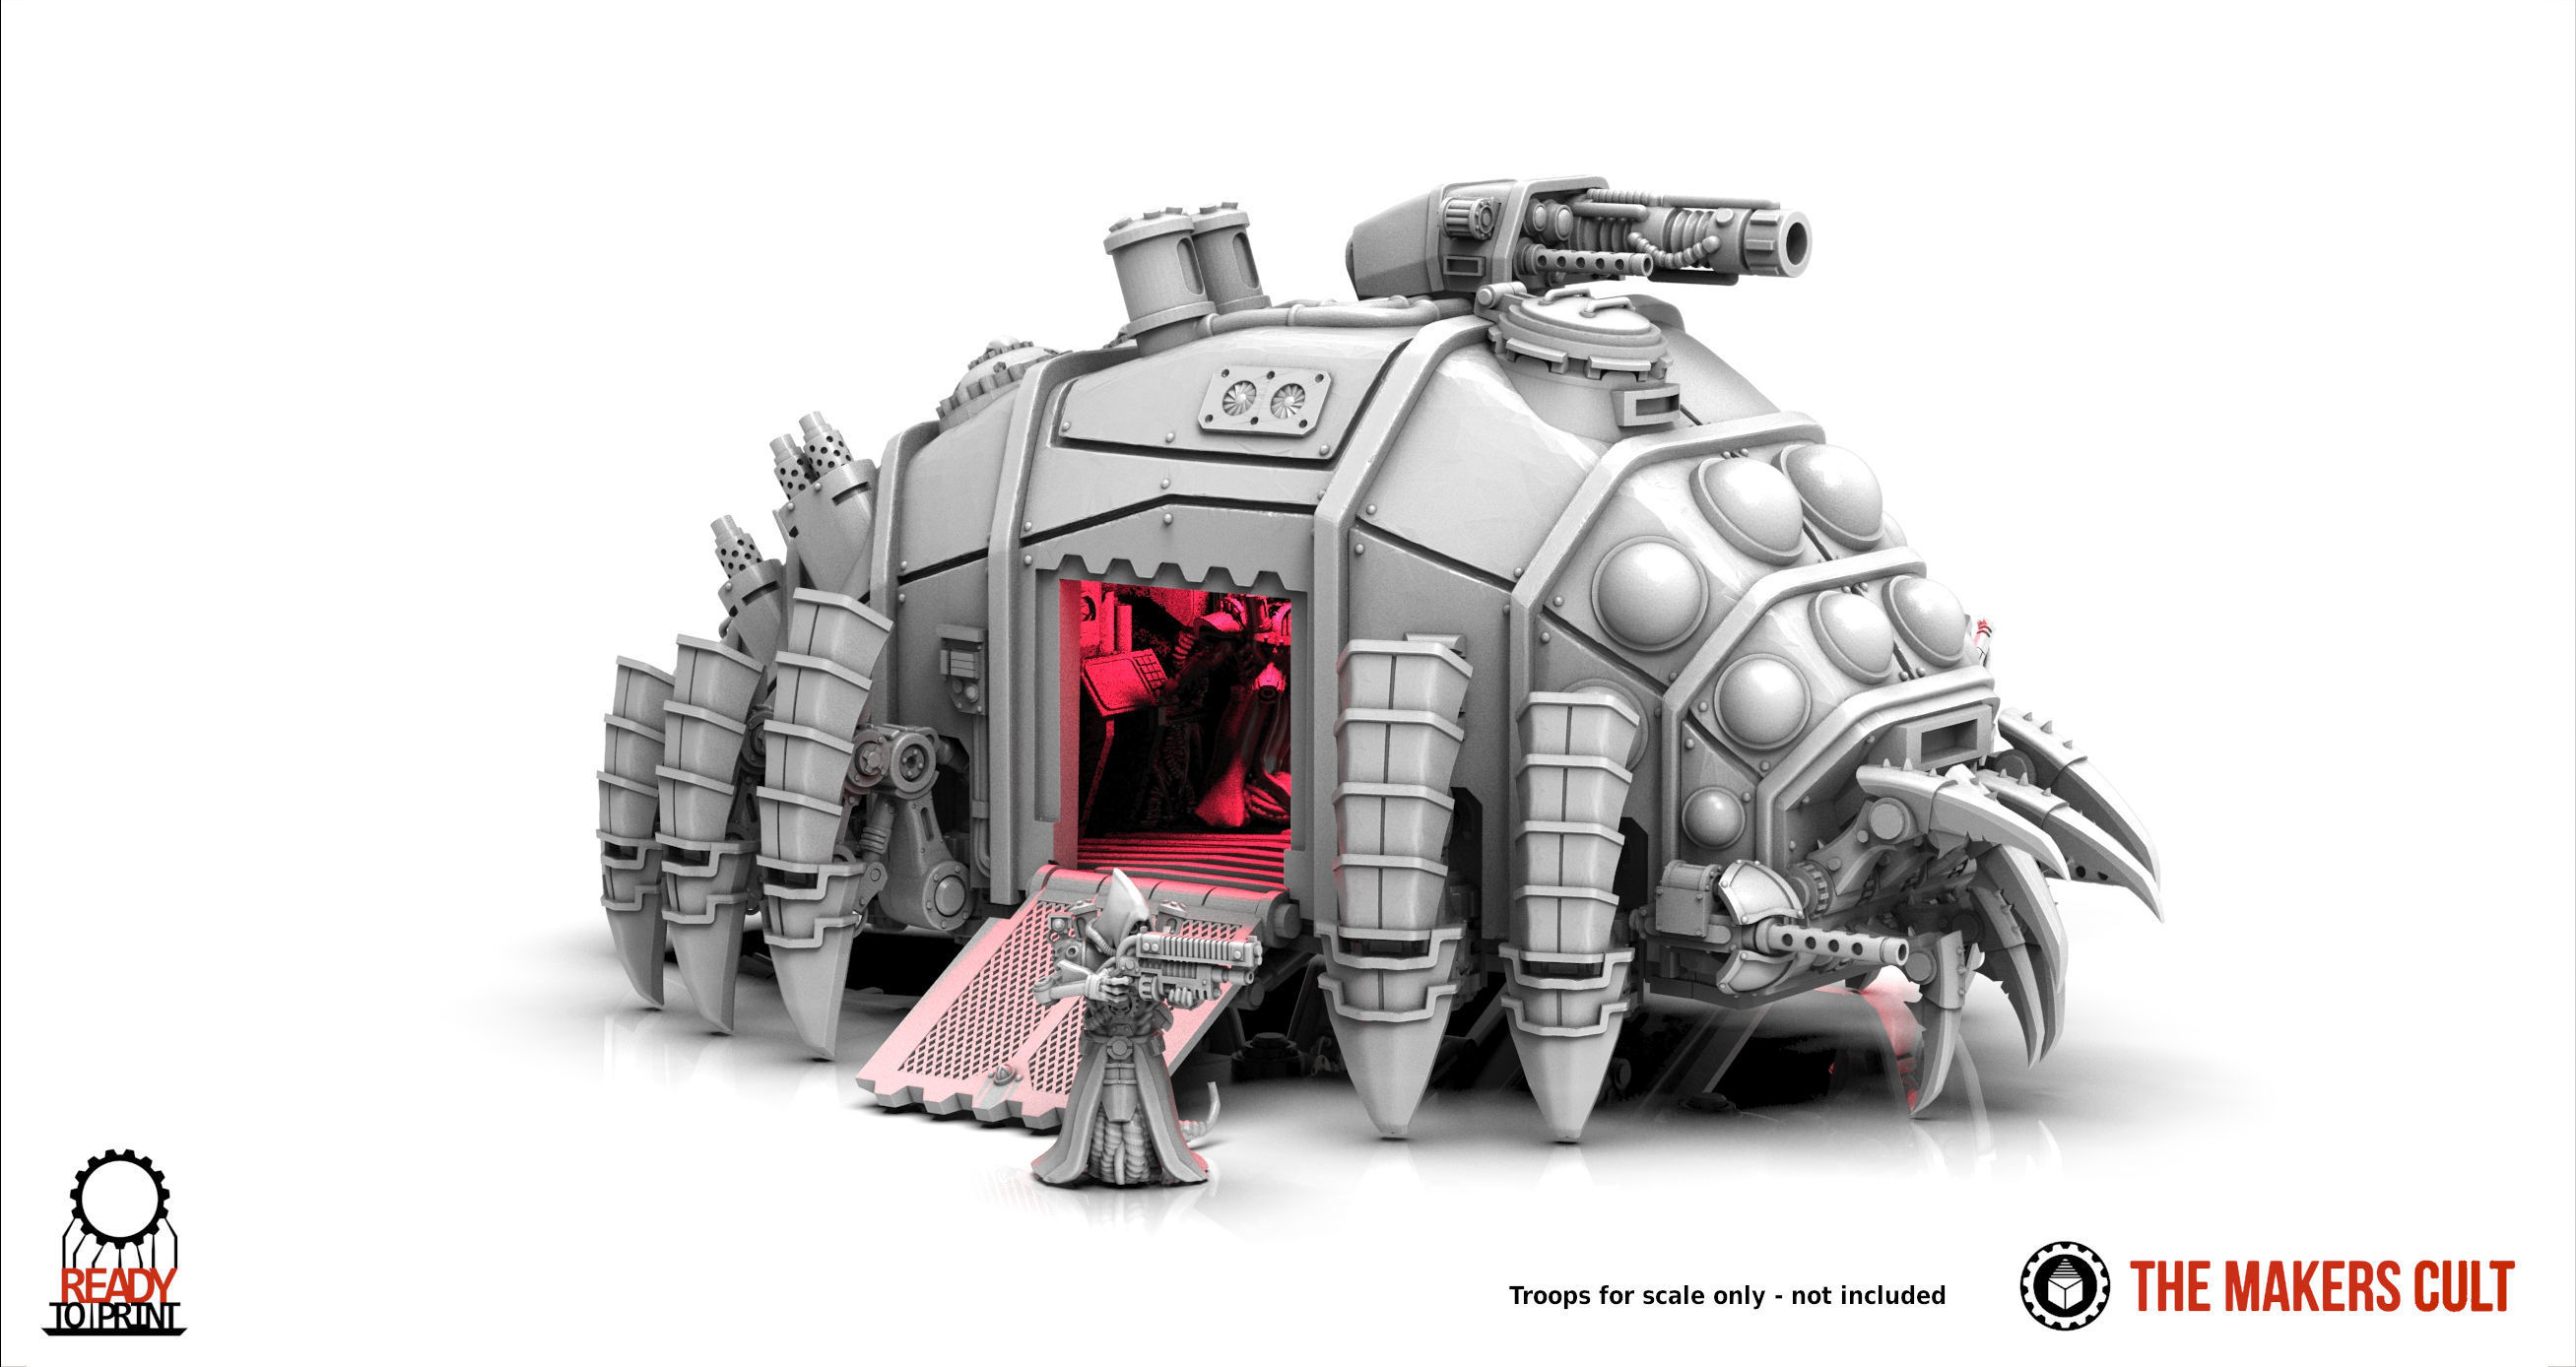
Source of Images: cgtrader.com.
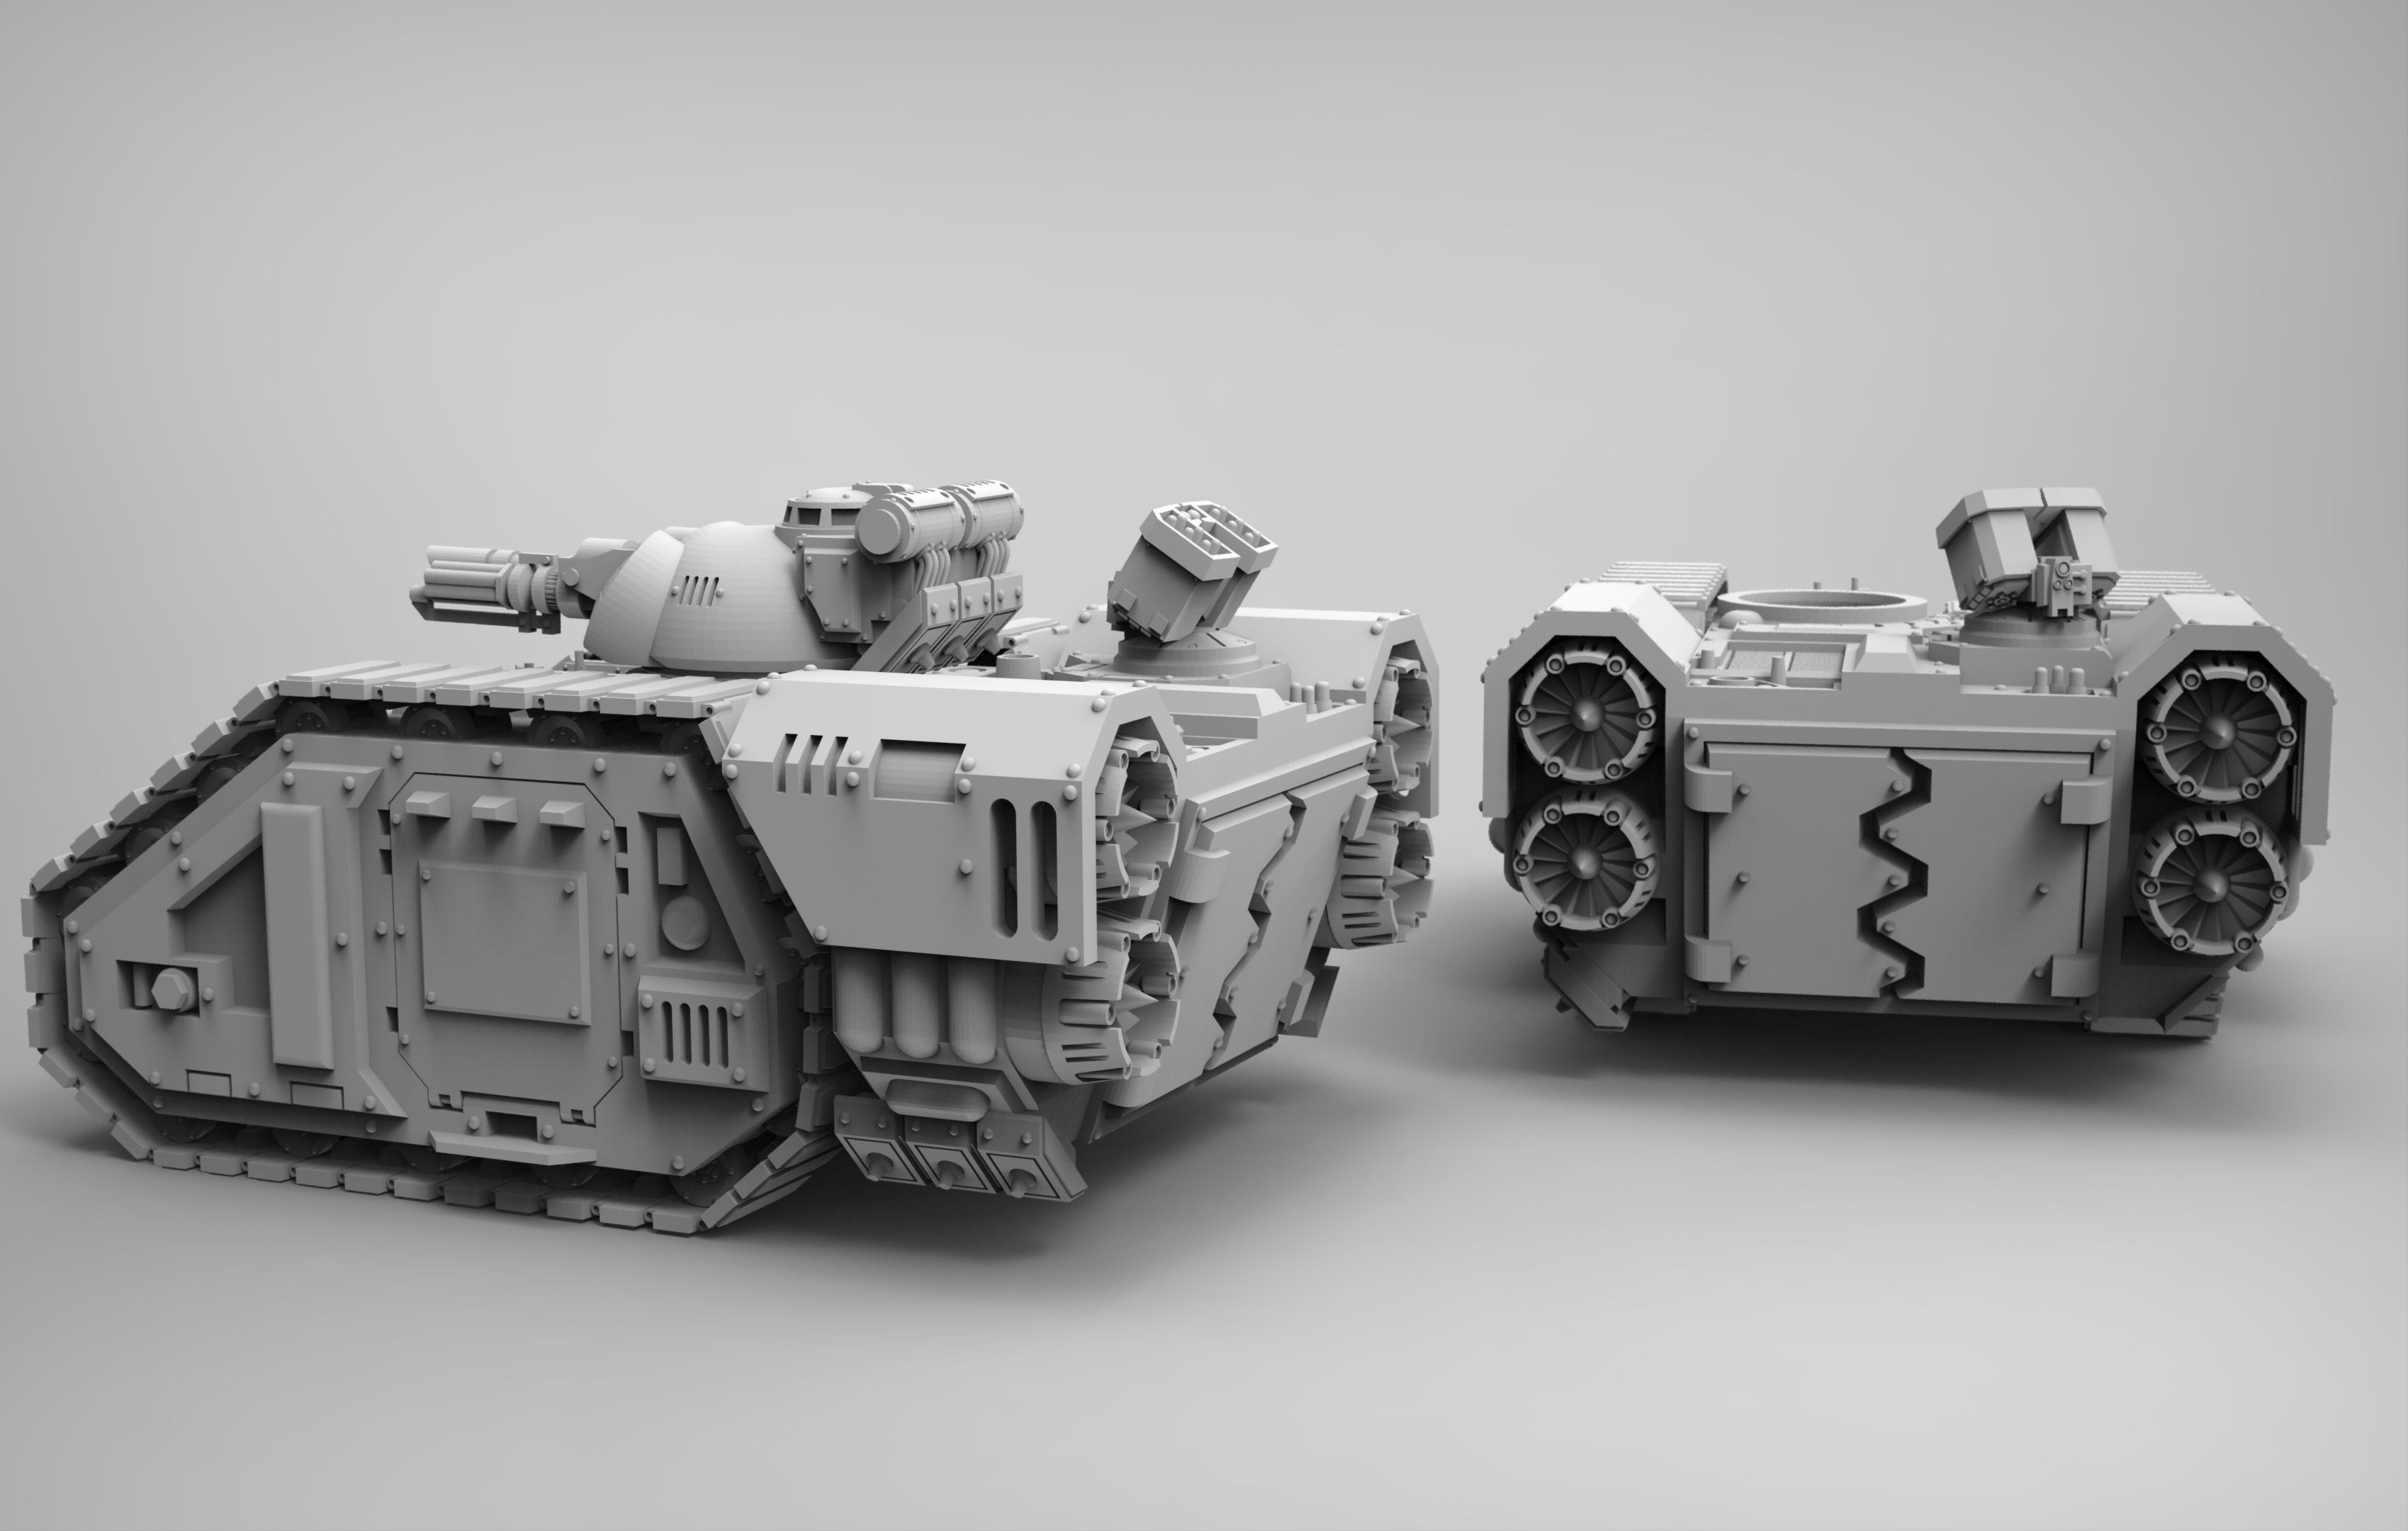
After many hours of 3D printing, all 36 parts for the Dark Techno Isopodius Transport/Tank were complete. I elected to use the long barrel cannon turret which goes on the top of the middle section cover, and the missile launcher for the top of the second forward section. Click on the next image below (to open the spotlight box) so you can see the fine detail obtained on all the parts by using a fine (0.15mm) layer thickness with a standard 0.4mm nozzle and some Creality Gray Hyper-PLA in my Ender-3 V3. Now it's over to Carolyn for the detailed painting.
Dark Techno Isopodius Transport/Tank 3D Print/Assembly Description.
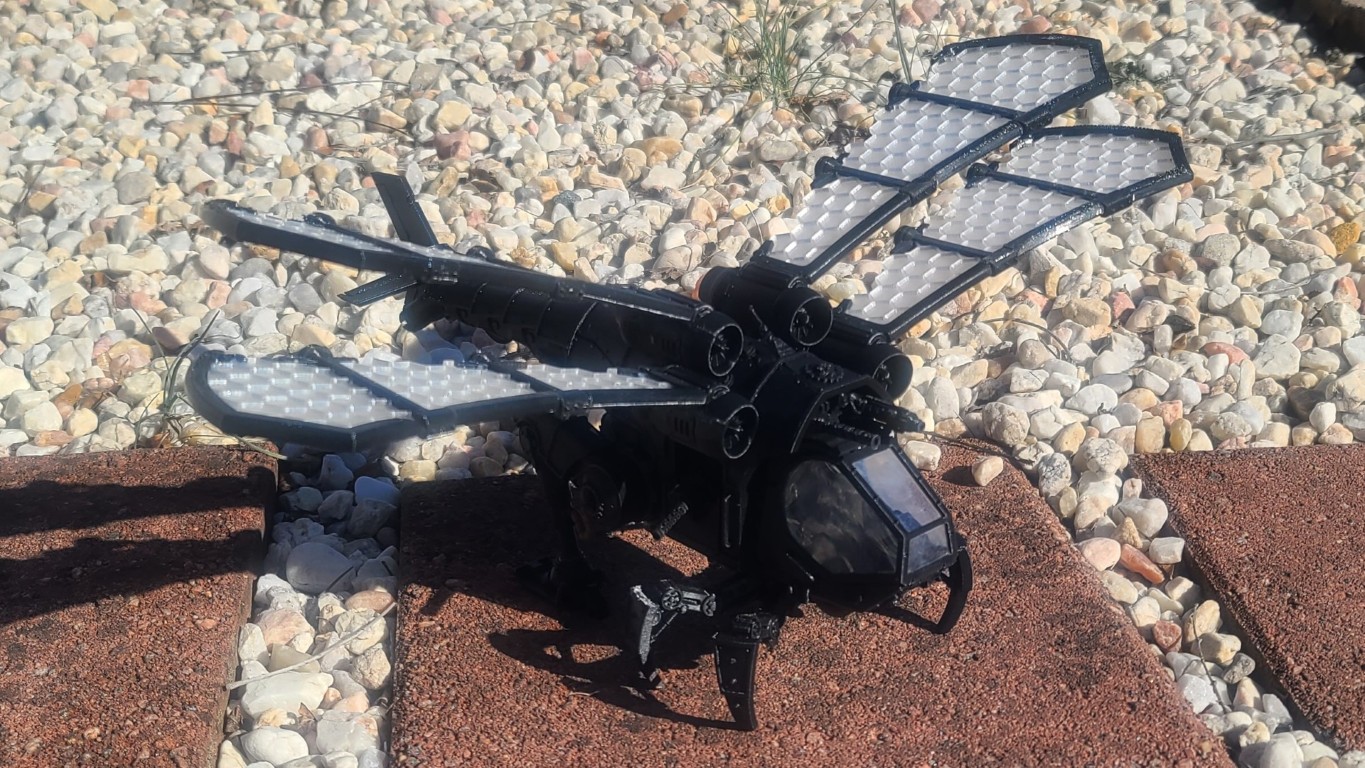
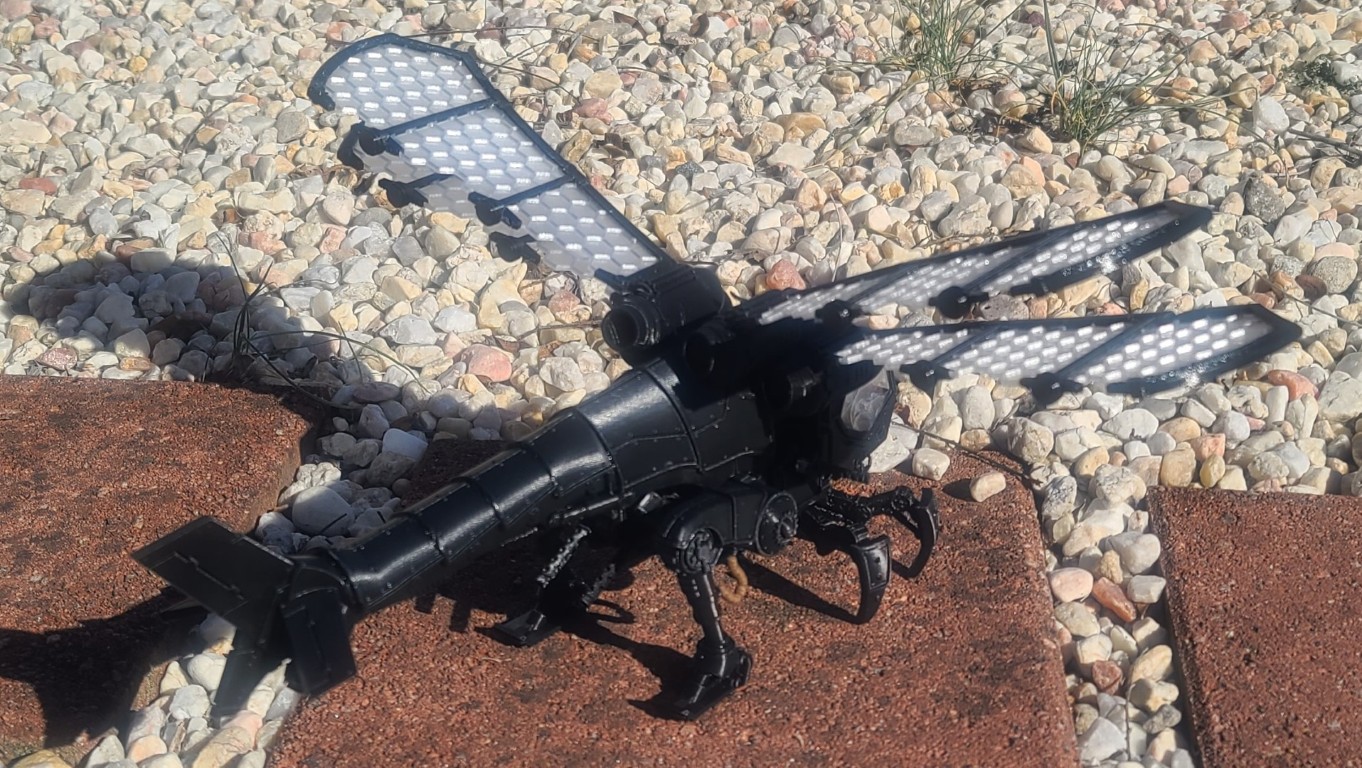
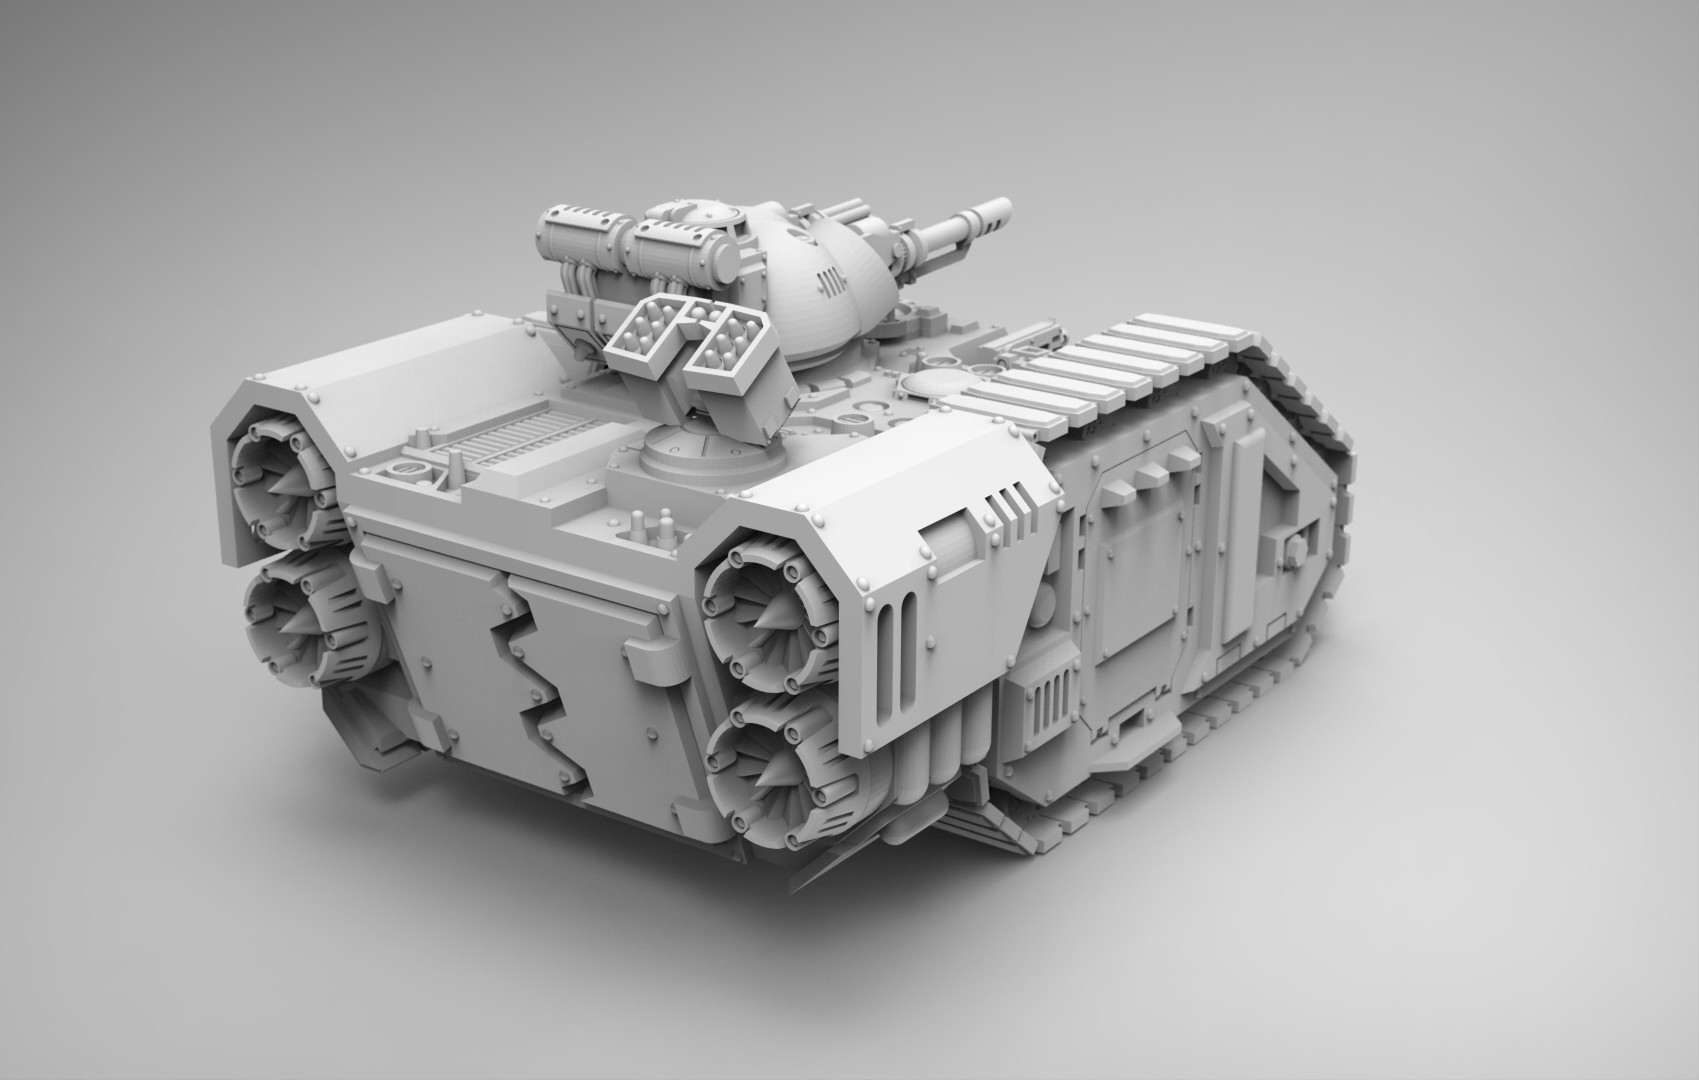
Dark Techno Odonatopter Gunship
Having completed the 3D printing of the Dark Techno Isopodius Transport/Tank for our Grandson August (Gus), I thought I would see if I could add something to his collection. So I went back to cgtrader.com to see what other models they might have in the same Dark Techno collection. As shown in the images below, I found an interesting model of a Gunship that was also modeled by “The Makers Cult.” All 3D files needed to print and build this model can be purchased from the cgtrader.com Dark Techno Odonatopter Gunship webpage.
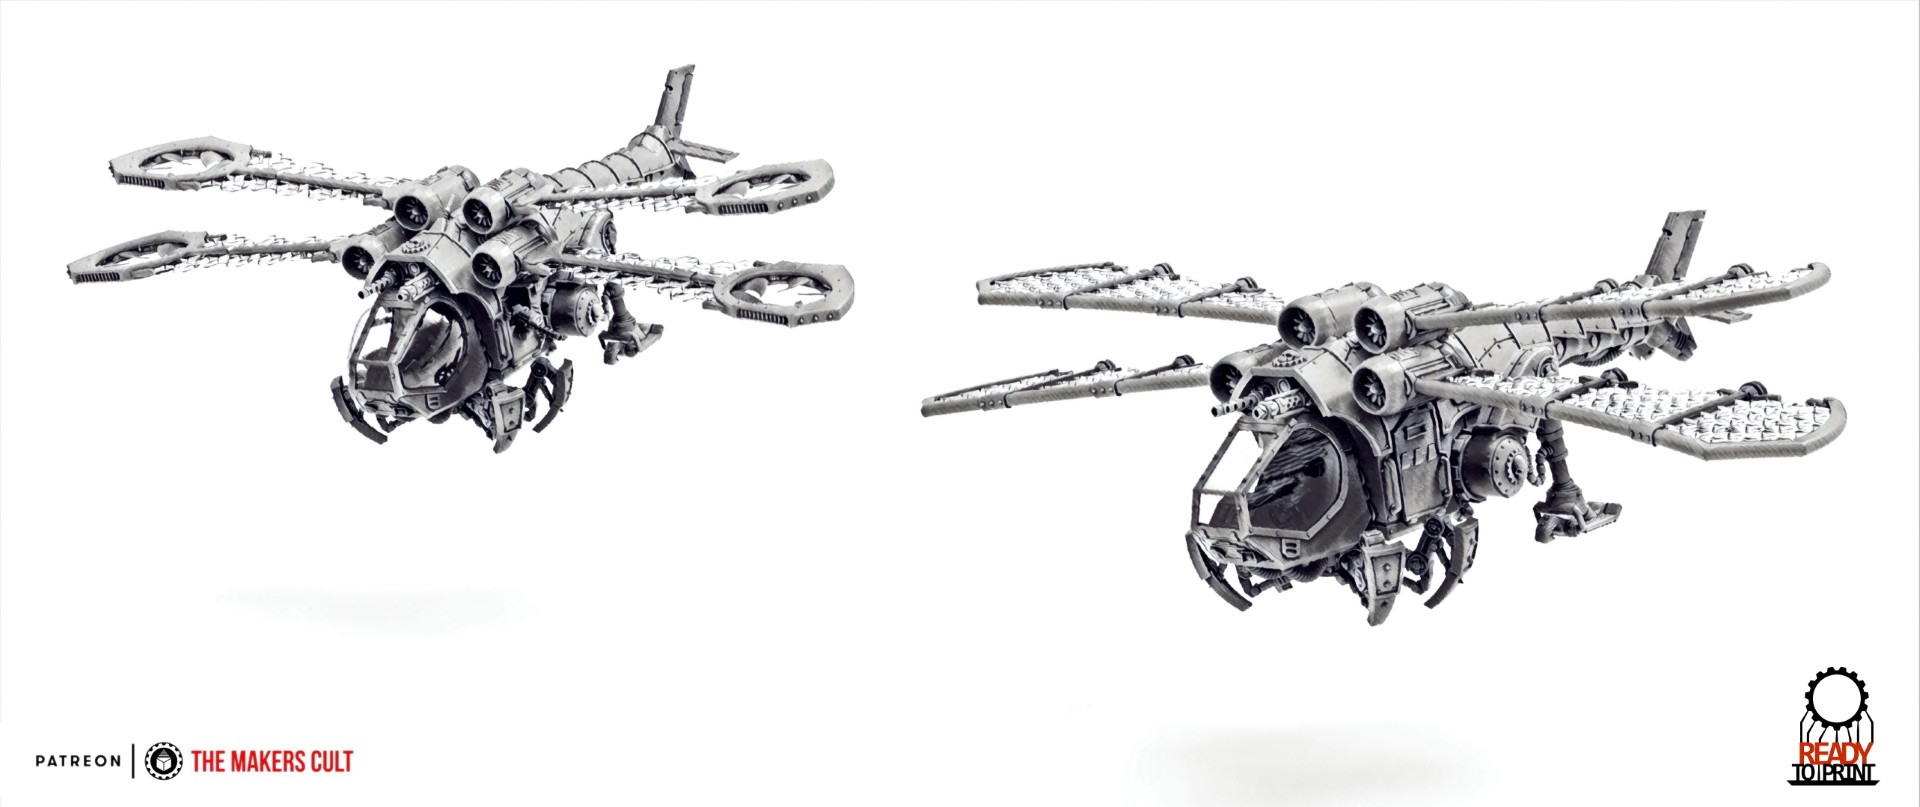
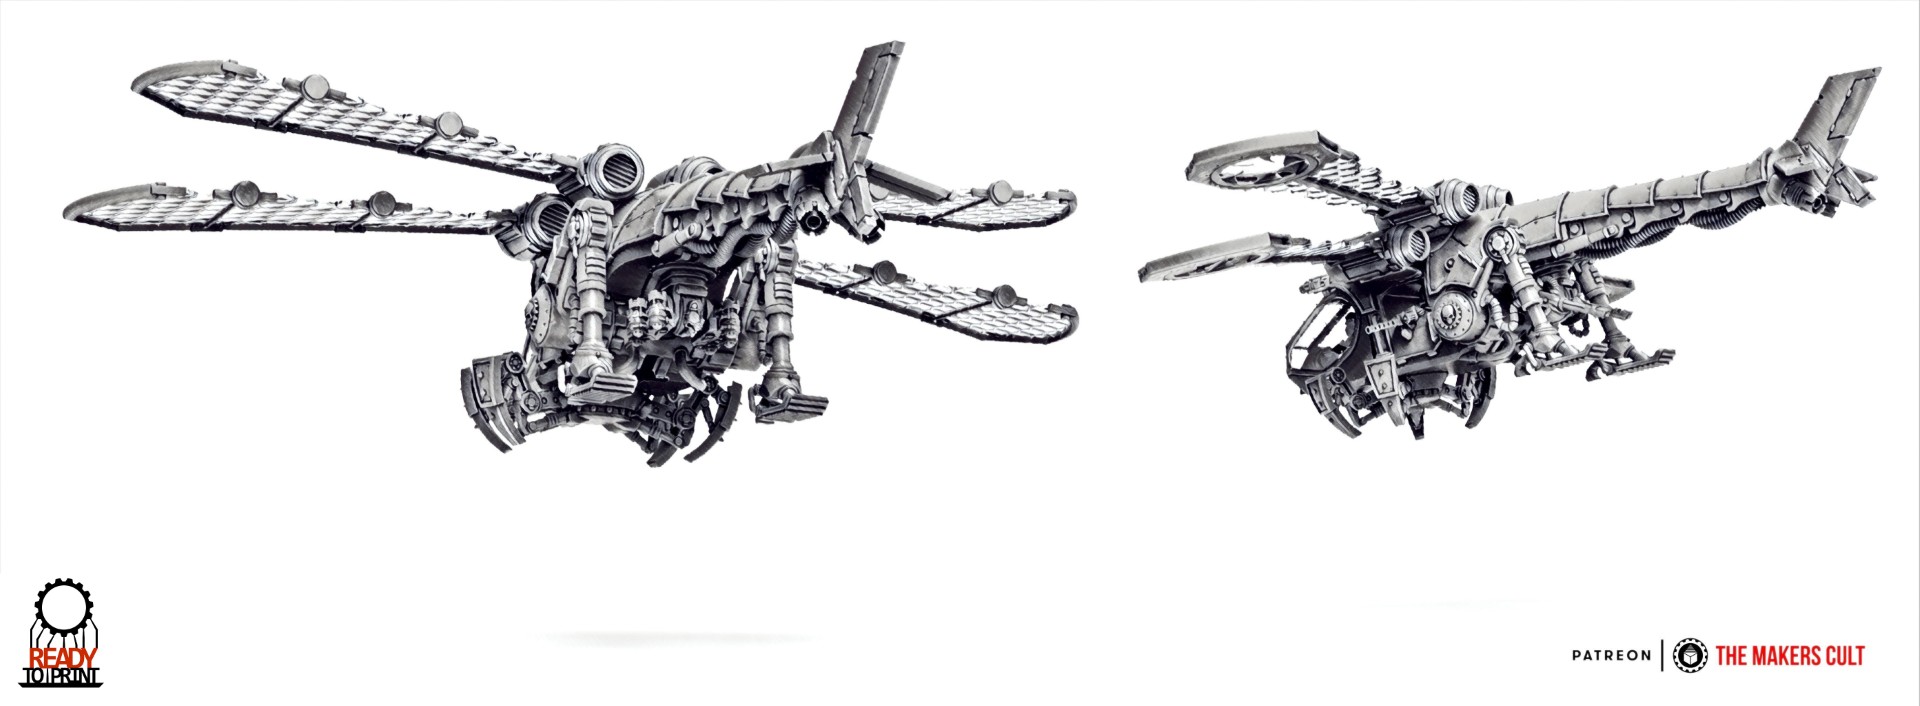
Source of Images: cgtrader.com.
After many hours of 3D printing, I had all Gunship 3D parts printed. Everything went together well with the assembly being fairly straight forward. The only issue I ran into was figuring out which of the jet engine pods was forward and rear. The final assembled Dark Techno Odonatopter Gunship is shown in the images below. Another model added to Gus's collection.
Dark Techno Odonatopter Gunship 3D Print/Assembly Description.
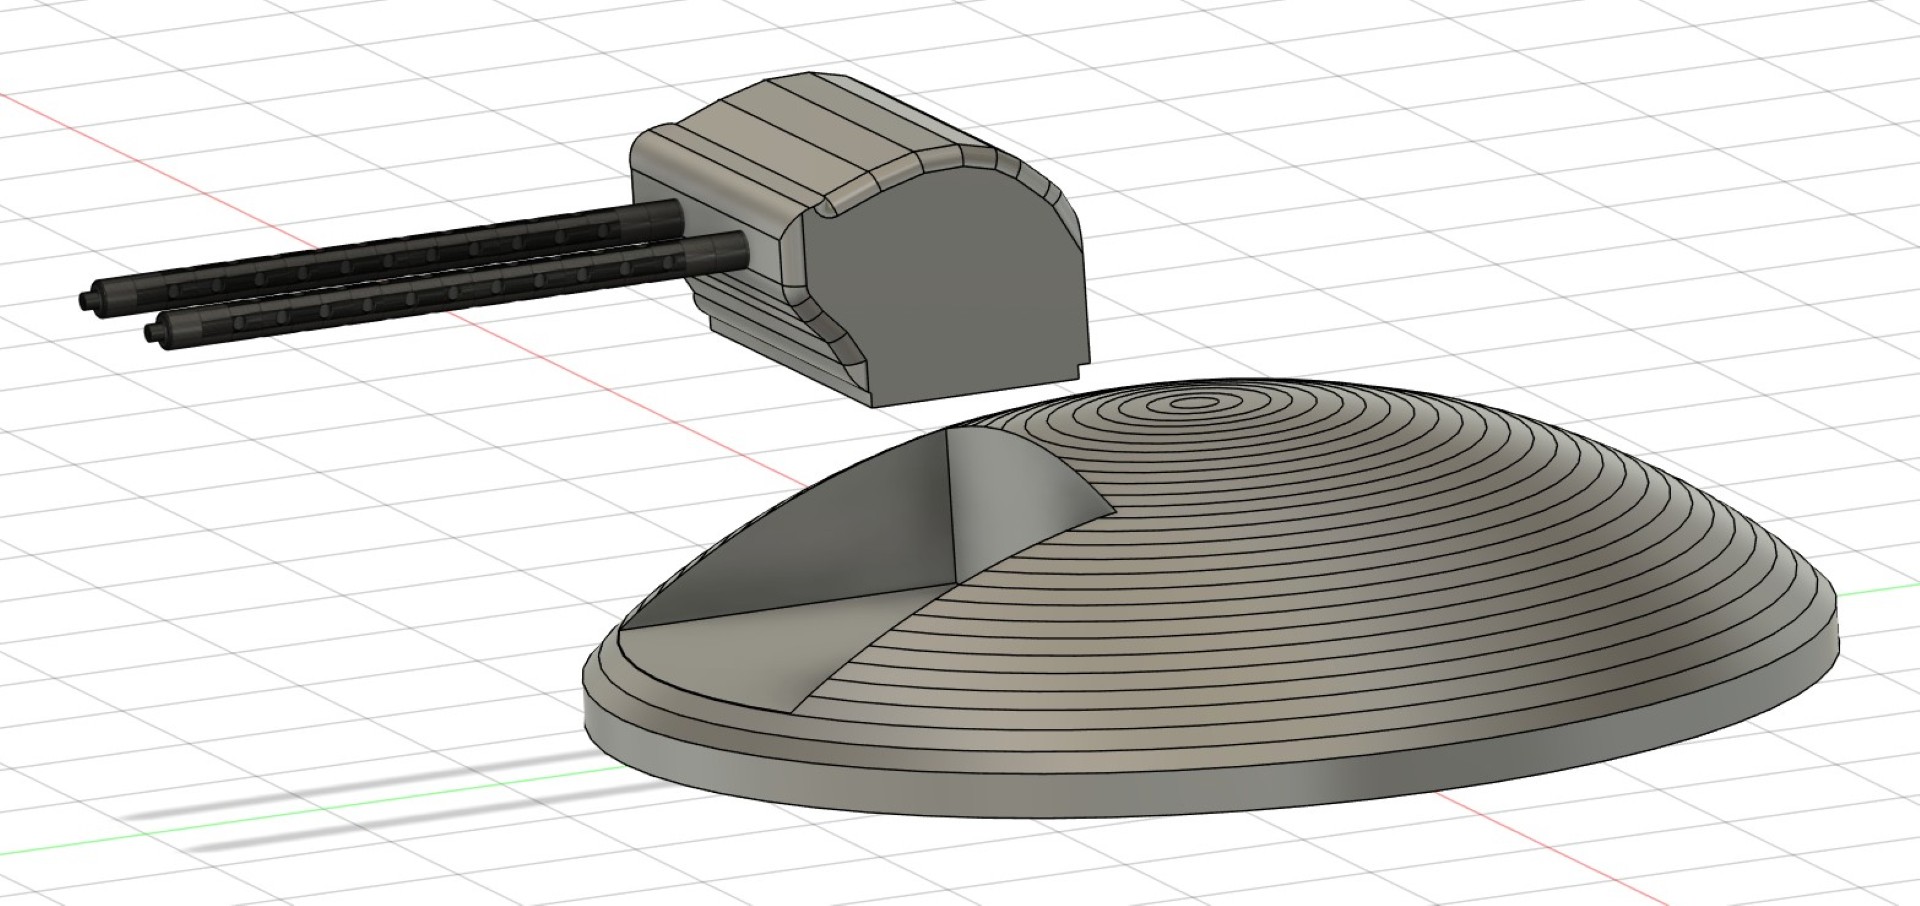
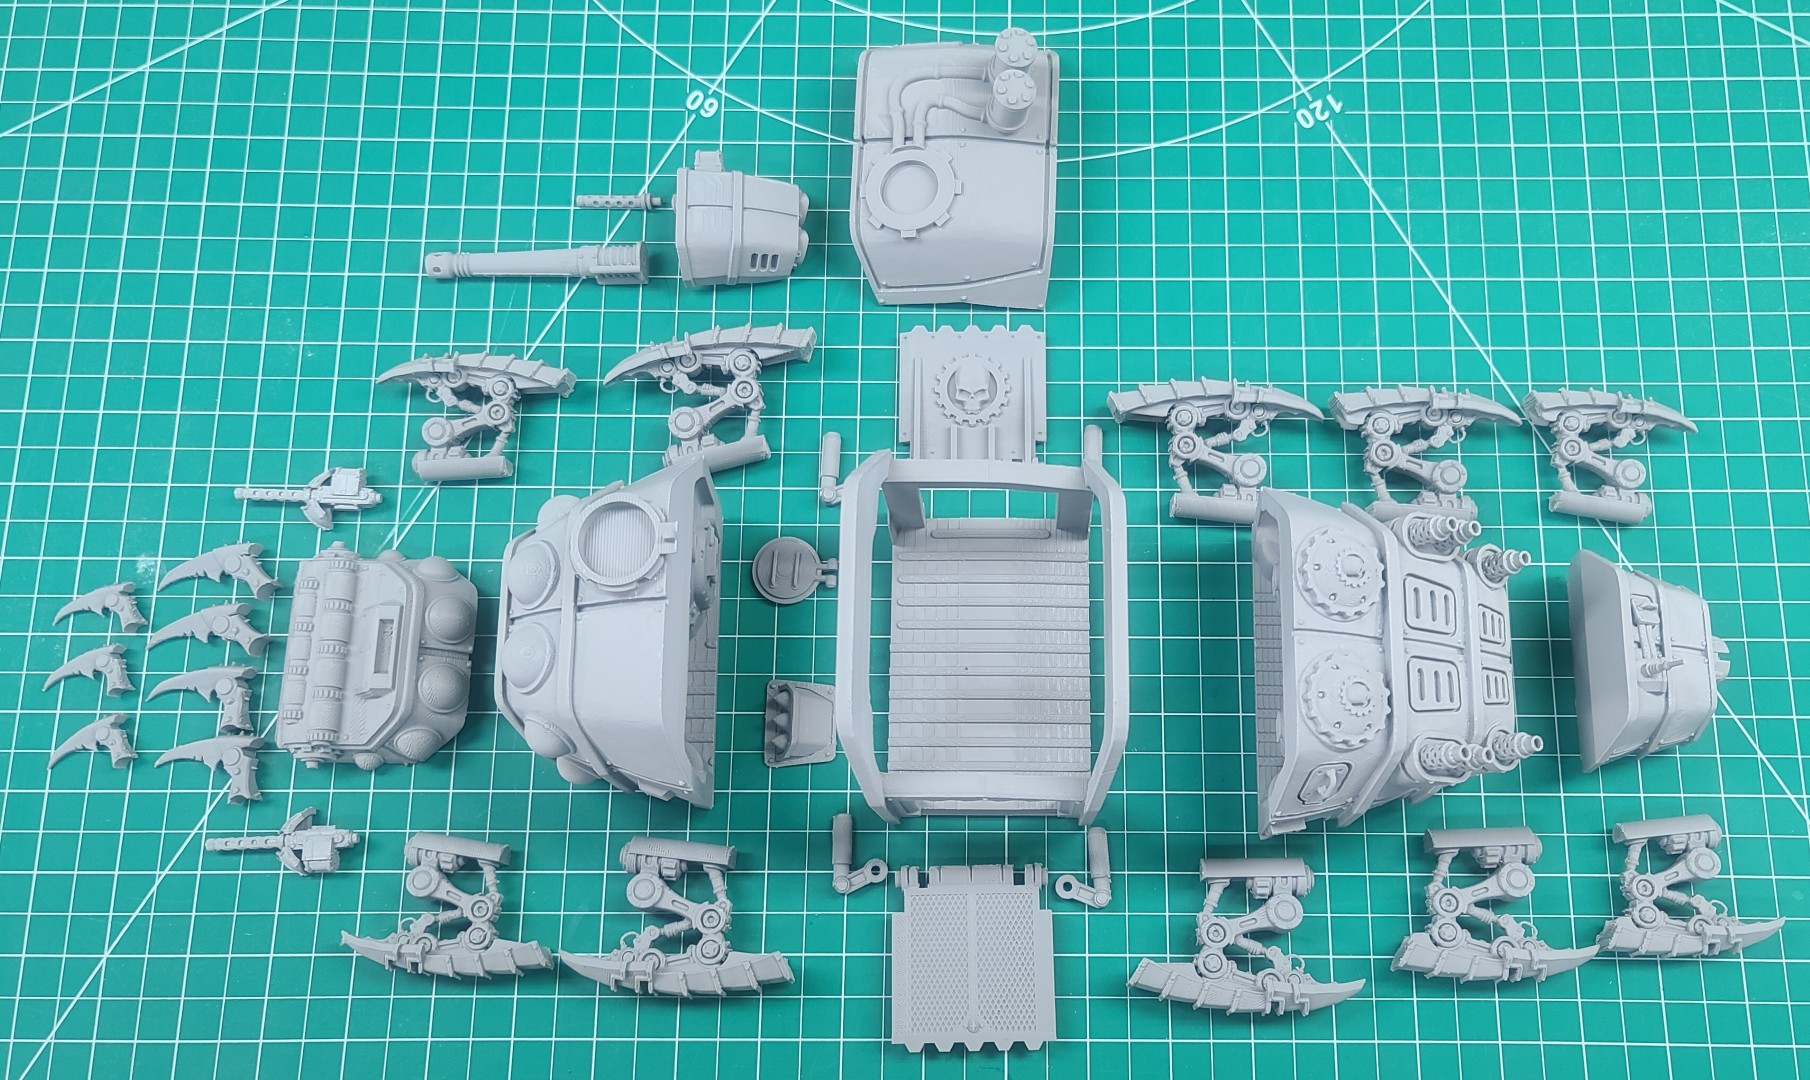
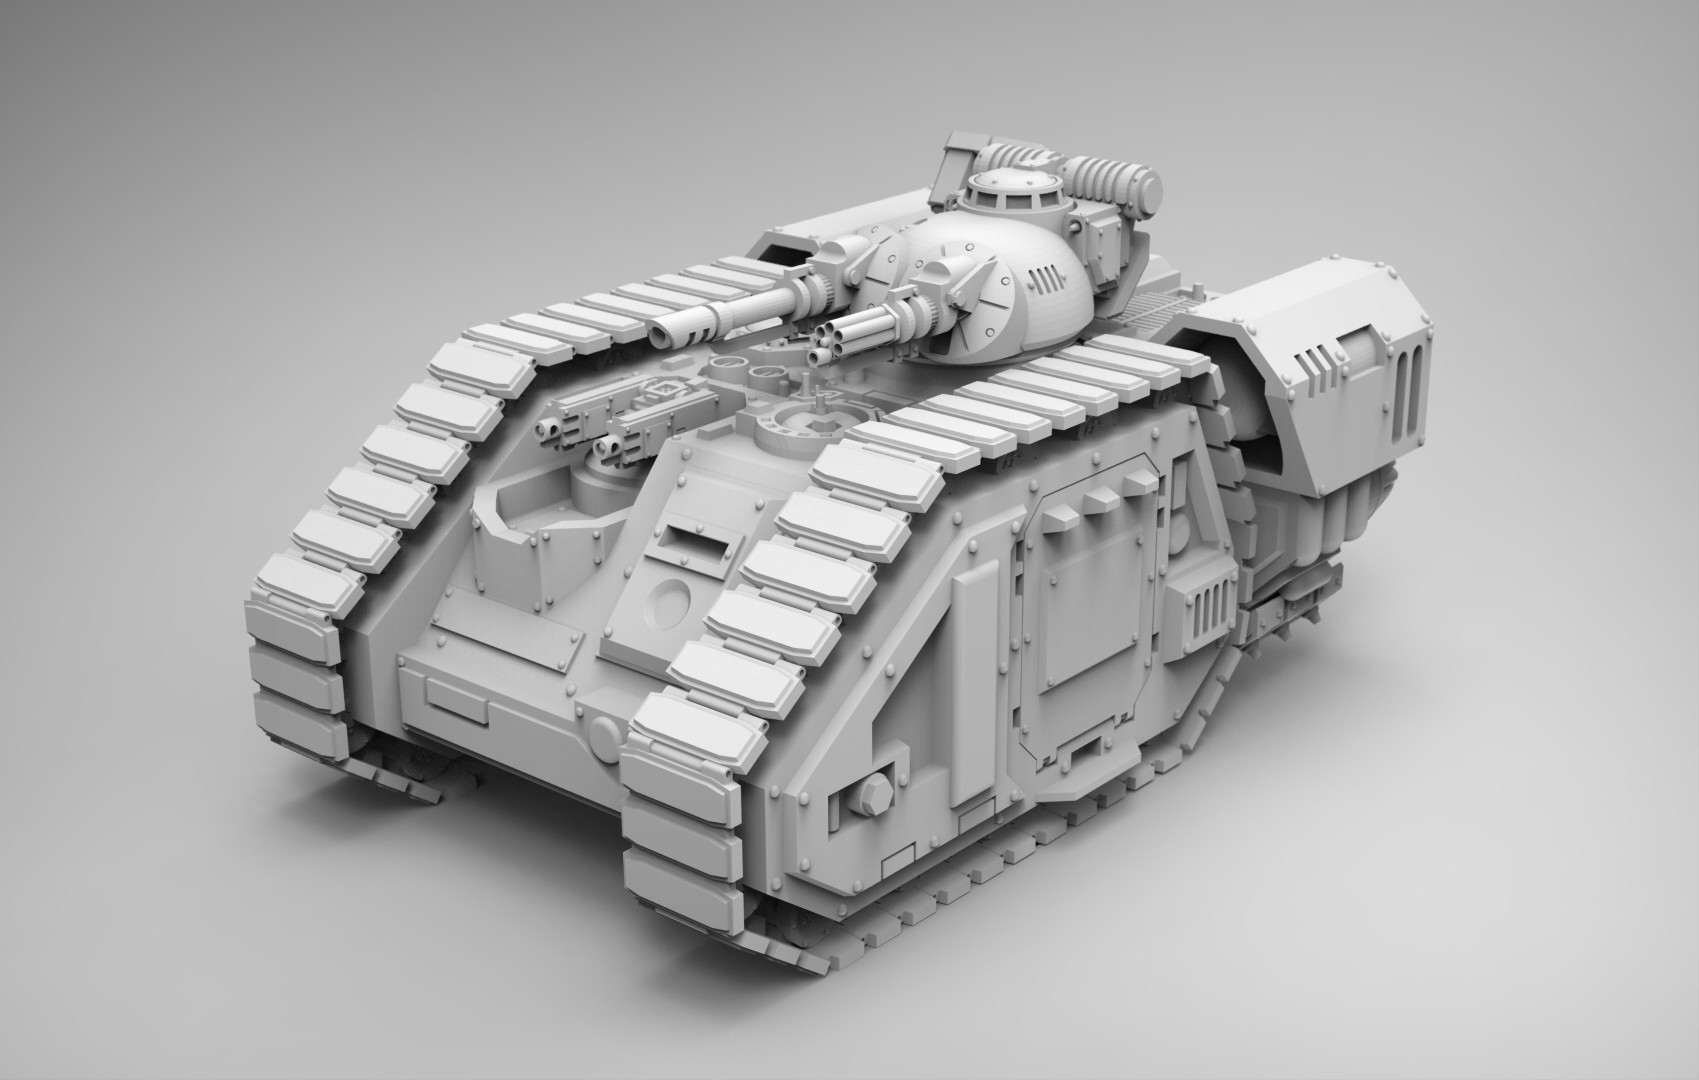
Tempest Knights Heavy Assault Resistance Eliminator (HARE)
I didn't want the 3D printer to cool down, so I starting 3D printing another 3D model to add to the collection we started for my Grandson Gus. This one is the “Tempest Knights - Heavy Assault Resistance Eliminator (HARE),” created by a modeler named “themakerscult,” which you can purchase from the cgtrader website.
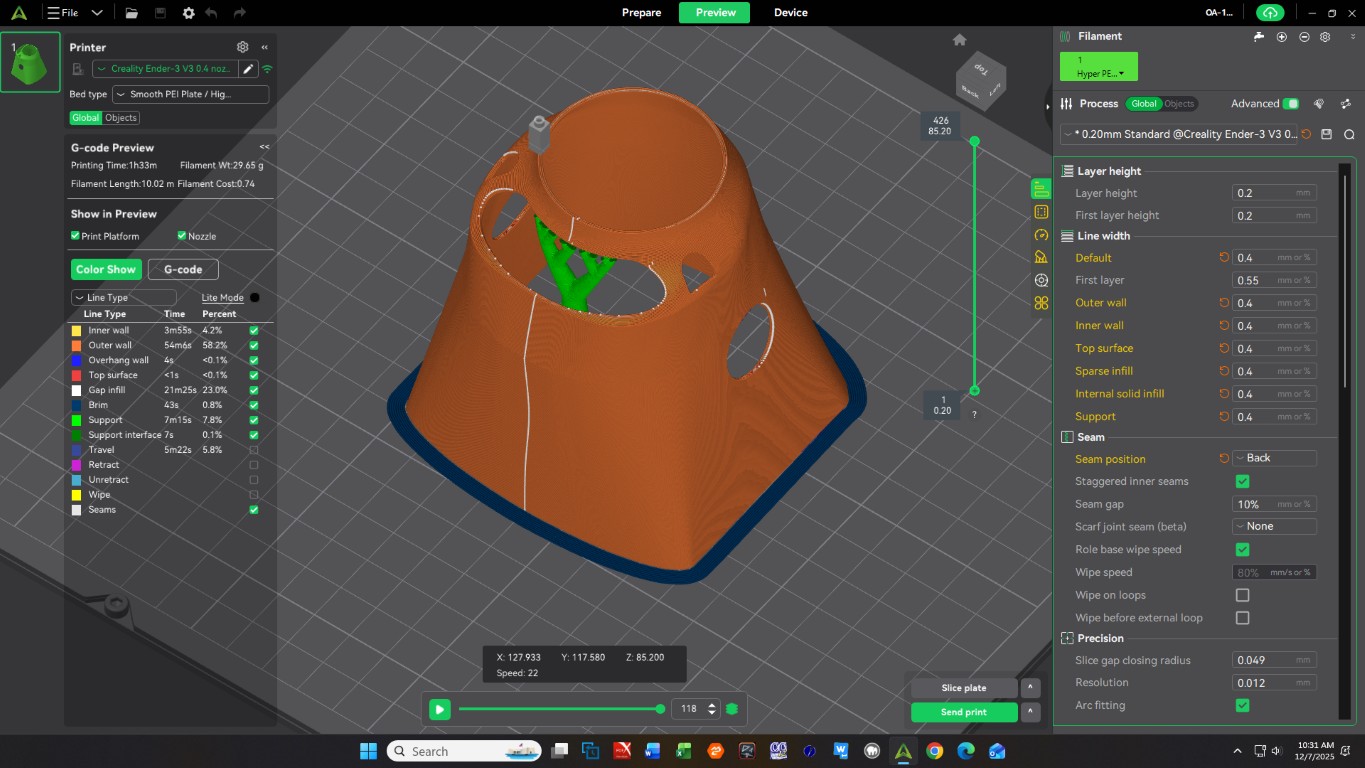
The Heavy Assault vehicle is designed for use with the Tempest Warriors line of 30mm scale wargaming miniatures. The OBJ files include a couple different hull configurations as well as the following weapon options: Gatling Cannons, High Caliber Auto Cannons, Heavy Bolt Cannons, Heavy Flamethrowers, Laser Cannons, Phased Vulcan Array, Vulcan Heat Ray, Plasma Cannons, Twin Heavy Bolt Guns, Twin Laser cannons, and Twin Missile Launchers. The weapons are shown in Creality Print 7.0 in the bottom image below. The example model shown in the two top images below were printed on an Ender 3 at 0.12mm Layer height with a 0.4mm nozzle.
Source of Images: cgtrader website.
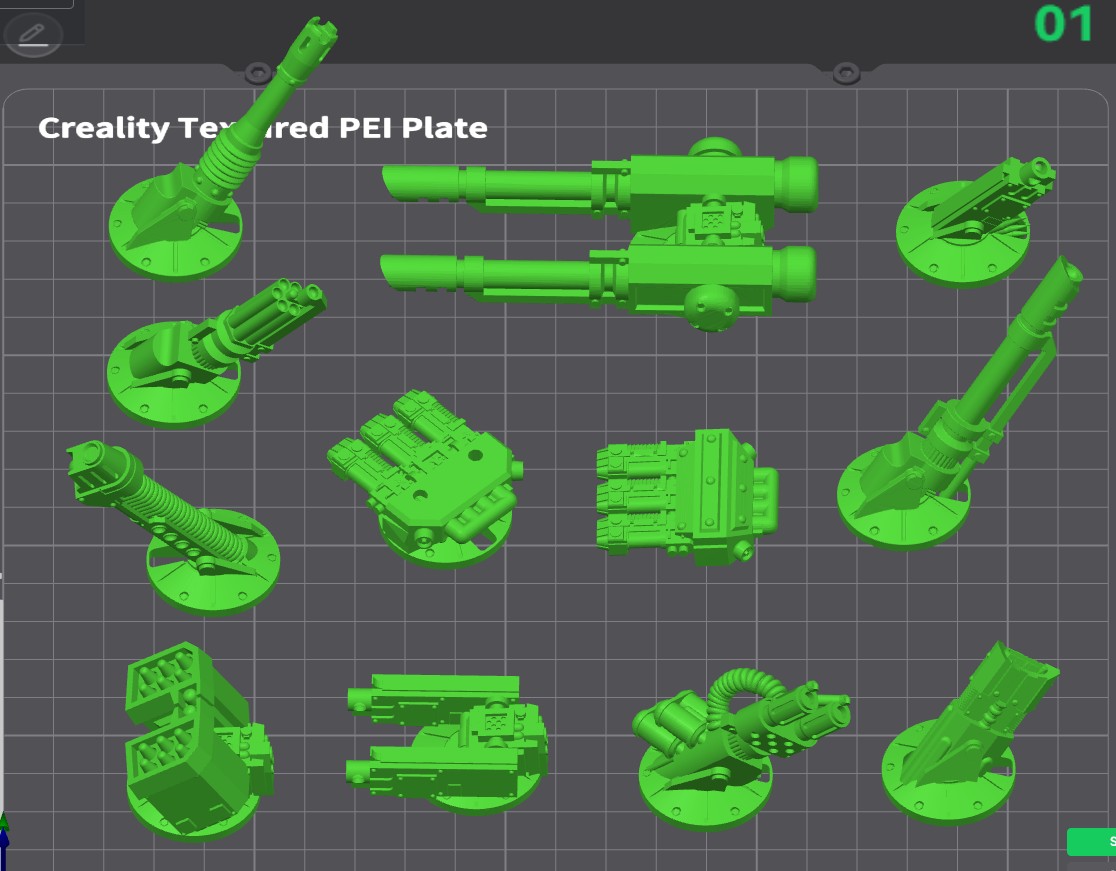
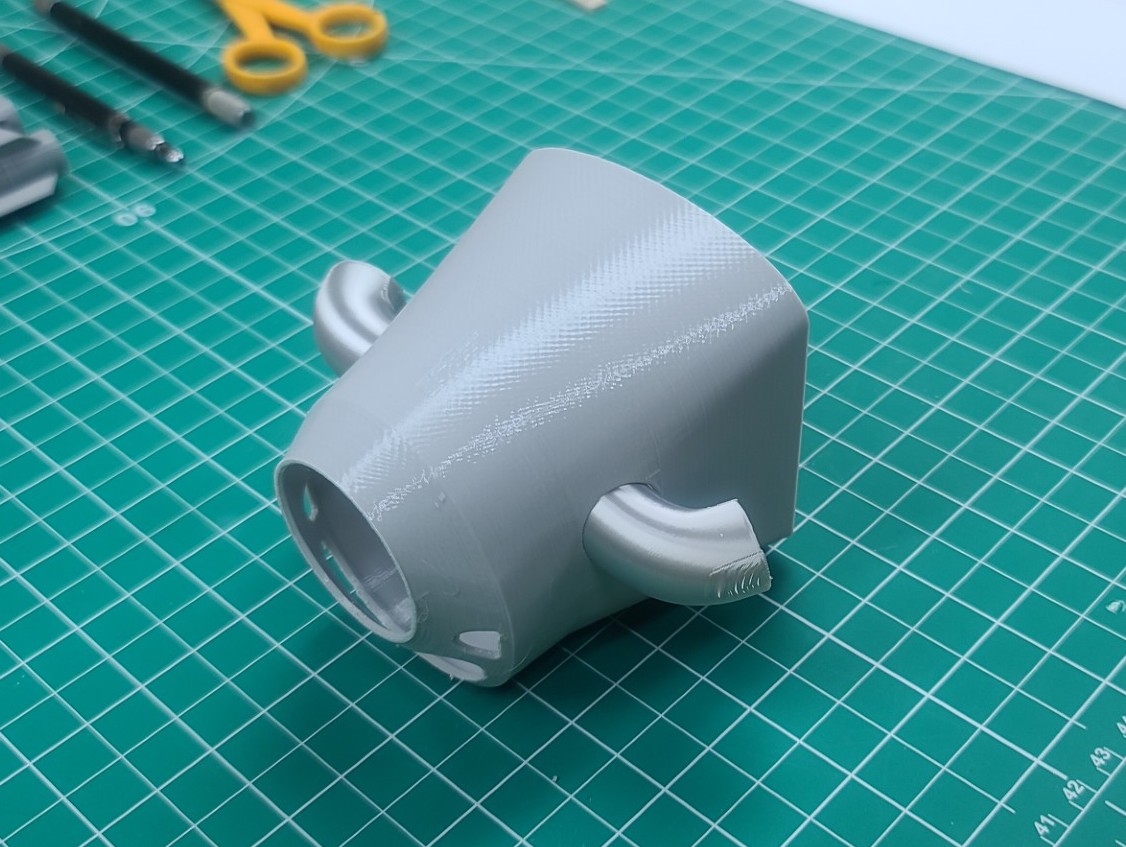
I started 3D printing the various HARE parts using a fine (0.15mm) layer thickness with a standard 0.4mm nozzle and some Elegoo Space Gray PLA in my Ender-3 V3. I elected to print the top turret hull configuration as well as the following weapons: High Caliber Auto Cannon and Assault Cannon on the turret; Twin Laser Cannons on each side of the hull; and a Twin Missile Launcher and Twin Heavy Bolt Guns on the top of the hull. After many hours of 3D printing, all 21 model parts were finally finished as shown below.
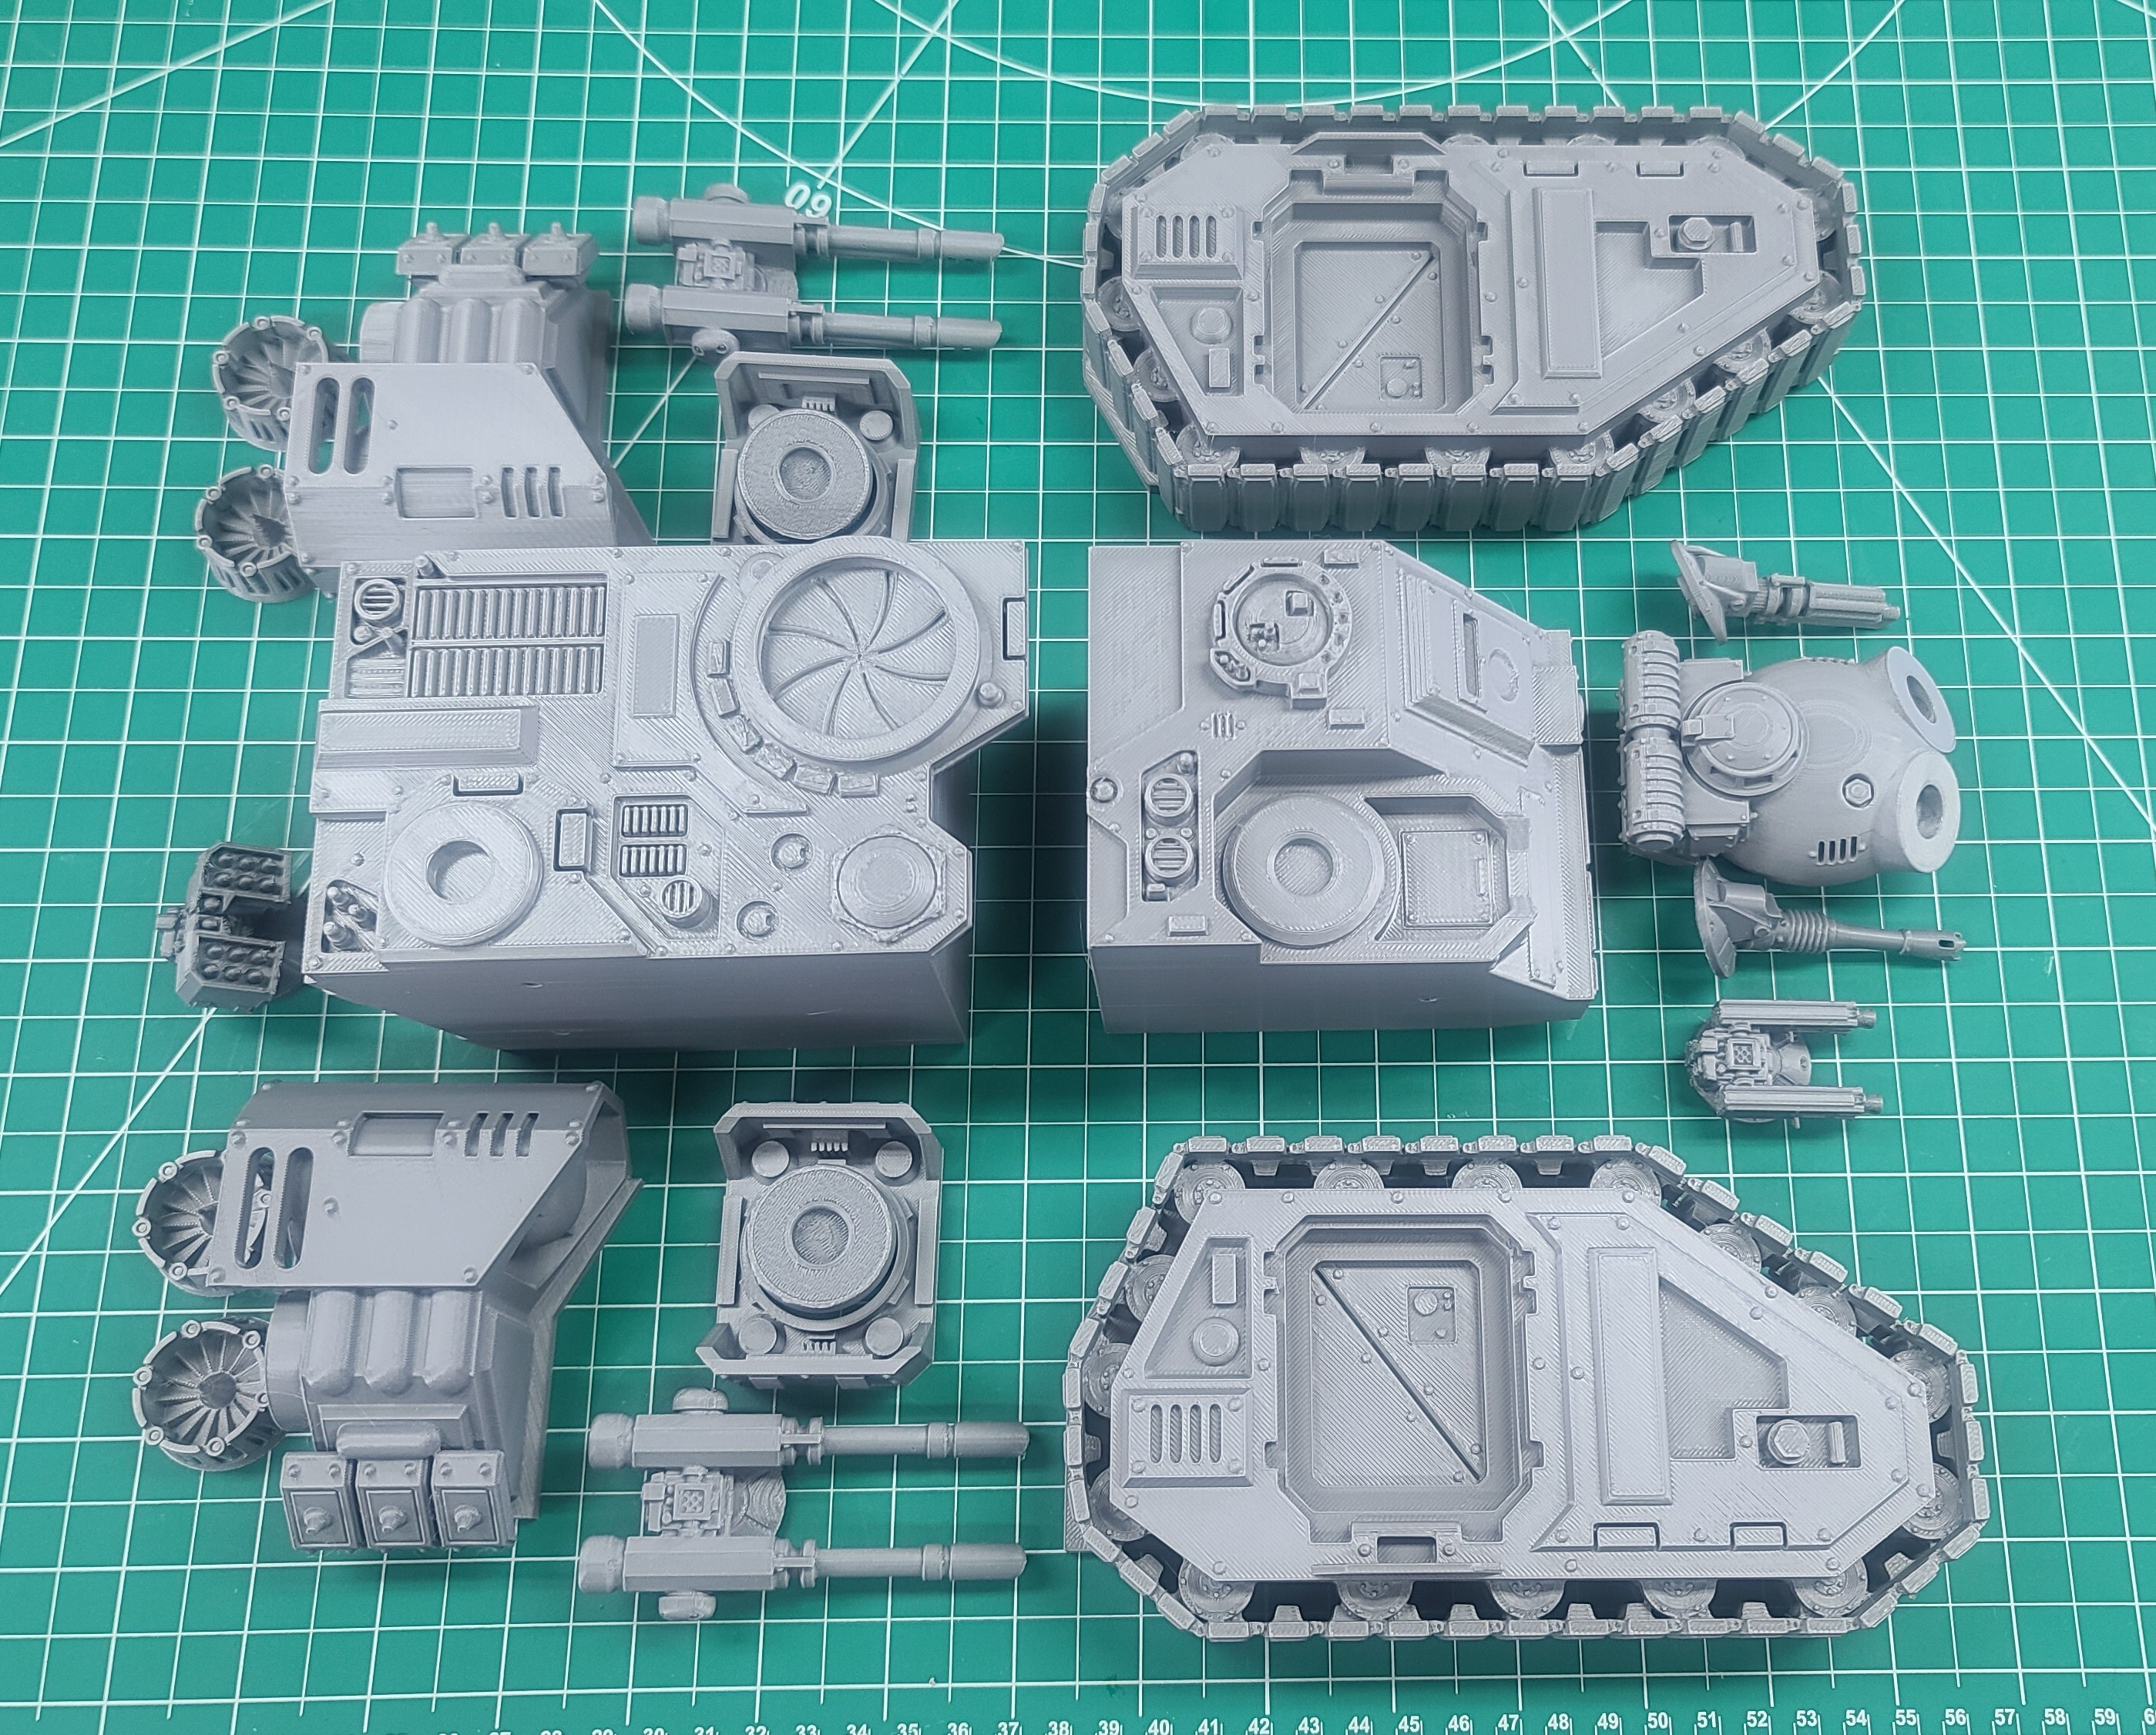
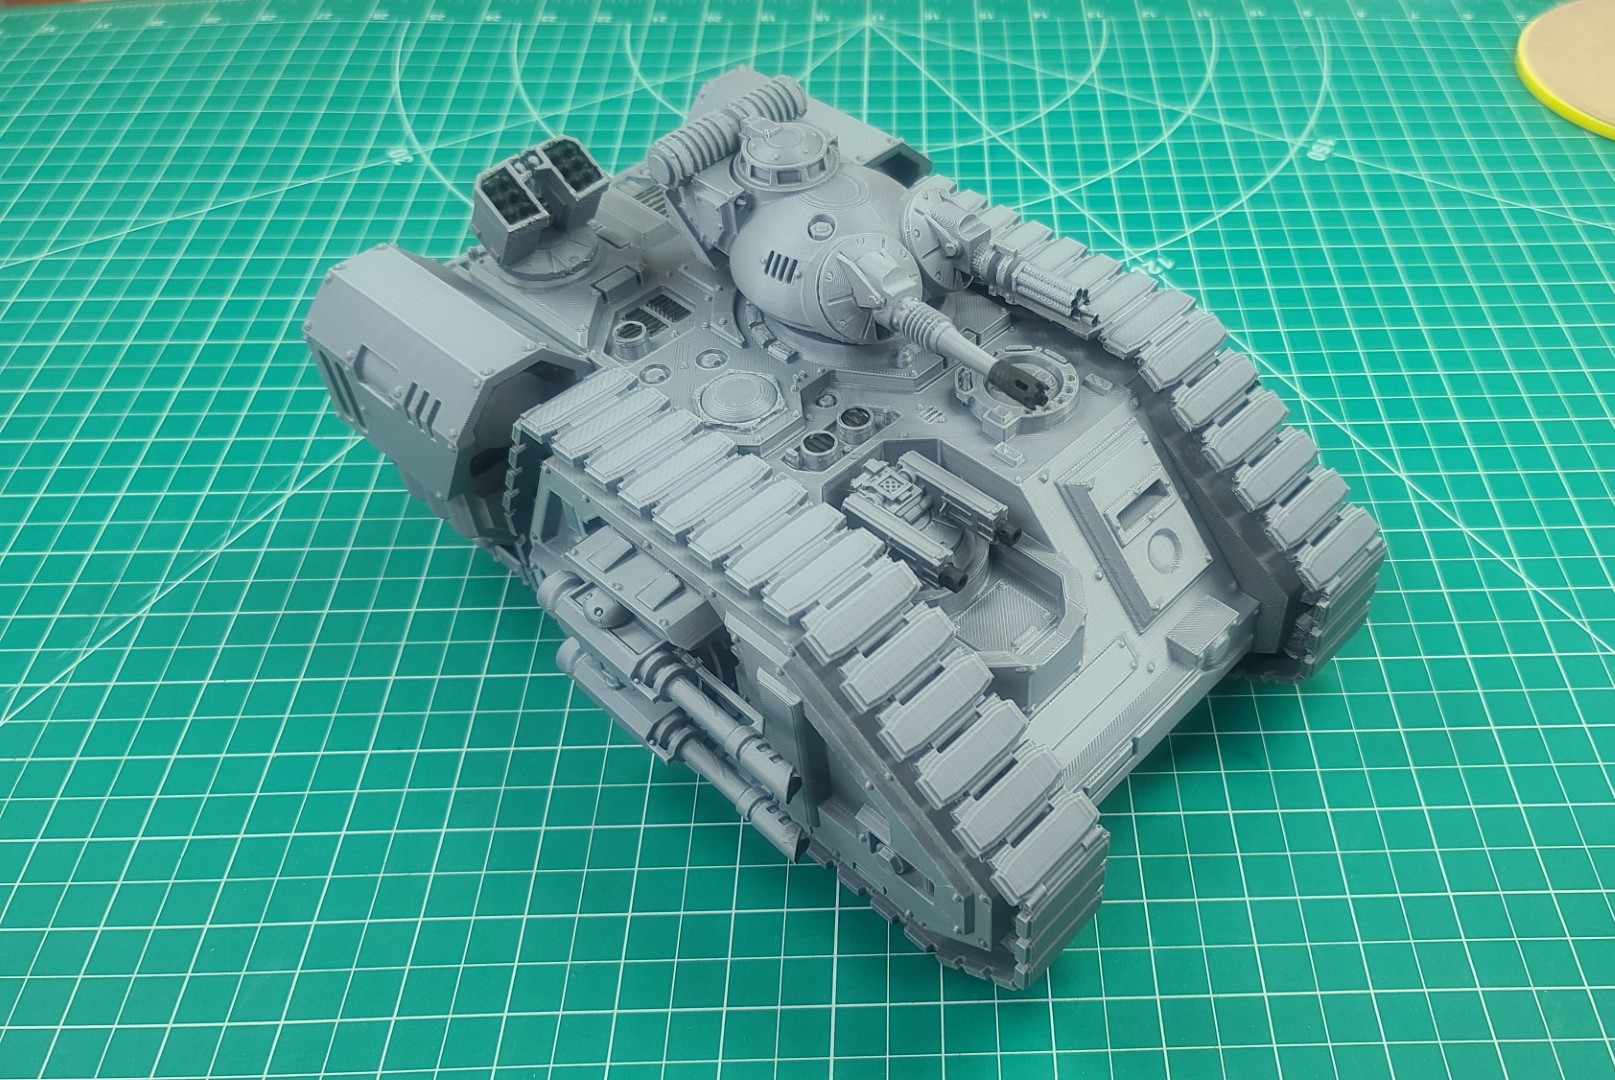
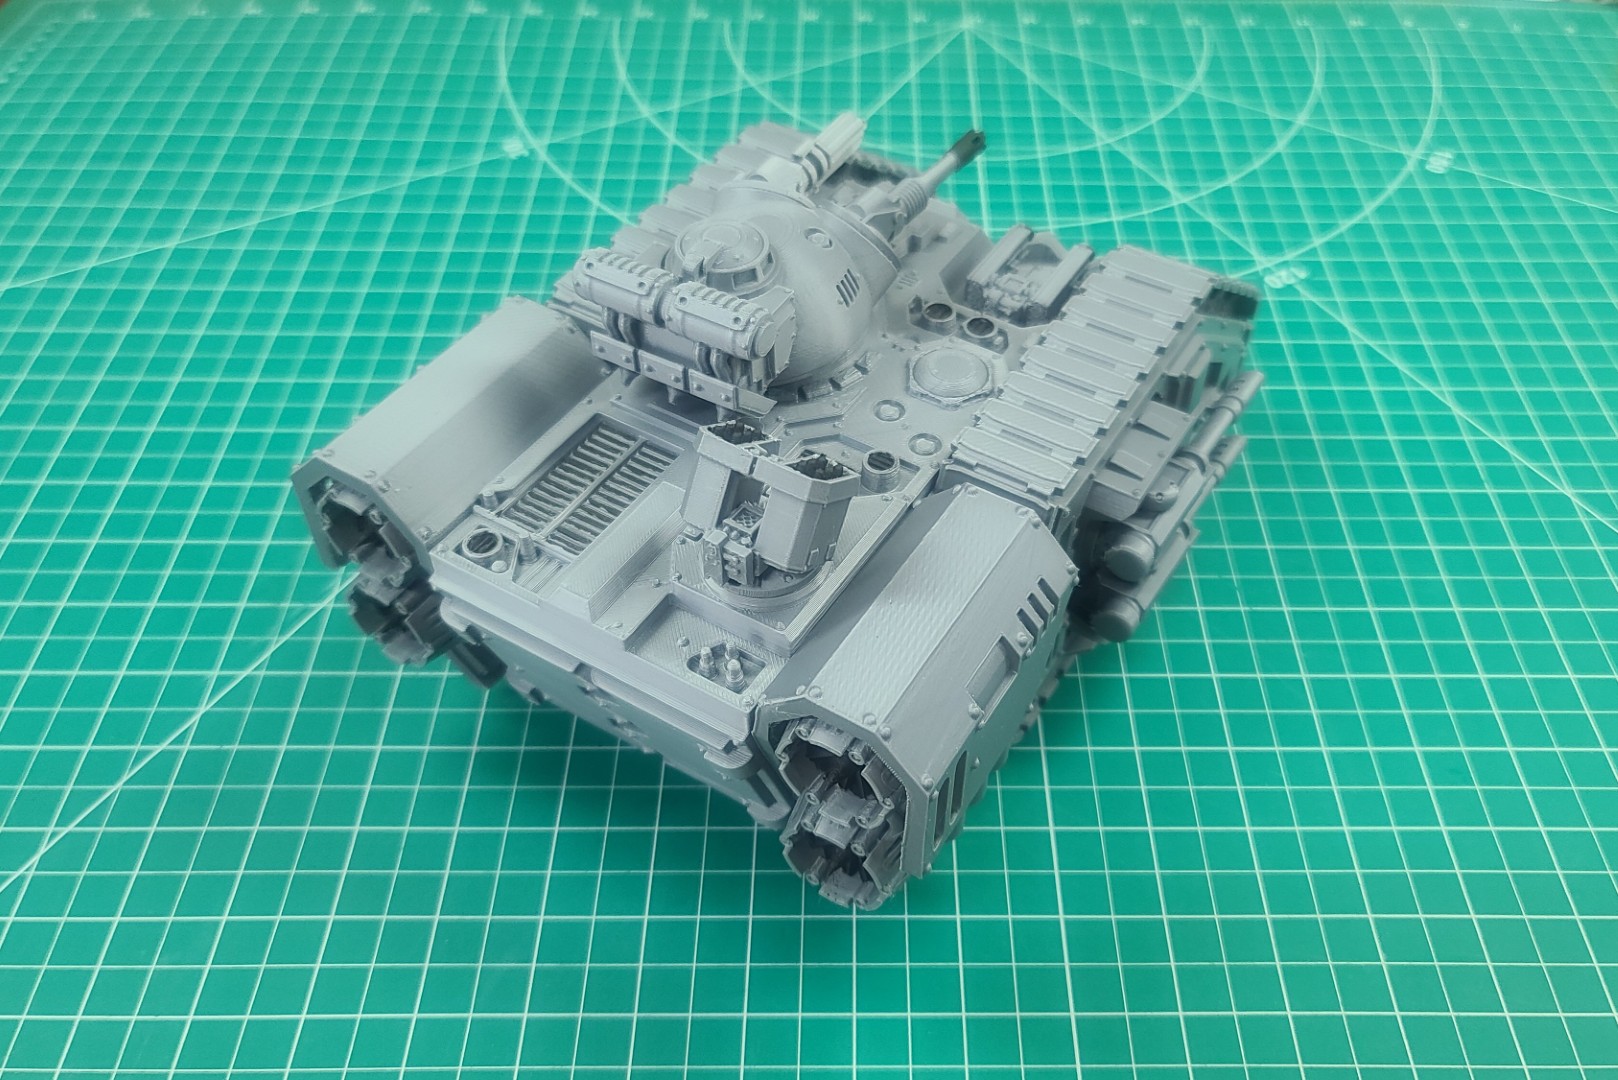
After a small amount of detail painting, I assembled the model using CA glue and some accelerator. All the parts went together very nicely, and the resulting 3D model shown in the next two images below measures approximately 250mm long x 180mm wide x 130mm high.
 All HTML & CSS Coded by Larry